> ## Documentation Index
> Fetch the complete documentation index at: https://sequin.io/docs/llms.txt
> Use this file to discover all available pages before exploring further.
# Prisma
> How to rapidly integrate with HubSpot using Sequin and Prisma.
**Pardon the mess**
We've made significant changes and improvements to the product since these docs were written. You'll find that we've made the workflow in this playbook faster and easier.
We haven't updated this particular playbook just yet, so it might not be very useful. [Go to docs home](/docs/) to see the latest on how Sequin works.
# Integrate with HubSpot using Prisma
Sequin lets you sync your HubSpot data to your database in real-time. You can then use ORMs, like [Prisma](https://www.prisma.io/), to rapidly build your HubSpot integration.
In this playbook, you'll learn how to set up HubSpot to work with Prisma using Sequin. You'll then write your first queries using the Prisma client and explore the development lifecycle as you run migrations and scale your integration.
 ## Starting with an existing project
You're likely already using Prisma as your ORM. So this playbook starts from an existing Prisma project and shows you how to add HubSpot data to your stack.
We assume you've already followed [Prisma's quickstart](https://www.prisma.io/docs/getting-started/quickstart) to create your TypeScript project, install Prisma, connect your database, introspect your schema, and query with the Prisma Client.
Specifically, this playbook builds on top of an existing Prisma project connected to a PostgreSQL database with one schema called `public` containing two tables: `users` and `orgs`. Each `user` is a part of an `org` — represented in the database with a foreign key relationship:
## Starting with an existing project
You're likely already using Prisma as your ORM. So this playbook starts from an existing Prisma project and shows you how to add HubSpot data to your stack.
We assume you've already followed [Prisma's quickstart](https://www.prisma.io/docs/getting-started/quickstart) to create your TypeScript project, install Prisma, connect your database, introspect your schema, and query with the Prisma Client.
Specifically, this playbook builds on top of an existing Prisma project connected to a PostgreSQL database with one schema called `public` containing two tables: `users` and `orgs`. Each `user` is a part of an `org` — represented in the database with a foreign key relationship:
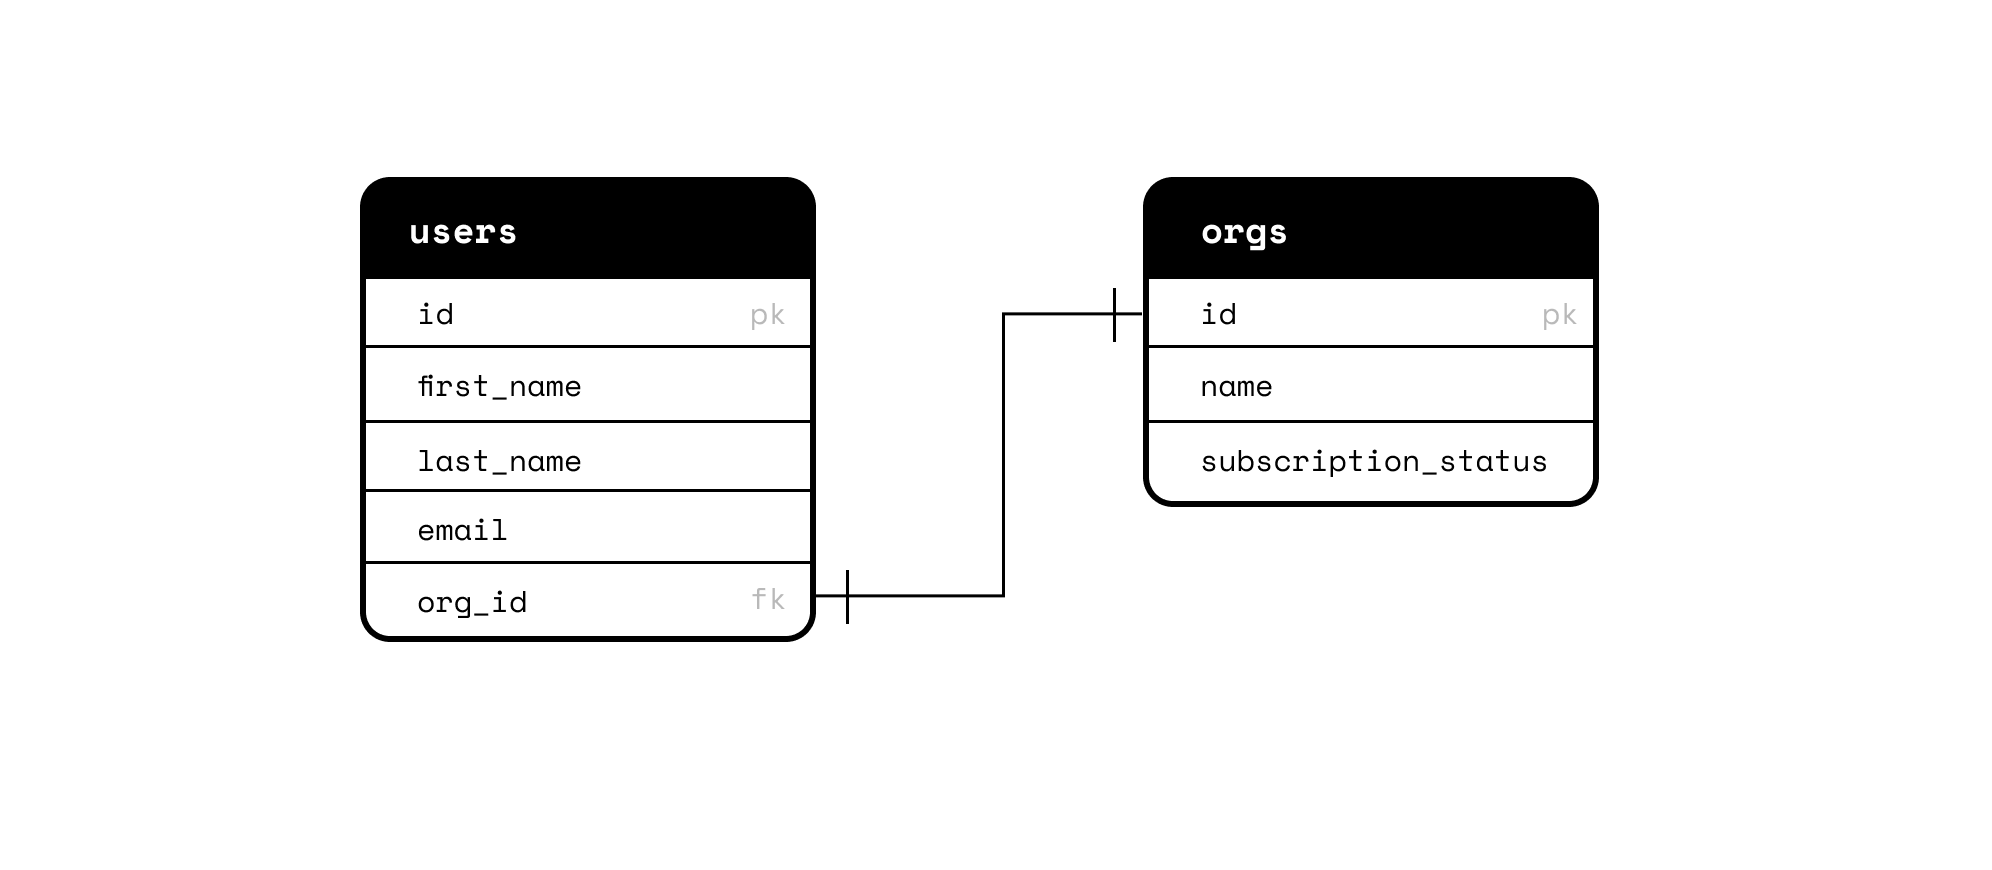 This schema is represented as a Prisma model in the `schema.prisma` file:
```js theme={null}
generator client {
provider = "prisma-client-js"
}
datasource db {
provider = "postgresql"
url = env("DATABASE_URL")
}
model orgs {
id Int @id @default(autoincrement())
name String?
subscription_status String?
users users[]
}
model users {
id Int @id @default(autoincrement())
first_name String?
last_name String?
email String?
org_id Int?
org orgs? @relation(fields: [org_id], references: [id], onDelete: NoAction, onUpdate: NoAction, map: "users_orgs_id_fk")
}
```
Each table has been translated into a model. And the foreign key [relationship](https://www.prisma.io/docs/concepts/components/prisma-schema/relations) between `users` and `orgs` has been defined with a `@relation` scalar.
From the foundation of this existing Prisma project, you'll now add your HubSpot schema to Prisma using Sequin.
## Setup your HubSpot sync
To build a sync between HubSpot and your database, Sequin will guide you through the process of authenticating with HubSpot, selecting the data you want to sync, and connecting to your database. Read our [HubSpot setup guide](/docs/integrations/hubspot/setup) for step-by-step instructions.
For the purposes of this playbook, you'll want to sync at least two HubSpot objects mapped together with an `association`. For instance, you can sync the `Contact` object, `Deal` object, and `Contact with Deal` associations:
This schema is represented as a Prisma model in the `schema.prisma` file:
```js theme={null}
generator client {
provider = "prisma-client-js"
}
datasource db {
provider = "postgresql"
url = env("DATABASE_URL")
}
model orgs {
id Int @id @default(autoincrement())
name String?
subscription_status String?
users users[]
}
model users {
id Int @id @default(autoincrement())
first_name String?
last_name String?
email String?
org_id Int?
org orgs? @relation(fields: [org_id], references: [id], onDelete: NoAction, onUpdate: NoAction, map: "users_orgs_id_fk")
}
```
Each table has been translated into a model. And the foreign key [relationship](https://www.prisma.io/docs/concepts/components/prisma-schema/relations) between `users` and `orgs` has been defined with a `@relation` scalar.
From the foundation of this existing Prisma project, you'll now add your HubSpot schema to Prisma using Sequin.
## Setup your HubSpot sync
To build a sync between HubSpot and your database, Sequin will guide you through the process of authenticating with HubSpot, selecting the data you want to sync, and connecting to your database. Read our [HubSpot setup guide](/docs/integrations/hubspot/setup) for step-by-step instructions.
For the purposes of this playbook, you'll want to sync at least two HubSpot objects mapped together with an `association`. For instance, you can sync the `Contact` object, `Deal` object, and `Contact with Deal` associations:
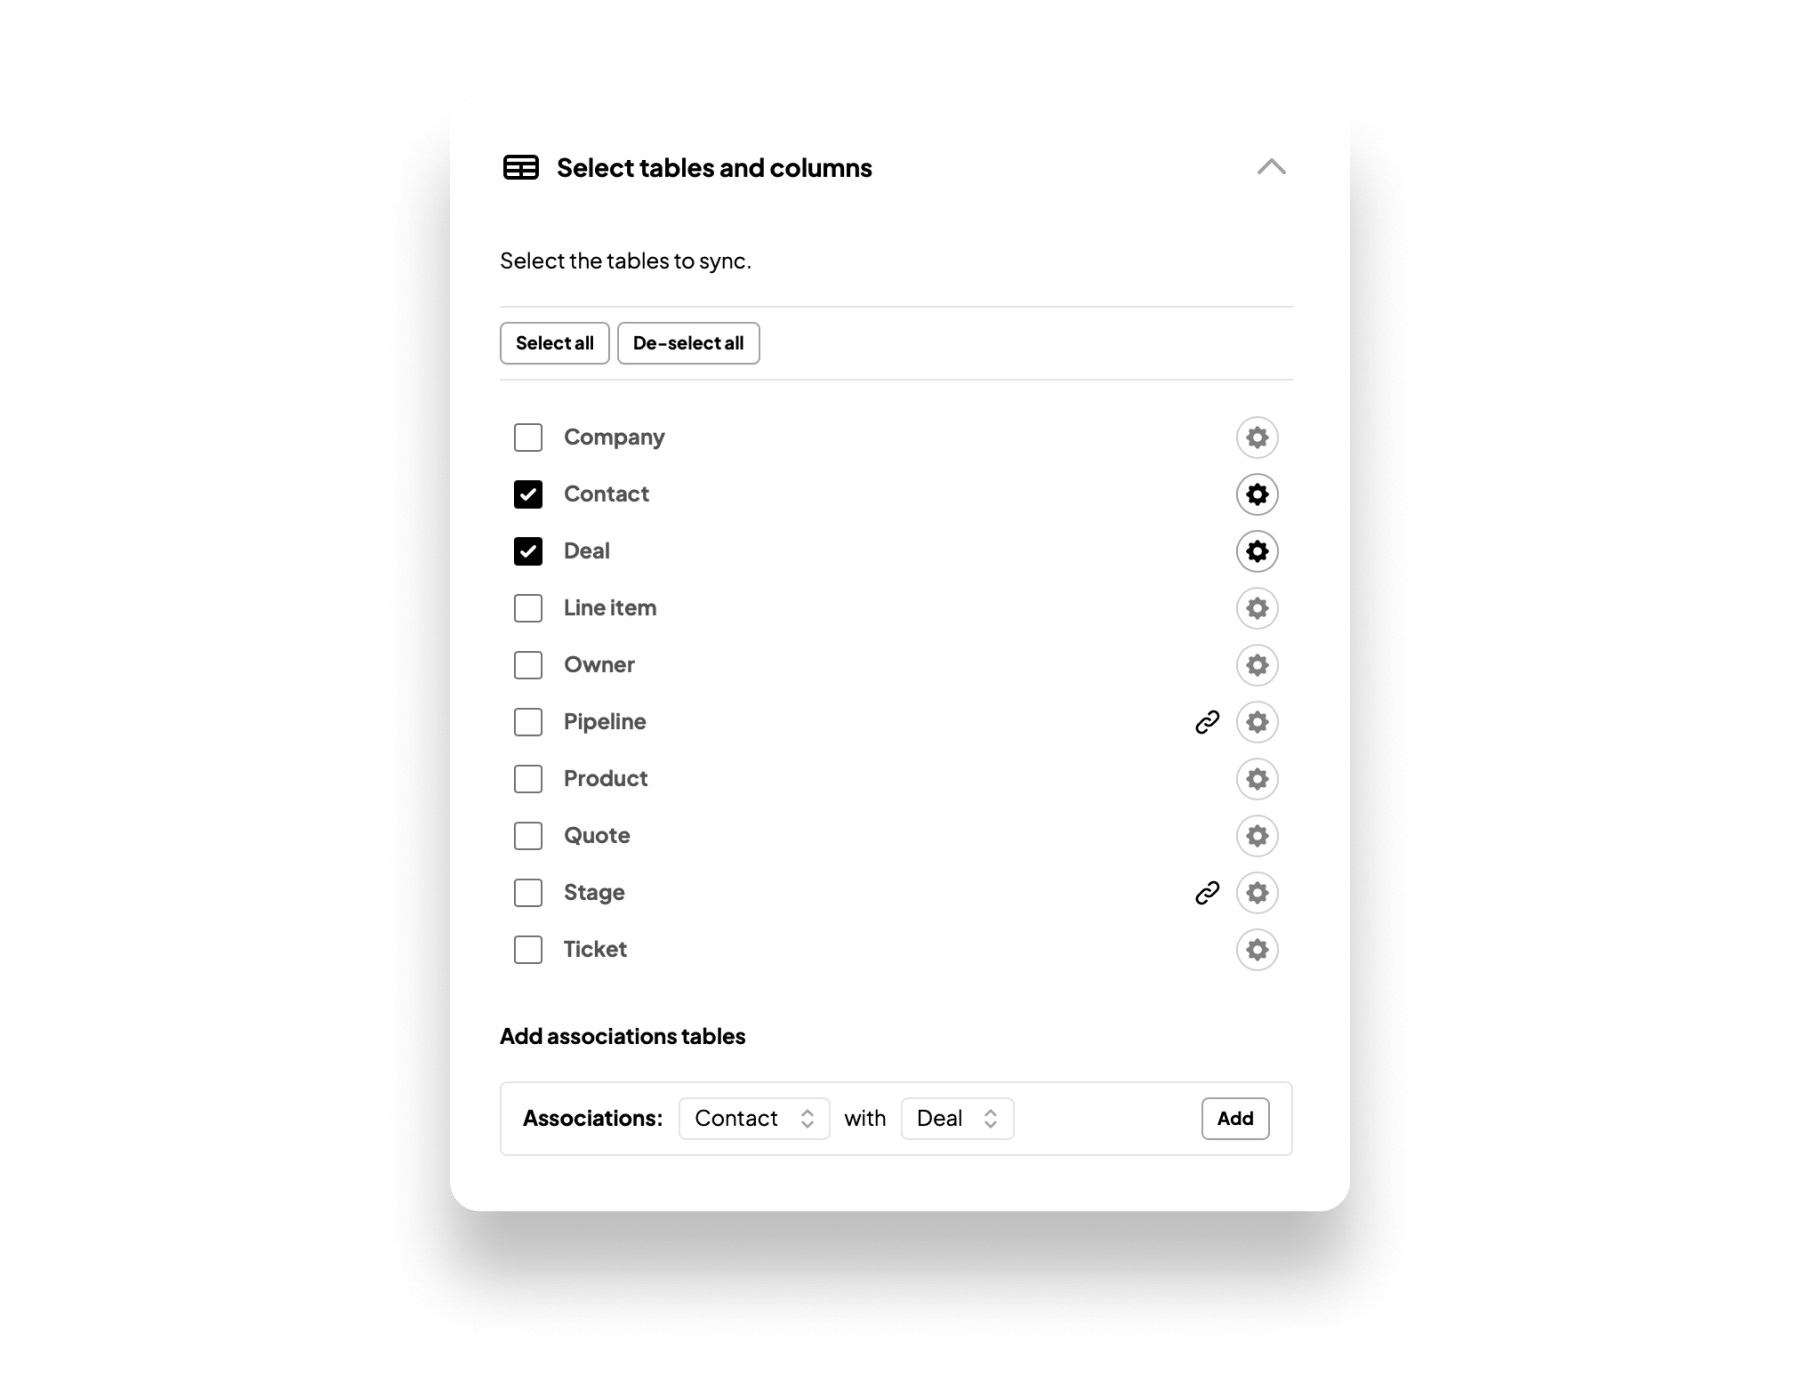 To get comfortable with your schema and Prisma's workflows, you also don't need to sync every HubSpot property. In the Sequin Console, configure your sync to include a handful of properties:
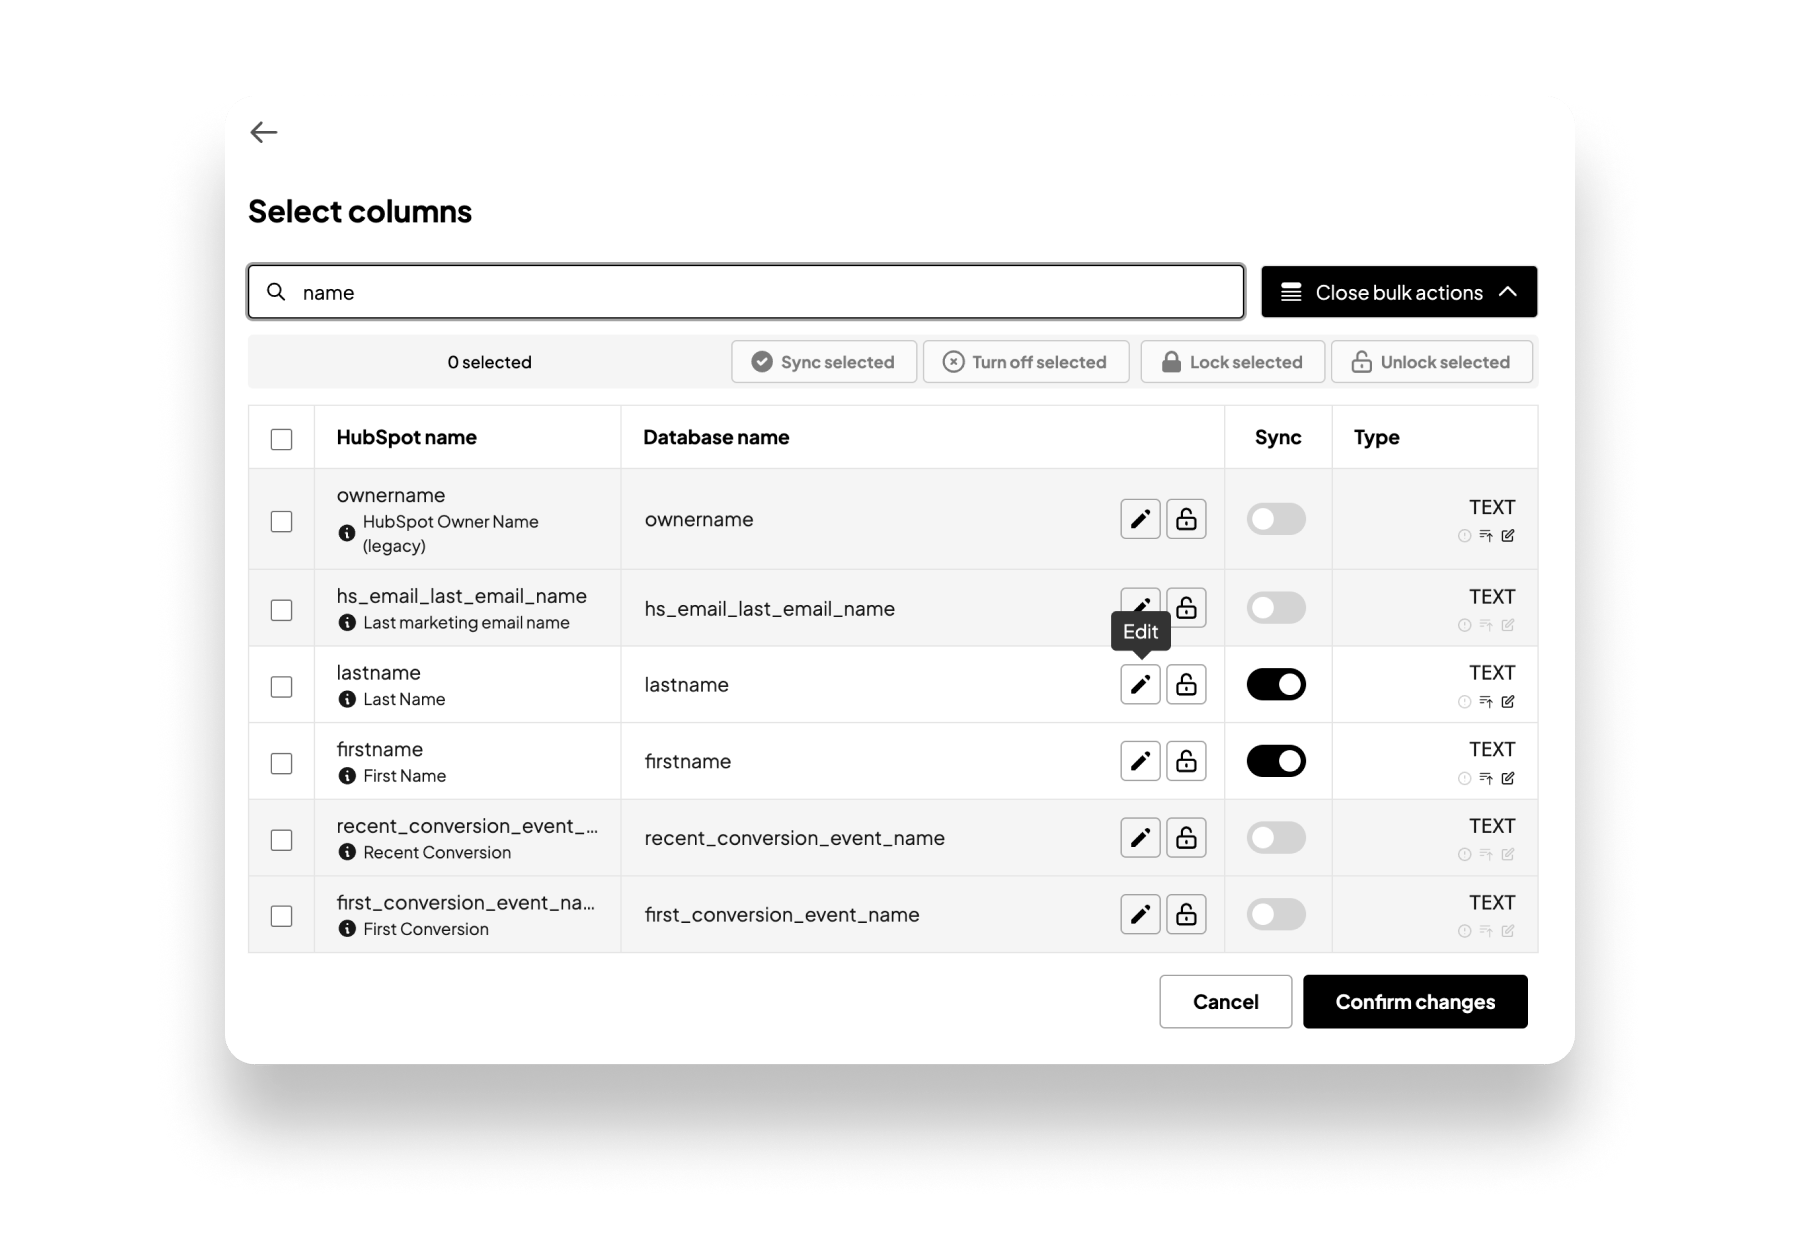 For instance, sync some standard properties for the `Contact` object. For reference, these are the `Contact` properties used in the remainder of this playbook:
* `industry`
* `associatedcompanyid`
* `numemployees`
* `website`
* `company`
* `jobtitle`
* `lastname`
* `firstname`
* `user_id`
As a helpful example, we include a custom property called `user_id`, which maps each HubSpot `contact` to a `user`. We'll explore this relationship more later in the playbook.
Do the same for the `Deals` object. Here are the `Deal` properties used in this playbook:
* `createdate`
* `closedate`
* `pipeline`
* `dealstage`
* `amount`
* `dealname`
* `hs_priority`
You can also edit and lock the column name for each property you sync. These tools allow you to create simple naming conventions in your database and buffer your database from breaking changes in HubSpot.
With HubSpot configured in Sequin, you can now [connect your database](/docs/sync-process/self-hosted) to Sequin and create your sync.
After you click **Create**, Sequin will begin backfilling all the `Contacts`, `Deals`, and `Contact - Deal` associations in your HubSpot instance to your database.
Within a minute, you'll see the new `hubspot` schema and tables in your database:
For instance, sync some standard properties for the `Contact` object. For reference, these are the `Contact` properties used in the remainder of this playbook:
* `industry`
* `associatedcompanyid`
* `numemployees`
* `website`
* `company`
* `jobtitle`
* `lastname`
* `firstname`
* `user_id`
As a helpful example, we include a custom property called `user_id`, which maps each HubSpot `contact` to a `user`. We'll explore this relationship more later in the playbook.
Do the same for the `Deals` object. Here are the `Deal` properties used in this playbook:
* `createdate`
* `closedate`
* `pipeline`
* `dealstage`
* `amount`
* `dealname`
* `hs_priority`
You can also edit and lock the column name for each property you sync. These tools allow you to create simple naming conventions in your database and buffer your database from breaking changes in HubSpot.
With HubSpot configured in Sequin, you can now [connect your database](/docs/sync-process/self-hosted) to Sequin and create your sync.
After you click **Create**, Sequin will begin backfilling all the `Contacts`, `Deals`, and `Contact - Deal` associations in your HubSpot instance to your database.
Within a minute, you'll see the new `hubspot` schema and tables in your database:
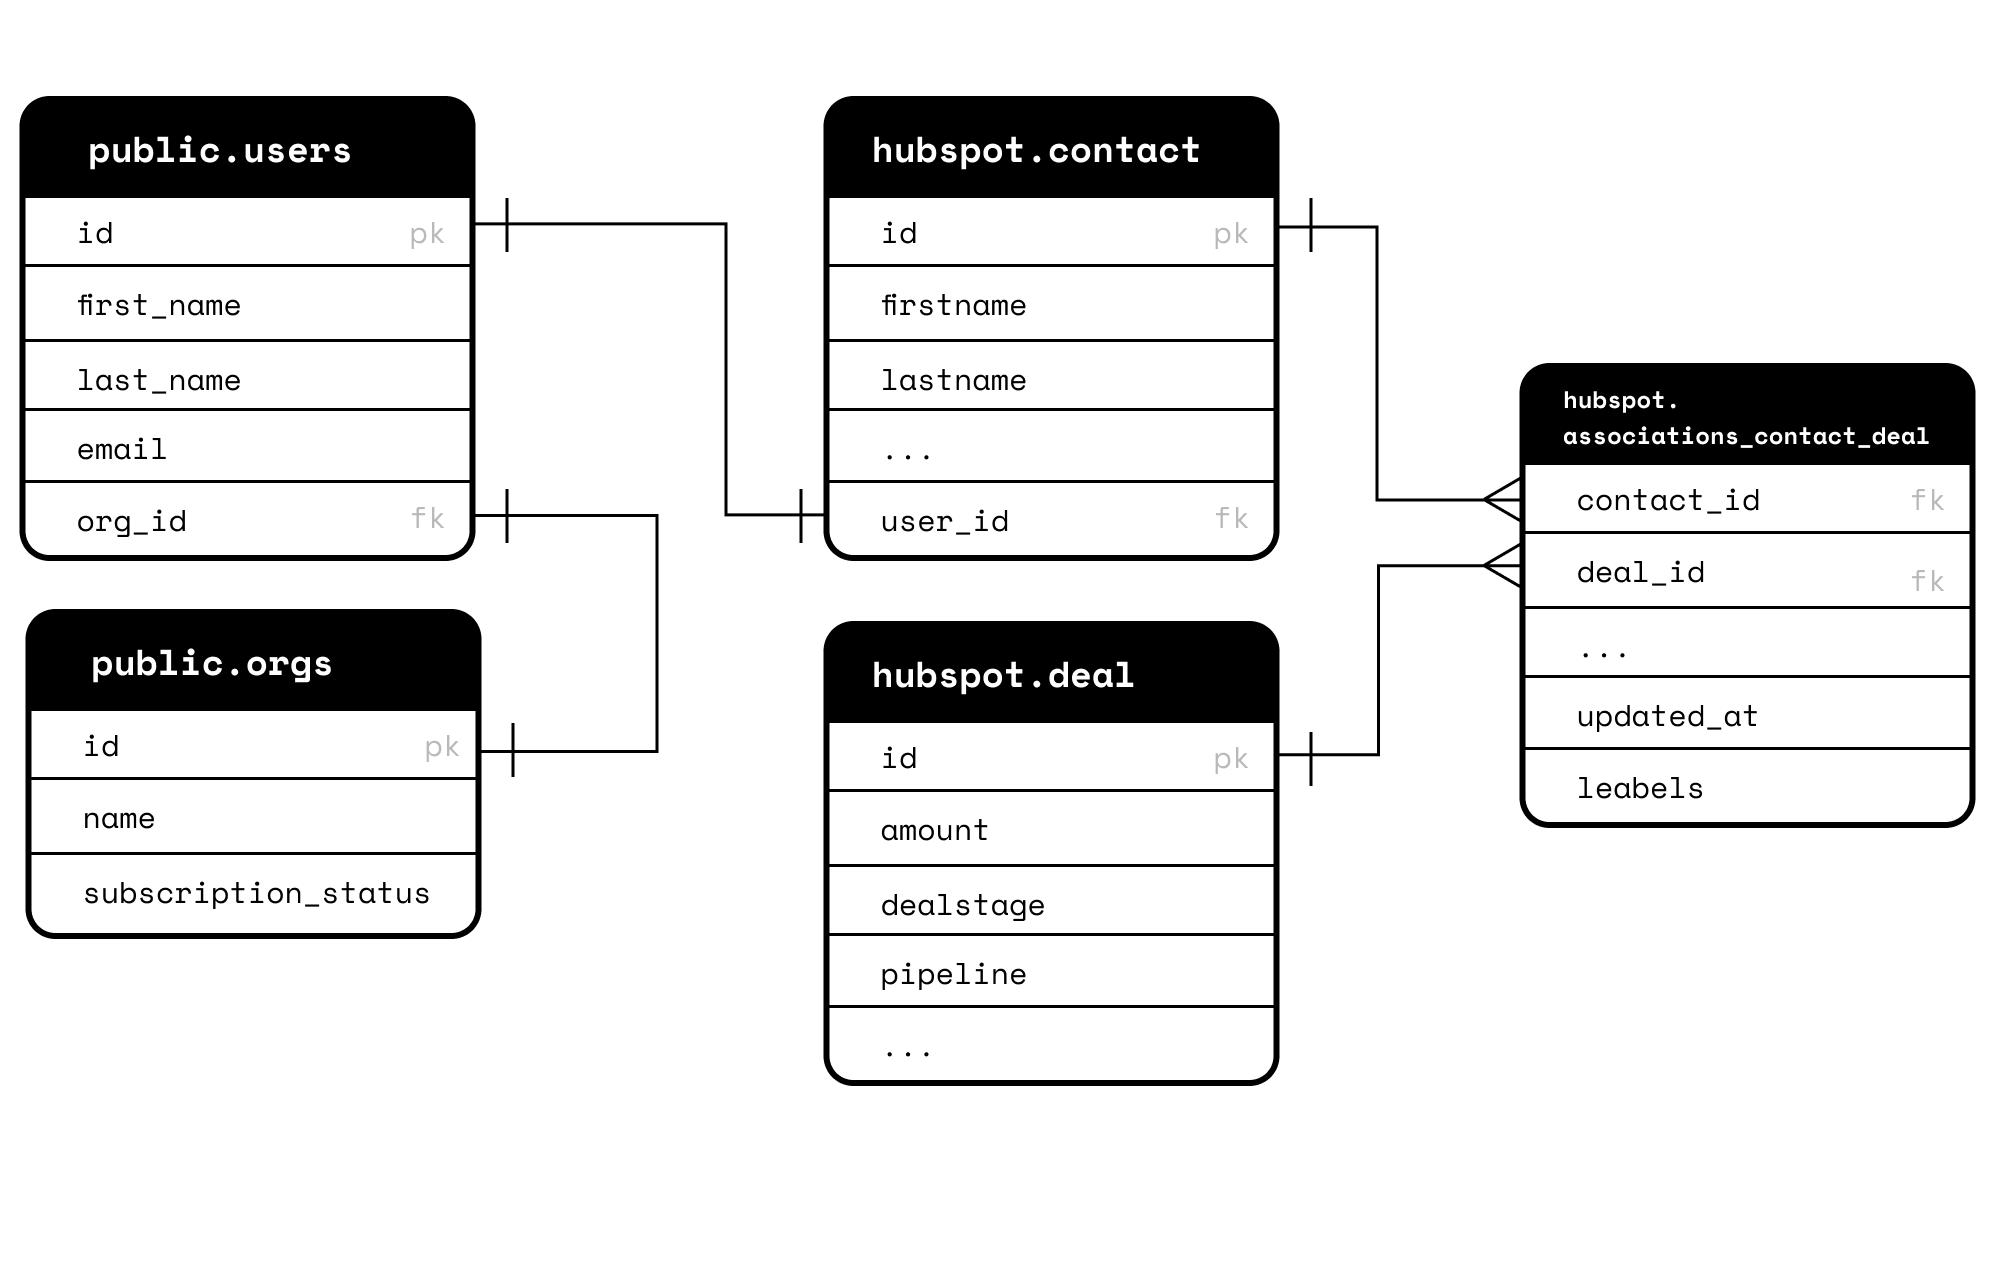 You can now configure Prisma to work with your HubSpot data.
## Add HubSpot to your Prisma Schema
Next, you'll update your `prisma.schema` file and then re-generate the Prisma Client to work with the HubSpot data in your database.
Before you do, it's worth building a mental model of this process.
Your database now contains two schemas:
1. **A `public` schema** that *you* own and control. You're probably used to using [Prisma's Migrate tools](https://www.prisma.io/docs/concepts/components/prisma-migrate/mental-model#what-is-prisma-migrate) to make changes to this schema. In Prisma, these are called "model/entity-first migrations." (Some Prisma users prefer to `create` new tables and `update` columns in the database via SQL. These are called "database-first migrations.")
2. **A `hubspot` schema** that *Sequin* owns and controls to maintain your HubSpot sync. All migrations in this schema are done directly to the database via SQL commands that originate from Sequin. So, these are database-first migrations *that Sequin runs*. If you add or drop columns in this schema using Prisma, you'll break the sync. Hence, all migrations in this schema are performed in the Sequin console. After Sequin applies the migrations to your database, you'll add the changes to Prisma.
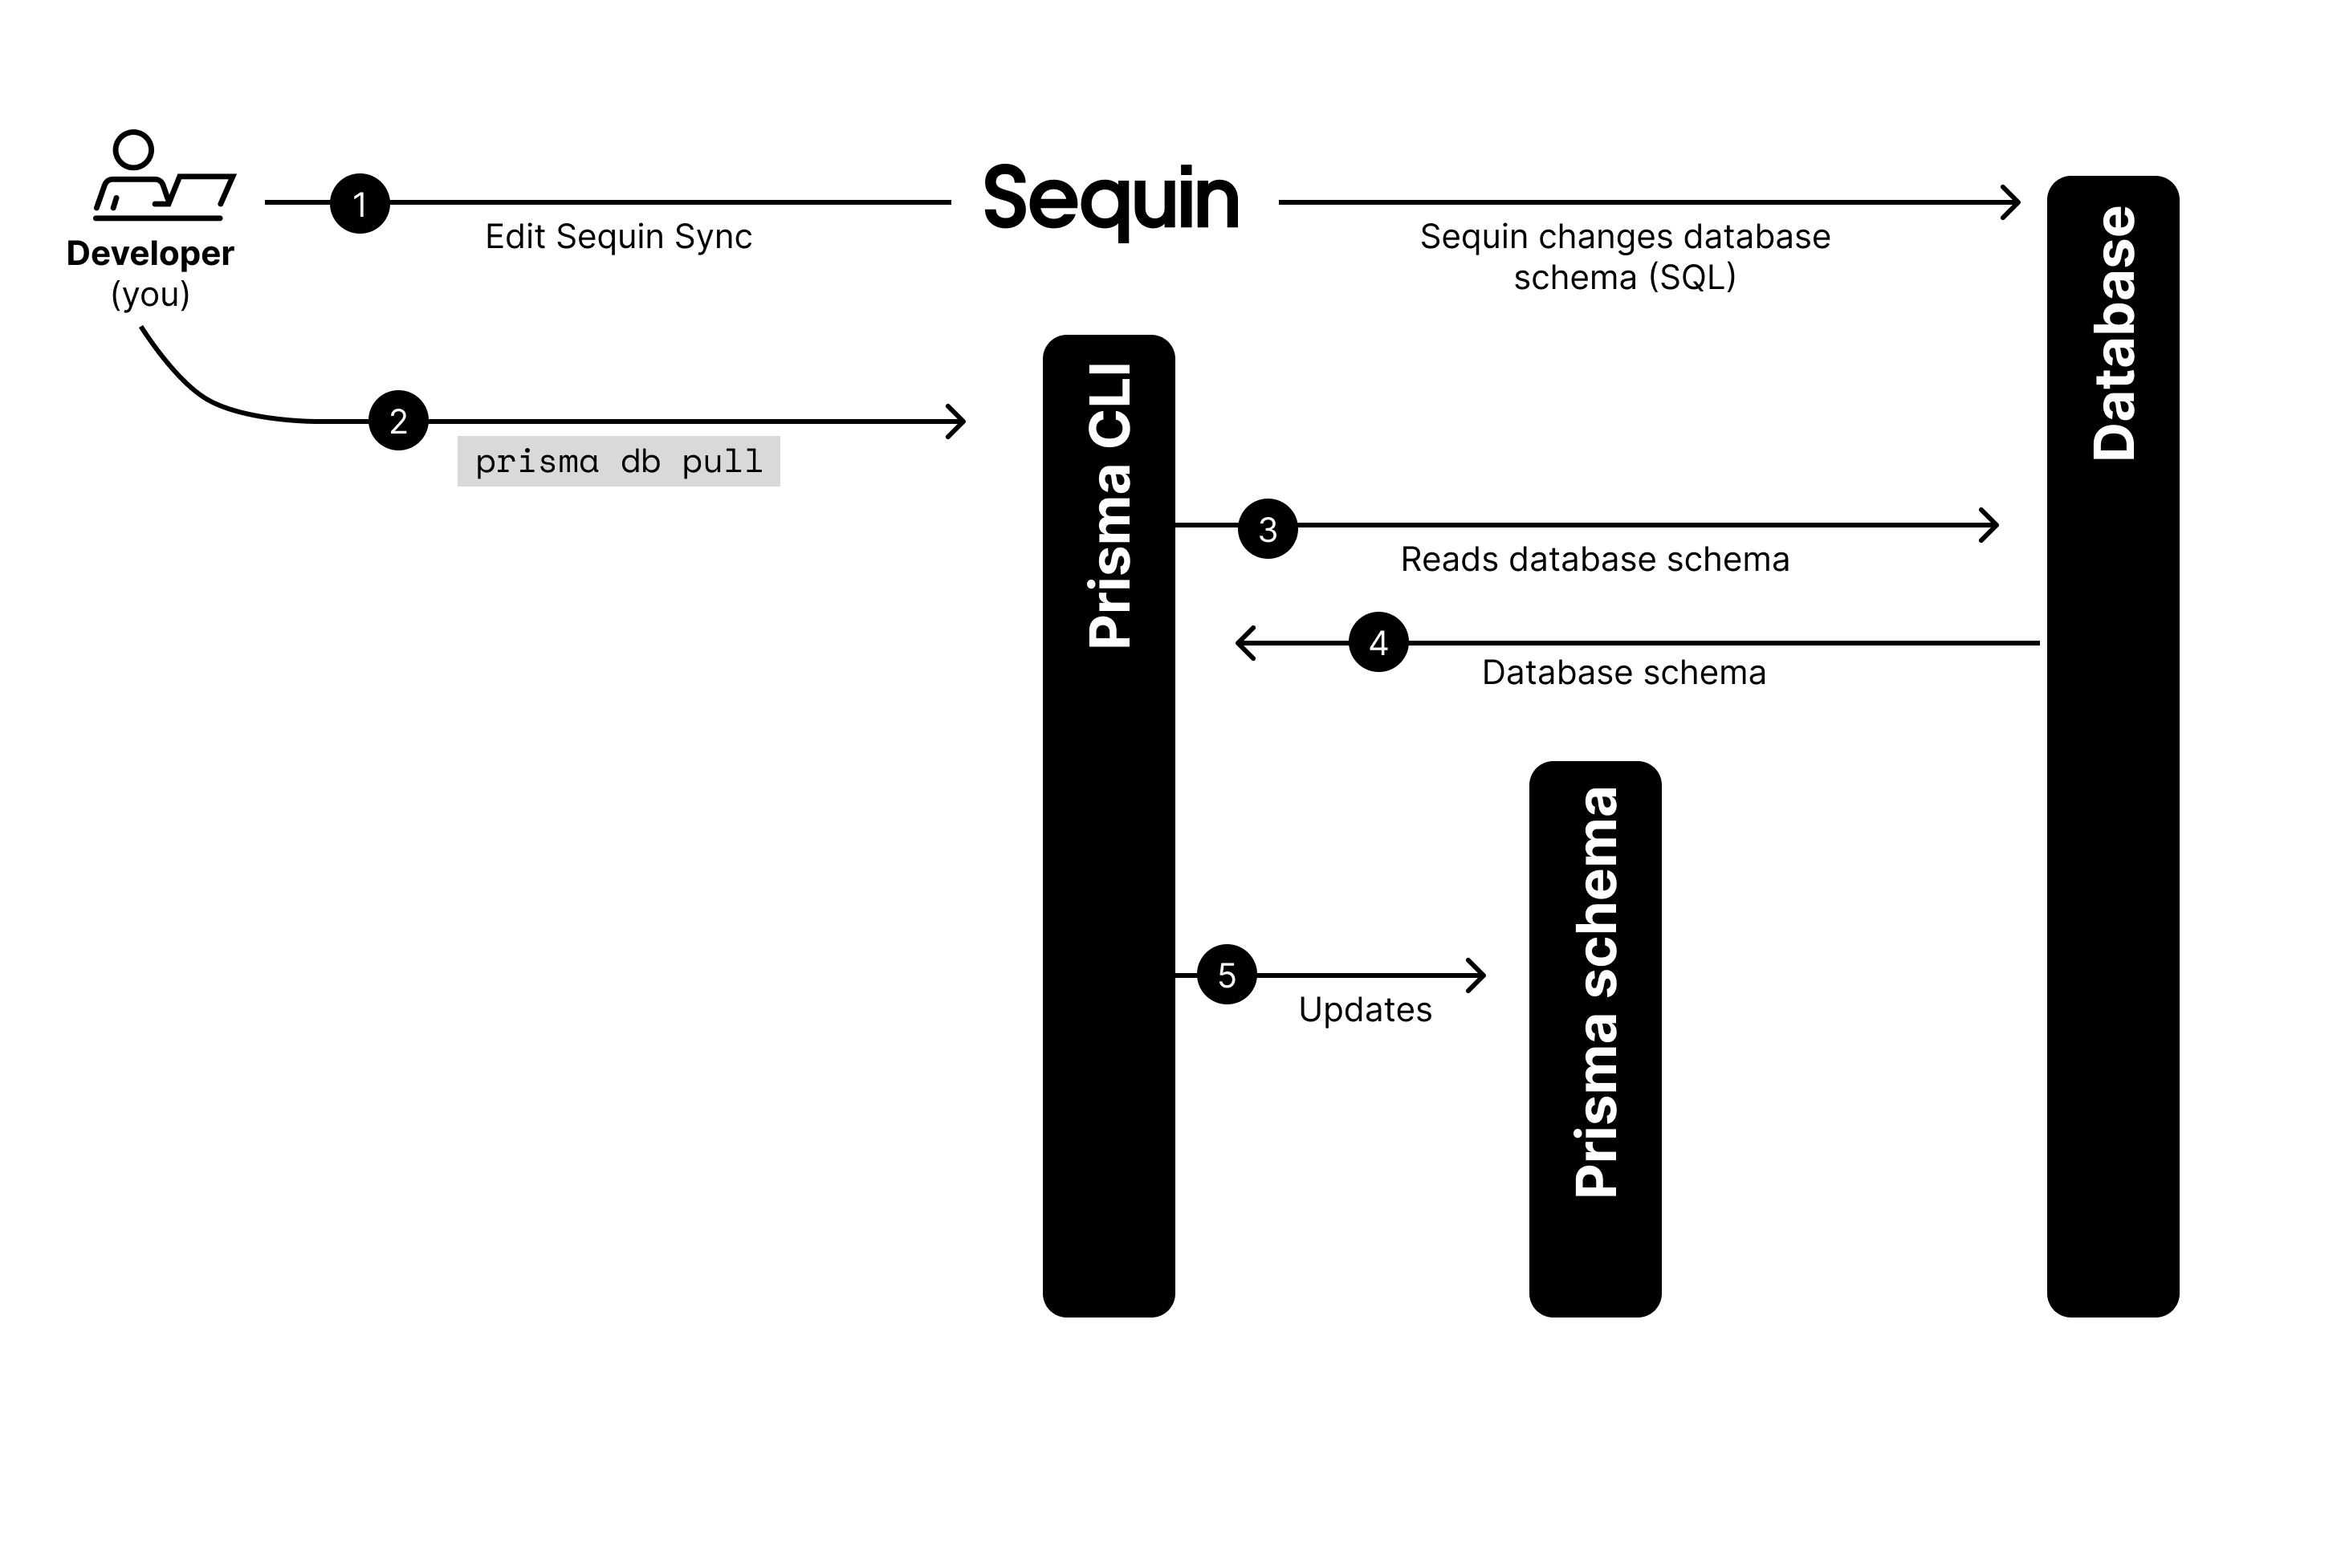
So, when working with your `hubpost` schema, you'll always follow a **database-first migration** pattern in Prisma. This means you'll `pull` the schema into Prisma models as opposed to pushing the schema from Prisma models into your database. Here is how.
You can now configure Prisma to work with your HubSpot data.
## Add HubSpot to your Prisma Schema
Next, you'll update your `prisma.schema` file and then re-generate the Prisma Client to work with the HubSpot data in your database.
Before you do, it's worth building a mental model of this process.
Your database now contains two schemas:
1. **A `public` schema** that *you* own and control. You're probably used to using [Prisma's Migrate tools](https://www.prisma.io/docs/concepts/components/prisma-migrate/mental-model#what-is-prisma-migrate) to make changes to this schema. In Prisma, these are called "model/entity-first migrations." (Some Prisma users prefer to `create` new tables and `update` columns in the database via SQL. These are called "database-first migrations.")
2. **A `hubspot` schema** that *Sequin* owns and controls to maintain your HubSpot sync. All migrations in this schema are done directly to the database via SQL commands that originate from Sequin. So, these are database-first migrations *that Sequin runs*. If you add or drop columns in this schema using Prisma, you'll break the sync. Hence, all migrations in this schema are performed in the Sequin console. After Sequin applies the migrations to your database, you'll add the changes to Prisma.
So, when working with your `hubpost` schema, you'll always follow a **database-first migration** pattern in Prisma. This means you'll `pull` the schema into Prisma models as opposed to pushing the schema from Prisma models into your database. Here is how.
 ### Turn on multiple schema support
Your database now contains two schemas. To configure Prisma to work with more than one schema, you need to turn on [multi schema support](https://www.prisma.io/docs/guides/database/multi-schema).
To do so, update your `schema.prisma` file as follows:
```js theme={null}
generator client {
provider = "prisma-client-js"
// highlight-new-line
previewFeatures = ["multiSchema"]
}
datasource db {
provider = "postgresql"
url = env("DATABASE_URL")
// highlight-new-line
schemas = ["public", "hubspot"]
}
model orgs {
id Int @id @default(autoincrement())
name String?
subscription_status String?
users users[]
// highlight-new-line
@@schema("public")
}
model users {
id Int @id @default(autoincrement())
first_name String?
last_name String?
email String?
org_id Int?
org orgs? @relation(fields: [org_id], references: [id], onDelete: NoAction, onUpdate: NoAction, map: "users_orgs_id_fk")
// highlight-new-line
@@schema("public")
}
```
1. Add `previewFeatures = ["multiSchema"]` in the `generator` block. This turns on multi schema support.
2. List your schemas in the `datasource` block. In this case: `schemas = ["public", "hubspot"]`
3. Designate which schema each of your Prisma models belongs to with a `@@schema('public')` attribute
Prisma is now ready to handle multiple schemas when you begin to introspect your database in the next step.
### Introspect your database
The Prisma CLI provides [introspection tools](https://www.prisma.io/docs/concepts/components/introspection#introspection-with-an-existing-schema) to automatically update your `schema.prisma` models to reflect the schema in your database.
To do so, ensure you have the [Prisma CLI installed](https://www.prisma.io/docs/concepts/components/prisma-cli/installation), navigate to the root directory of your project, and run the following command:
```bash theme={null}
prisma db pull
```
Prisma will then retrieve the schema from your database and map your tables, columns, indexes, and constraints into Prisma models, fields, indexes, and attributes in your `schema.prisma` file.
If you've manually altered your `schema.prisma` file, some changes will be [over-written](https://www.prisma.io/docs/concepts/components/introspection#introspection-with-an-existing-schema) when you run `db pull`. This includes any manually created `@relation` scalars you've defined in your model. You can instead introspect just your `hubspot` schema to avoid any issues. Learn how in the [Prisma docs](https://www.prisma.io/docs/concepts/components/introspection#introspecting-only-a-subset-of-your-database-schema).
After introspecting your database, your `schema.prisma` file will be updated to include your `hubspot` schema and the underlying `contact`, `deal`, and `associations_contact_deal ` models:
```js theme={null}
generator client {
provider = "prisma-client-js"
previewFeatures = ["multiSchema"]
}
datasource db {
provider = "postgresql"
url = env("DATABASE_URL")
schemas = ["hubspot", "public"]
}
model orgs {
id Int @id @default(autoincrement())
name String?
subscription_status String?
users users[]
@@schema("public")
}
model users {
id Int @id @default(autoincrement())
first_name String?
last_name String?
email String?
org_id Int?
org orgs? @relation(fields: [org_id], references: [id], onDelete: NoAction, onUpdate: NoAction, map: "users_orgs_id_fk")
contact contact[]
@@schema("public")
}
// highlight-new-start
model associations_contact_deal {
contact_id String
contact contact? @relation(fields: [contact_id], references: [id])
deal_id String
deal deal? @relation(fields: [deal_id], references: [id])
sync_hash String? @map("_sync_hash")
sync_inserted_at DateTime @default(now()) @map("_sync_inserted_at") @db.Timestamp(6)
sync_updated_at DateTime @default(now()) @map("_sync_updated_at") @db.Timestamp(6)
updated_at DateTime @default(now()) @map("_updated_at") @db.Timestamp(6)
labels String[]
@@id([contact_id, deal_id], map: "associations_contact_deal_pk")
@@schema("hubspot")
}
model contact {
id String @id(map: "CONTACT_pk")
sync_inserted_at DateTime @default(now()) @map("_sync_inserted_at") @db.Timestamp(6)
sync_updated_at DateTime @default(now()) @map("_sync_updated_at") @db.Timestamp(6)
updated_at DateTime @default(now()) @map("_updated_at") @db.Timestamp(6)
associatedcompanyid Decimal? @db.Decimal
company String?
firstname String?
industry String?
jobtitle String?
lastname String?
numemployees String?
user_id Int?
user users? @relation(fields: [user_id], references: [id])
website String?
associations_contact_deal associations_contact_deal[]
@@index([updated_at], map: "_updated_at_idx")
@@schema("hubspot")
}
model deal {
id String @id(map: "DEAL_pk")
sync_inserted_at DateTime @default(now()) @map("_sync_inserted_at") @db.Timestamp(6)
sync_updated_at DateTime @default(now()) @map("_sync_updated_at") @db.Timestamp(6)
updated_at DateTime @default(now()) @map("_updated_at") @db.Timestamp(6)
amount Decimal? @db.Decimal
closedate DateTime? @db.Timestamp(6)
createdate DateTime? @db.Timestamp(6)
dealname String?
dealstage String?
hs_priority String?
pipeline String?
associations_contact_deal associations_contact_deal[]
@@schema("hubspot")
}
// highlight-new-end
```
### Define relationships
Out of the box, the schema generated via `prisma db pull` is almost entirely workable. But because Sequin doesn't enforce foreign key constraints, Prisma can't detect the relationships that exist across your `contact` and `deal` tables via the `associations_contact_deal` relation table. You'll add these relationships to your `schema.prisma` file.
To define a many-to-many relationship using a [relation table](https://www.prisma.io/docs/concepts/components/prisma-schema/relations/many-to-many-relations#relation-tables), you need to tell Prisma that the `deal_id` and `contact_id` fields in the `associations_contact_deal` model relate to the `id` field on the `deal` and `contact` models respectively. You'll do this by adding the two relation scalars:
```js theme={null}
model associations_contact_deal {
// highlight-new-line
contact contact @relation(fields: [contact_id], references: [id])
contact_id String
// highlight-new-line
deal deal @relation(fields: [deal_id], references: [id])
deal_id String
sync_hash String? @map("_sync_hash")
sync_inserted_at DateTime @default(now()) @map("_sync_inserted_at") @db.Timestamp(6)
sync_updated_at DateTime @default(now()) @map("_sync_updated_at") @db.Timestamp(6)
updated_at DateTime @default(now()) @map("_updated_at") @db.Timestamp(6)
labels String[]
@@id([contact_id, deal_id], map: "associations_contact_deal_pk")
@@schema("hubspot")
}
```
Additionally, on the `deal` and `contact` models, you need to define the other side of this many-to-many relationship by pointing a new field back to the `associations_contact_deal` model:
```js theme={null}
model deal {
id String @id(map: "DEAL_pk")
sync_inserted_at DateTime @default(now()) @map("_sync_inserted_at") @db.Timestamp(6)
sync_updated_at DateTime @default(now()) @map("_sync_updated_at") @db.Timestamp(6)
updated_at DateTime @default(now()) @map("_updated_at") @db.Timestamp(6)
amount Decimal? @db.Decimal
closedate DateTime? @db.Timestamp(6)
createdate DateTime? @db.Timestamp(6)
dealname String?
dealstage String?
hs_priority String?
pipeline String?
// highlight-new-line
contacts associations_contact_deal[]
@@schema("hubspot")
}
model contact {
id String @id(map: "CONTACT_pk")
sync_inserted_at DateTime @default(now()) @map("_sync_inserted_at") @db.Timestamp(6)
sync_updated_at DateTime @default(now()) @map("_sync_updated_at") @db.Timestamp(6)
updated_at DateTime @default(now()) @map("_updated_at") @db.Timestamp(6)
associatedcompanyid Decimal? @db.Decimal
company String?
firstname String?
industry String?
jobtitle String?
lastname String?
numemployees String?
user_id Int?
website String?
// highlight-new-line
deals associations_contact_deal[]
@@index([updated_at], map: "_updated_at_idx")
@@schema("hubspot")
}
```
As you may recall, you can also define a [one-to-one relationship](https://www.prisma.io/docs/concepts/components/prisma-schema/relations/one-to-one-relations) between the `user_id` field in the `contact` model with the `id` field on the `users` model. This will make querying across your internal data model and HubSpot data possible. To do so, add one more relation scalar to your `contact` model:
```js theme={null}
model contact {
id String @id(map: "CONTACT_pk")
sync_inserted_at DateTime @default(now()) @map("_sync_inserted_at") @db.Timestamp(6)
sync_updated_at DateTime @default(now()) @map("_sync_updated_at") @db.Timestamp(6)
updated_at DateTime @default(now()) @map("_updated_at") @db.Timestamp(6)
associatedcompanyid Decimal? @db.Decimal
company String?
firstname String?
industry String?
jobtitle String?
lastname String?
numemployees String?
user_id Int?
// highlight-new-line
user users? @relation(fields: [user_id], references: [id])
website String?
deals associations_contact_deal[]
@@index([updated_at], map: "_updated_at_idx")
@@schema("hubspot")
}
```
### Generate your Prisma Client
All the relationships in your data model are now defined in your `schema.prisma` file. The last step before writing your first query is to re-generate your Prisma client:
```bash theme={null}
prisma generate
```
## Query HubSpot using the Prisma Client
Prisma gives you a modern, intuitive API for querying your HubSpot data. For instance, you can return all your HubSpot deals in one simple query:
```js index.js theme={null}
async function get_all_deals() {
const deals = await prisma.deal.findMany();
console.log(deals);
}
```
No pagination. No authentication token. No metering your requests through a rate limiter.
Or, you can return all the deals at a certain stage as well as all the contacts associated with those deals:
```js index.js theme={null}
async function get_qualified_deals() {
const deals = await prisma.deal.findMany({
where: {
dealstage: "qualifiedtobuy",
},
include: {
contacts: {
include: {
contact: true,
},
},
},
});
console.log(deals);
}
```
You'll note that in your IDE, you get helpful type warnings and type-ahead support as you write these queries—niceties missing from the HubSpot API and SDK.
More impactful to your productivity, you can query HubSpot and your internal data together. For instance, you can query for all the `deals` associated to a specific `user` in your `public` schema:
```js theme={null}
async function get_user_deals() {
const user_deals = await prisma.users.findUnique({
where: { email: eric@sequin.io },
include: {
contact: {
include: {
deals: {
include: {
deal: true,
},
},
},
},
},
});
console.log(user_deals);
}
```
This query builds on the relationships you defined in your `schema.prisma` file to return the deals related to `eric@sequin.io`. In one Prisma query, you do the work of a SQL query paired with three nested calls to the HubSpot API.
## Migrations
Inevitably, the data you need from HubSpot will change, and you'll need to migrate your Prisma schema. While a more [comprehensive guide to migrations](https://rtpg.co/2021/06/07/changes-checklist.html) should be referenced to avoid downtime in your application, here are the order of operations to consider when using Sequin with Prisma.
As noted above, your `hubspot` schema is managed by Sequin. For simplicity, all migrations start in the Sequin Console and are applied to Prisma as database-first migrations. As a result, you will not use Prisma Migrate when making changes to the HubSpot objects and properties syncing to your database.
Here are some common scenarios:
### Adding or removing a HubSpot property
**Step 1:** If you're about to remove a HubSpot property, first remove it from your app and your Prisma Client.
**Step 2:** Add/remove the property to/from your sync by editing your table and column mapping in the Sequin Console.
When you click **Update**, Sequin will immediately migrate your database to add the new property as a new column or drop the column related to the property you removed. In the case where you added a new property, Sequin will begin the backfill process, syncing the property to your database.
**Step 3:** If you are adding a new property, you'll now **manually** add the field associated with the new column/property in the appropriate model in your `schema.prisma` file. It is easier to do this by hand as opposed to introspecting your database so that you can preserve the other relationship scalars.
**Step 4:** Run the `prisma generate` command in your terminal to update the Prisma Client.
### Adding or removing a HubSpot Object
**Step 1:** If you're about to remove a HubSpot object, first remove it from your app and your Prisma Client.
**Step 2:** Add/remove the object to/from your sync by editing your table and column mapping in the Sequin Console.
When you click **Update**, Sequin will run a migration to create or drop the tables related to your change.
**Step 3:** If you are adding a new HubSpot object to your sync, you'll now add these new tables as models in your `schema.prisma` file. You have two options:
1. **Manually** add or remove the appropriate models.
2. **⚠️ Partial Introspect Workaround ⚠️:** Partially introspect your database by first saving your existing `schema.prisma` file. Then follow Prisma's guide for [introspecting just a subset of your database](https://www.prisma.io/docs/concepts/components/introspection#introspecting-only-a-subset-of-your-database-schema). In this case, you'll create a new database user that can only access the new tables added to your database by Sequin. Then, append the new models generated by your introspection to your saved `prisma.schema` file. This is often a more straightforward path when adding an object to your HubSpot sync.
**Step 4:** Run the `prisma generate` command in your terminal to update the Prisma Client.
## Development lifecycle
You aren't using Prisma Migrate to track the migrations related to changes in your `hubspot` schema and the underlying Sequin sync. So how does this all work across dev and staging environments?
To support development and staging environments, you'll set up a dev HubSpot account and a dev Sequin sync. You'll then use Sequin's **copy config** setting to copy changes from the dev sync and database to your production sync and database. Here is the flow.
### Turn on multiple schema support
Your database now contains two schemas. To configure Prisma to work with more than one schema, you need to turn on [multi schema support](https://www.prisma.io/docs/guides/database/multi-schema).
To do so, update your `schema.prisma` file as follows:
```js theme={null}
generator client {
provider = "prisma-client-js"
// highlight-new-line
previewFeatures = ["multiSchema"]
}
datasource db {
provider = "postgresql"
url = env("DATABASE_URL")
// highlight-new-line
schemas = ["public", "hubspot"]
}
model orgs {
id Int @id @default(autoincrement())
name String?
subscription_status String?
users users[]
// highlight-new-line
@@schema("public")
}
model users {
id Int @id @default(autoincrement())
first_name String?
last_name String?
email String?
org_id Int?
org orgs? @relation(fields: [org_id], references: [id], onDelete: NoAction, onUpdate: NoAction, map: "users_orgs_id_fk")
// highlight-new-line
@@schema("public")
}
```
1. Add `previewFeatures = ["multiSchema"]` in the `generator` block. This turns on multi schema support.
2. List your schemas in the `datasource` block. In this case: `schemas = ["public", "hubspot"]`
3. Designate which schema each of your Prisma models belongs to with a `@@schema('public')` attribute
Prisma is now ready to handle multiple schemas when you begin to introspect your database in the next step.
### Introspect your database
The Prisma CLI provides [introspection tools](https://www.prisma.io/docs/concepts/components/introspection#introspection-with-an-existing-schema) to automatically update your `schema.prisma` models to reflect the schema in your database.
To do so, ensure you have the [Prisma CLI installed](https://www.prisma.io/docs/concepts/components/prisma-cli/installation), navigate to the root directory of your project, and run the following command:
```bash theme={null}
prisma db pull
```
Prisma will then retrieve the schema from your database and map your tables, columns, indexes, and constraints into Prisma models, fields, indexes, and attributes in your `schema.prisma` file.
If you've manually altered your `schema.prisma` file, some changes will be [over-written](https://www.prisma.io/docs/concepts/components/introspection#introspection-with-an-existing-schema) when you run `db pull`. This includes any manually created `@relation` scalars you've defined in your model. You can instead introspect just your `hubspot` schema to avoid any issues. Learn how in the [Prisma docs](https://www.prisma.io/docs/concepts/components/introspection#introspecting-only-a-subset-of-your-database-schema).
After introspecting your database, your `schema.prisma` file will be updated to include your `hubspot` schema and the underlying `contact`, `deal`, and `associations_contact_deal ` models:
```js theme={null}
generator client {
provider = "prisma-client-js"
previewFeatures = ["multiSchema"]
}
datasource db {
provider = "postgresql"
url = env("DATABASE_URL")
schemas = ["hubspot", "public"]
}
model orgs {
id Int @id @default(autoincrement())
name String?
subscription_status String?
users users[]
@@schema("public")
}
model users {
id Int @id @default(autoincrement())
first_name String?
last_name String?
email String?
org_id Int?
org orgs? @relation(fields: [org_id], references: [id], onDelete: NoAction, onUpdate: NoAction, map: "users_orgs_id_fk")
contact contact[]
@@schema("public")
}
// highlight-new-start
model associations_contact_deal {
contact_id String
contact contact? @relation(fields: [contact_id], references: [id])
deal_id String
deal deal? @relation(fields: [deal_id], references: [id])
sync_hash String? @map("_sync_hash")
sync_inserted_at DateTime @default(now()) @map("_sync_inserted_at") @db.Timestamp(6)
sync_updated_at DateTime @default(now()) @map("_sync_updated_at") @db.Timestamp(6)
updated_at DateTime @default(now()) @map("_updated_at") @db.Timestamp(6)
labels String[]
@@id([contact_id, deal_id], map: "associations_contact_deal_pk")
@@schema("hubspot")
}
model contact {
id String @id(map: "CONTACT_pk")
sync_inserted_at DateTime @default(now()) @map("_sync_inserted_at") @db.Timestamp(6)
sync_updated_at DateTime @default(now()) @map("_sync_updated_at") @db.Timestamp(6)
updated_at DateTime @default(now()) @map("_updated_at") @db.Timestamp(6)
associatedcompanyid Decimal? @db.Decimal
company String?
firstname String?
industry String?
jobtitle String?
lastname String?
numemployees String?
user_id Int?
user users? @relation(fields: [user_id], references: [id])
website String?
associations_contact_deal associations_contact_deal[]
@@index([updated_at], map: "_updated_at_idx")
@@schema("hubspot")
}
model deal {
id String @id(map: "DEAL_pk")
sync_inserted_at DateTime @default(now()) @map("_sync_inserted_at") @db.Timestamp(6)
sync_updated_at DateTime @default(now()) @map("_sync_updated_at") @db.Timestamp(6)
updated_at DateTime @default(now()) @map("_updated_at") @db.Timestamp(6)
amount Decimal? @db.Decimal
closedate DateTime? @db.Timestamp(6)
createdate DateTime? @db.Timestamp(6)
dealname String?
dealstage String?
hs_priority String?
pipeline String?
associations_contact_deal associations_contact_deal[]
@@schema("hubspot")
}
// highlight-new-end
```
### Define relationships
Out of the box, the schema generated via `prisma db pull` is almost entirely workable. But because Sequin doesn't enforce foreign key constraints, Prisma can't detect the relationships that exist across your `contact` and `deal` tables via the `associations_contact_deal` relation table. You'll add these relationships to your `schema.prisma` file.
To define a many-to-many relationship using a [relation table](https://www.prisma.io/docs/concepts/components/prisma-schema/relations/many-to-many-relations#relation-tables), you need to tell Prisma that the `deal_id` and `contact_id` fields in the `associations_contact_deal` model relate to the `id` field on the `deal` and `contact` models respectively. You'll do this by adding the two relation scalars:
```js theme={null}
model associations_contact_deal {
// highlight-new-line
contact contact @relation(fields: [contact_id], references: [id])
contact_id String
// highlight-new-line
deal deal @relation(fields: [deal_id], references: [id])
deal_id String
sync_hash String? @map("_sync_hash")
sync_inserted_at DateTime @default(now()) @map("_sync_inserted_at") @db.Timestamp(6)
sync_updated_at DateTime @default(now()) @map("_sync_updated_at") @db.Timestamp(6)
updated_at DateTime @default(now()) @map("_updated_at") @db.Timestamp(6)
labels String[]
@@id([contact_id, deal_id], map: "associations_contact_deal_pk")
@@schema("hubspot")
}
```
Additionally, on the `deal` and `contact` models, you need to define the other side of this many-to-many relationship by pointing a new field back to the `associations_contact_deal` model:
```js theme={null}
model deal {
id String @id(map: "DEAL_pk")
sync_inserted_at DateTime @default(now()) @map("_sync_inserted_at") @db.Timestamp(6)
sync_updated_at DateTime @default(now()) @map("_sync_updated_at") @db.Timestamp(6)
updated_at DateTime @default(now()) @map("_updated_at") @db.Timestamp(6)
amount Decimal? @db.Decimal
closedate DateTime? @db.Timestamp(6)
createdate DateTime? @db.Timestamp(6)
dealname String?
dealstage String?
hs_priority String?
pipeline String?
// highlight-new-line
contacts associations_contact_deal[]
@@schema("hubspot")
}
model contact {
id String @id(map: "CONTACT_pk")
sync_inserted_at DateTime @default(now()) @map("_sync_inserted_at") @db.Timestamp(6)
sync_updated_at DateTime @default(now()) @map("_sync_updated_at") @db.Timestamp(6)
updated_at DateTime @default(now()) @map("_updated_at") @db.Timestamp(6)
associatedcompanyid Decimal? @db.Decimal
company String?
firstname String?
industry String?
jobtitle String?
lastname String?
numemployees String?
user_id Int?
website String?
// highlight-new-line
deals associations_contact_deal[]
@@index([updated_at], map: "_updated_at_idx")
@@schema("hubspot")
}
```
As you may recall, you can also define a [one-to-one relationship](https://www.prisma.io/docs/concepts/components/prisma-schema/relations/one-to-one-relations) between the `user_id` field in the `contact` model with the `id` field on the `users` model. This will make querying across your internal data model and HubSpot data possible. To do so, add one more relation scalar to your `contact` model:
```js theme={null}
model contact {
id String @id(map: "CONTACT_pk")
sync_inserted_at DateTime @default(now()) @map("_sync_inserted_at") @db.Timestamp(6)
sync_updated_at DateTime @default(now()) @map("_sync_updated_at") @db.Timestamp(6)
updated_at DateTime @default(now()) @map("_updated_at") @db.Timestamp(6)
associatedcompanyid Decimal? @db.Decimal
company String?
firstname String?
industry String?
jobtitle String?
lastname String?
numemployees String?
user_id Int?
// highlight-new-line
user users? @relation(fields: [user_id], references: [id])
website String?
deals associations_contact_deal[]
@@index([updated_at], map: "_updated_at_idx")
@@schema("hubspot")
}
```
### Generate your Prisma Client
All the relationships in your data model are now defined in your `schema.prisma` file. The last step before writing your first query is to re-generate your Prisma client:
```bash theme={null}
prisma generate
```
## Query HubSpot using the Prisma Client
Prisma gives you a modern, intuitive API for querying your HubSpot data. For instance, you can return all your HubSpot deals in one simple query:
```js index.js theme={null}
async function get_all_deals() {
const deals = await prisma.deal.findMany();
console.log(deals);
}
```
No pagination. No authentication token. No metering your requests through a rate limiter.
Or, you can return all the deals at a certain stage as well as all the contacts associated with those deals:
```js index.js theme={null}
async function get_qualified_deals() {
const deals = await prisma.deal.findMany({
where: {
dealstage: "qualifiedtobuy",
},
include: {
contacts: {
include: {
contact: true,
},
},
},
});
console.log(deals);
}
```
You'll note that in your IDE, you get helpful type warnings and type-ahead support as you write these queries—niceties missing from the HubSpot API and SDK.
More impactful to your productivity, you can query HubSpot and your internal data together. For instance, you can query for all the `deals` associated to a specific `user` in your `public` schema:
```js theme={null}
async function get_user_deals() {
const user_deals = await prisma.users.findUnique({
where: { email: eric@sequin.io },
include: {
contact: {
include: {
deals: {
include: {
deal: true,
},
},
},
},
},
});
console.log(user_deals);
}
```
This query builds on the relationships you defined in your `schema.prisma` file to return the deals related to `eric@sequin.io`. In one Prisma query, you do the work of a SQL query paired with three nested calls to the HubSpot API.
## Migrations
Inevitably, the data you need from HubSpot will change, and you'll need to migrate your Prisma schema. While a more [comprehensive guide to migrations](https://rtpg.co/2021/06/07/changes-checklist.html) should be referenced to avoid downtime in your application, here are the order of operations to consider when using Sequin with Prisma.
As noted above, your `hubspot` schema is managed by Sequin. For simplicity, all migrations start in the Sequin Console and are applied to Prisma as database-first migrations. As a result, you will not use Prisma Migrate when making changes to the HubSpot objects and properties syncing to your database.
Here are some common scenarios:
### Adding or removing a HubSpot property
**Step 1:** If you're about to remove a HubSpot property, first remove it from your app and your Prisma Client.
**Step 2:** Add/remove the property to/from your sync by editing your table and column mapping in the Sequin Console.
When you click **Update**, Sequin will immediately migrate your database to add the new property as a new column or drop the column related to the property you removed. In the case where you added a new property, Sequin will begin the backfill process, syncing the property to your database.
**Step 3:** If you are adding a new property, you'll now **manually** add the field associated with the new column/property in the appropriate model in your `schema.prisma` file. It is easier to do this by hand as opposed to introspecting your database so that you can preserve the other relationship scalars.
**Step 4:** Run the `prisma generate` command in your terminal to update the Prisma Client.
### Adding or removing a HubSpot Object
**Step 1:** If you're about to remove a HubSpot object, first remove it from your app and your Prisma Client.
**Step 2:** Add/remove the object to/from your sync by editing your table and column mapping in the Sequin Console.
When you click **Update**, Sequin will run a migration to create or drop the tables related to your change.
**Step 3:** If you are adding a new HubSpot object to your sync, you'll now add these new tables as models in your `schema.prisma` file. You have two options:
1. **Manually** add or remove the appropriate models.
2. **⚠️ Partial Introspect Workaround ⚠️:** Partially introspect your database by first saving your existing `schema.prisma` file. Then follow Prisma's guide for [introspecting just a subset of your database](https://www.prisma.io/docs/concepts/components/introspection#introspecting-only-a-subset-of-your-database-schema). In this case, you'll create a new database user that can only access the new tables added to your database by Sequin. Then, append the new models generated by your introspection to your saved `prisma.schema` file. This is often a more straightforward path when adding an object to your HubSpot sync.
**Step 4:** Run the `prisma generate` command in your terminal to update the Prisma Client.
## Development lifecycle
You aren't using Prisma Migrate to track the migrations related to changes in your `hubspot` schema and the underlying Sequin sync. So how does this all work across dev and staging environments?
To support development and staging environments, you'll set up a dev HubSpot account and a dev Sequin sync. You'll then use Sequin's **copy config** setting to copy changes from the dev sync and database to your production sync and database. Here is the flow.
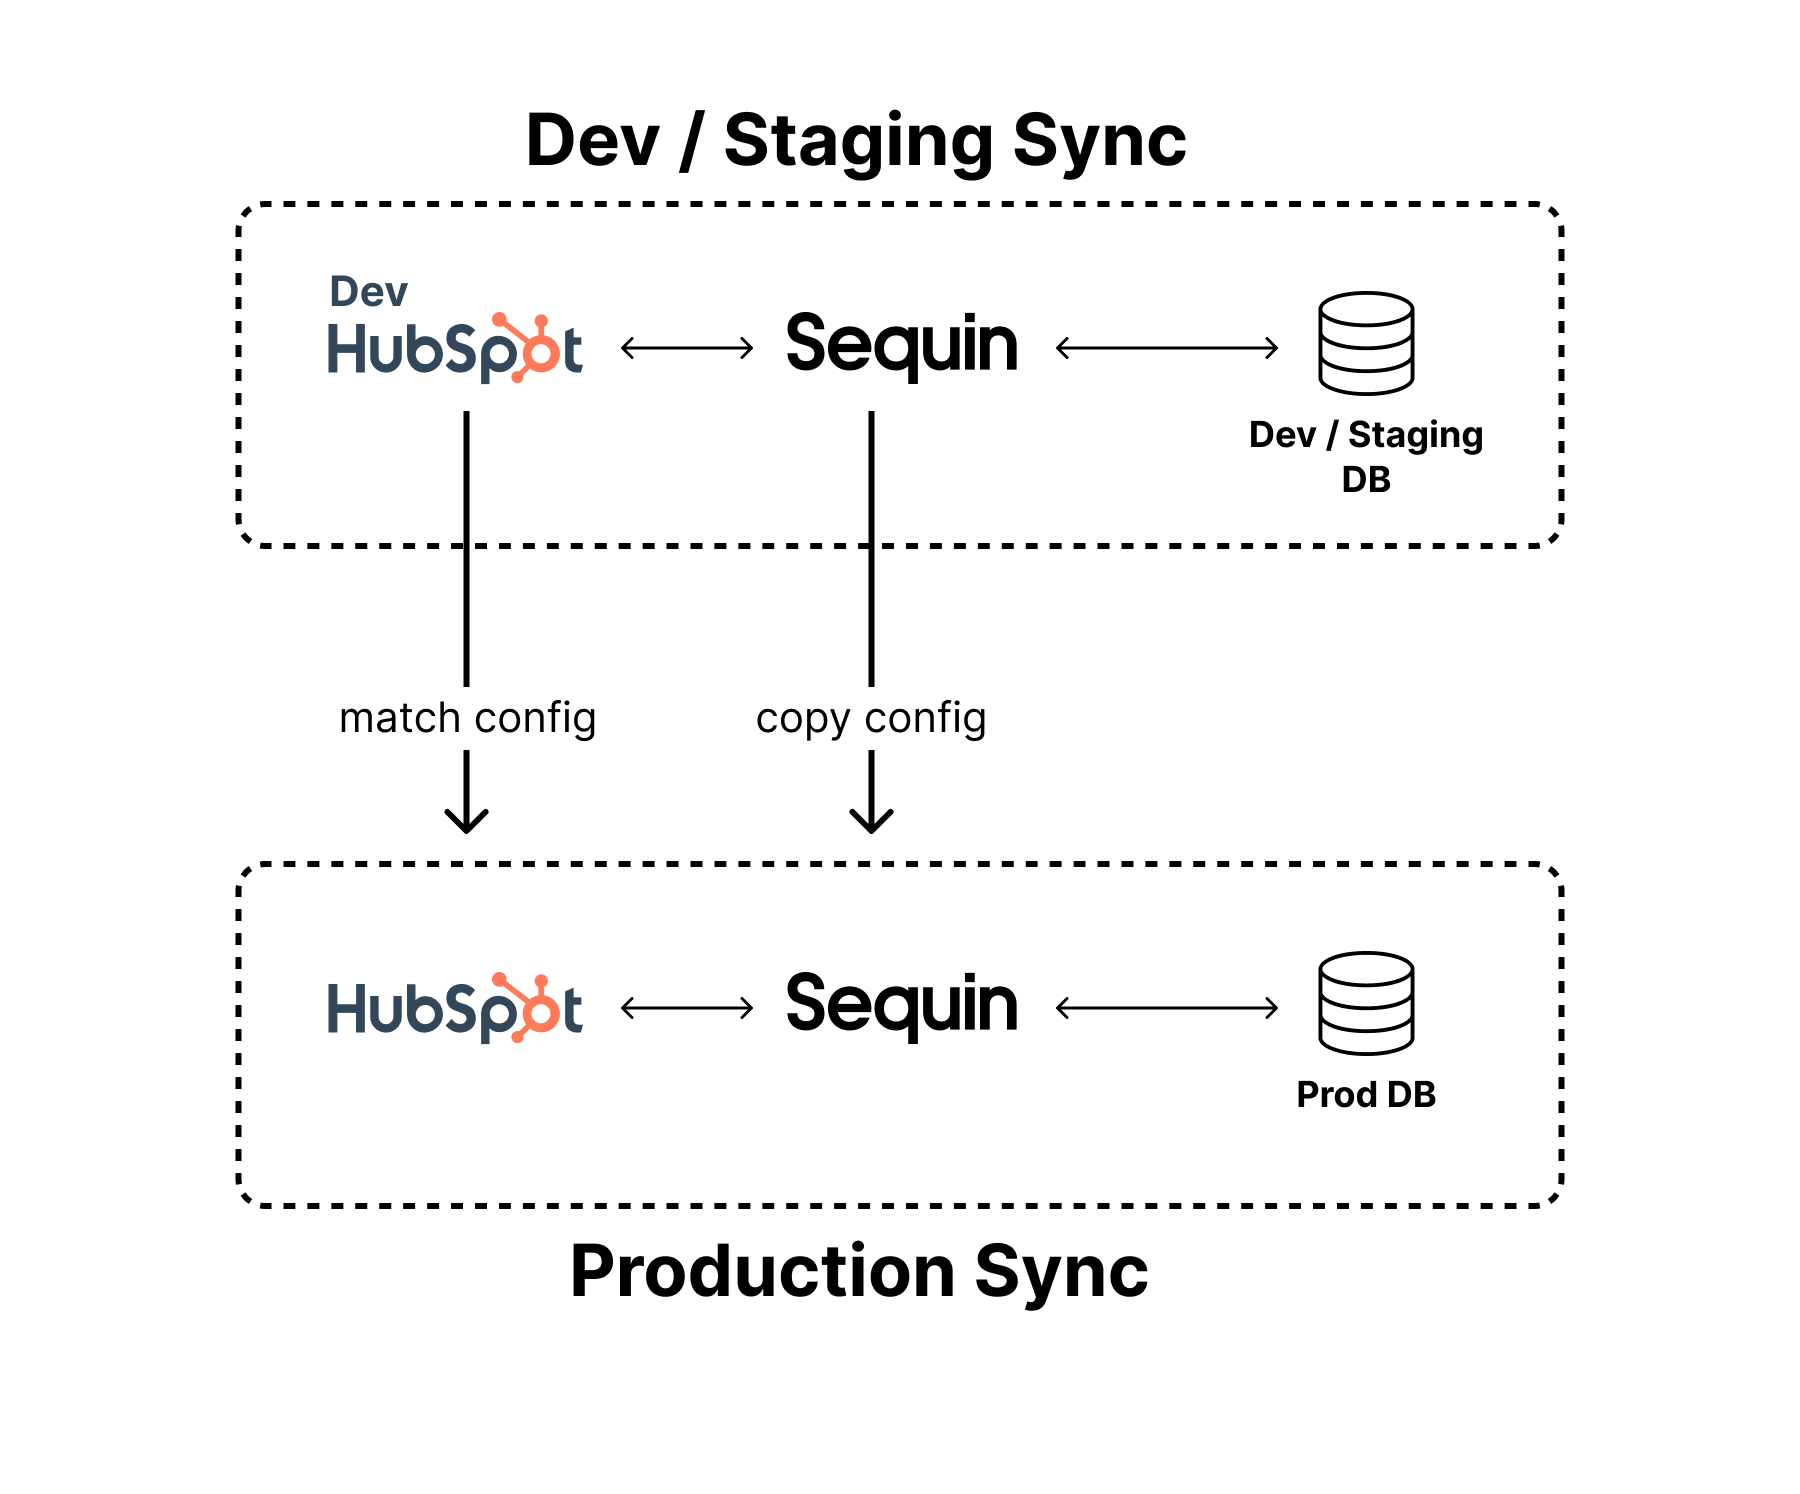 **Step 1:** Setup a [HubSpot development account](https://developers.hubspot.com/) to create a new HubSpot instance you can use for development.
**Step 2:** Sync your HubSpot development account as a new sync in Sequin. Follow the steps at the [start of this guide](#setup-your-hubspot-sync).
**Step 3:** Make changes and migrations using this development account and sync.
**Step 4:** When you are ready to deploy these changes to production, copy the changes from your development sync in Sequin to your production sync:
1. First, make sure any new properties or settings in your dev HubSpot instance have been applied to your production instance.
2. Then, click to edit your production sync in Sequin. In the **Select tables and columns** section, click the **Copy config from...** button. Select your dev sync to apply your development sync configuration to your production sync.
3. Click **Update**.
Sequin will run a migration to apply any schema changes.
**Step 5:** In Prisma, update your **schema.prisma** file to reflect your dev environment, then run the `prisma generate` command to update your client.
**Step 1:** Setup a [HubSpot development account](https://developers.hubspot.com/) to create a new HubSpot instance you can use for development.
**Step 2:** Sync your HubSpot development account as a new sync in Sequin. Follow the steps at the [start of this guide](#setup-your-hubspot-sync).
**Step 3:** Make changes and migrations using this development account and sync.
**Step 4:** When you are ready to deploy these changes to production, copy the changes from your development sync in Sequin to your production sync:
1. First, make sure any new properties or settings in your dev HubSpot instance have been applied to your production instance.
2. Then, click to edit your production sync in Sequin. In the **Select tables and columns** section, click the **Copy config from...** button. Select your dev sync to apply your development sync configuration to your production sync.
3. Click **Update**.
Sequin will run a migration to apply any schema changes.
**Step 5:** In Prisma, update your **schema.prisma** file to reflect your dev environment, then run the `prisma generate` command to update your client.