> ## Documentation Index
> Fetch the complete documentation index at: https://sequin.io/docs/llms.txt
> Use this file to discover all available pages before exploring further.
# Metabase
**These docs are out of date.**
We've made significant changes and improvements to the product since these docs were written. As such, they don't reflect how Sequin works today.
We're keeping them up here a bit longer before permanently archiving them.
[Go to docs home](/docs/).
# Build a dashboard using Airtable and Metabase
Sequin makes it easy for you to connect [Airtable](https://airtable.com) to [Metabase](https://metabase.com) so you can quickly build dashboards and answer questions using the data in your Airtable bases.
## What is Metabase
[Metabase](https://metabase.com) is a powerful platform for asking questions of data. Sequin allows you to connect all your Airtable data to Metabase.
While Metabase doesn’t have native support for Airtable, it does come with first-class support for Postgres. So we’re going to use [Sequin](https://sequin.io) to turn your Airtable base into a Postgres database that plugs right into Metabase.
 Then, in the background, Sequin will do all the hard work to keep the data current so your metrics are always up to date.
## Airtable Setup
For this tutorial, we'll use [Airtable's inventory tracking template](https://airtable.com/templates/local-business/expDrHGuyjSQlrKTq/inventory-tracking):
Then, in the background, Sequin will do all the hard work to keep the data current so your metrics are always up to date.
## Airtable Setup
For this tutorial, we'll use [Airtable's inventory tracking template](https://airtable.com/templates/local-business/expDrHGuyjSQlrKTq/inventory-tracking):
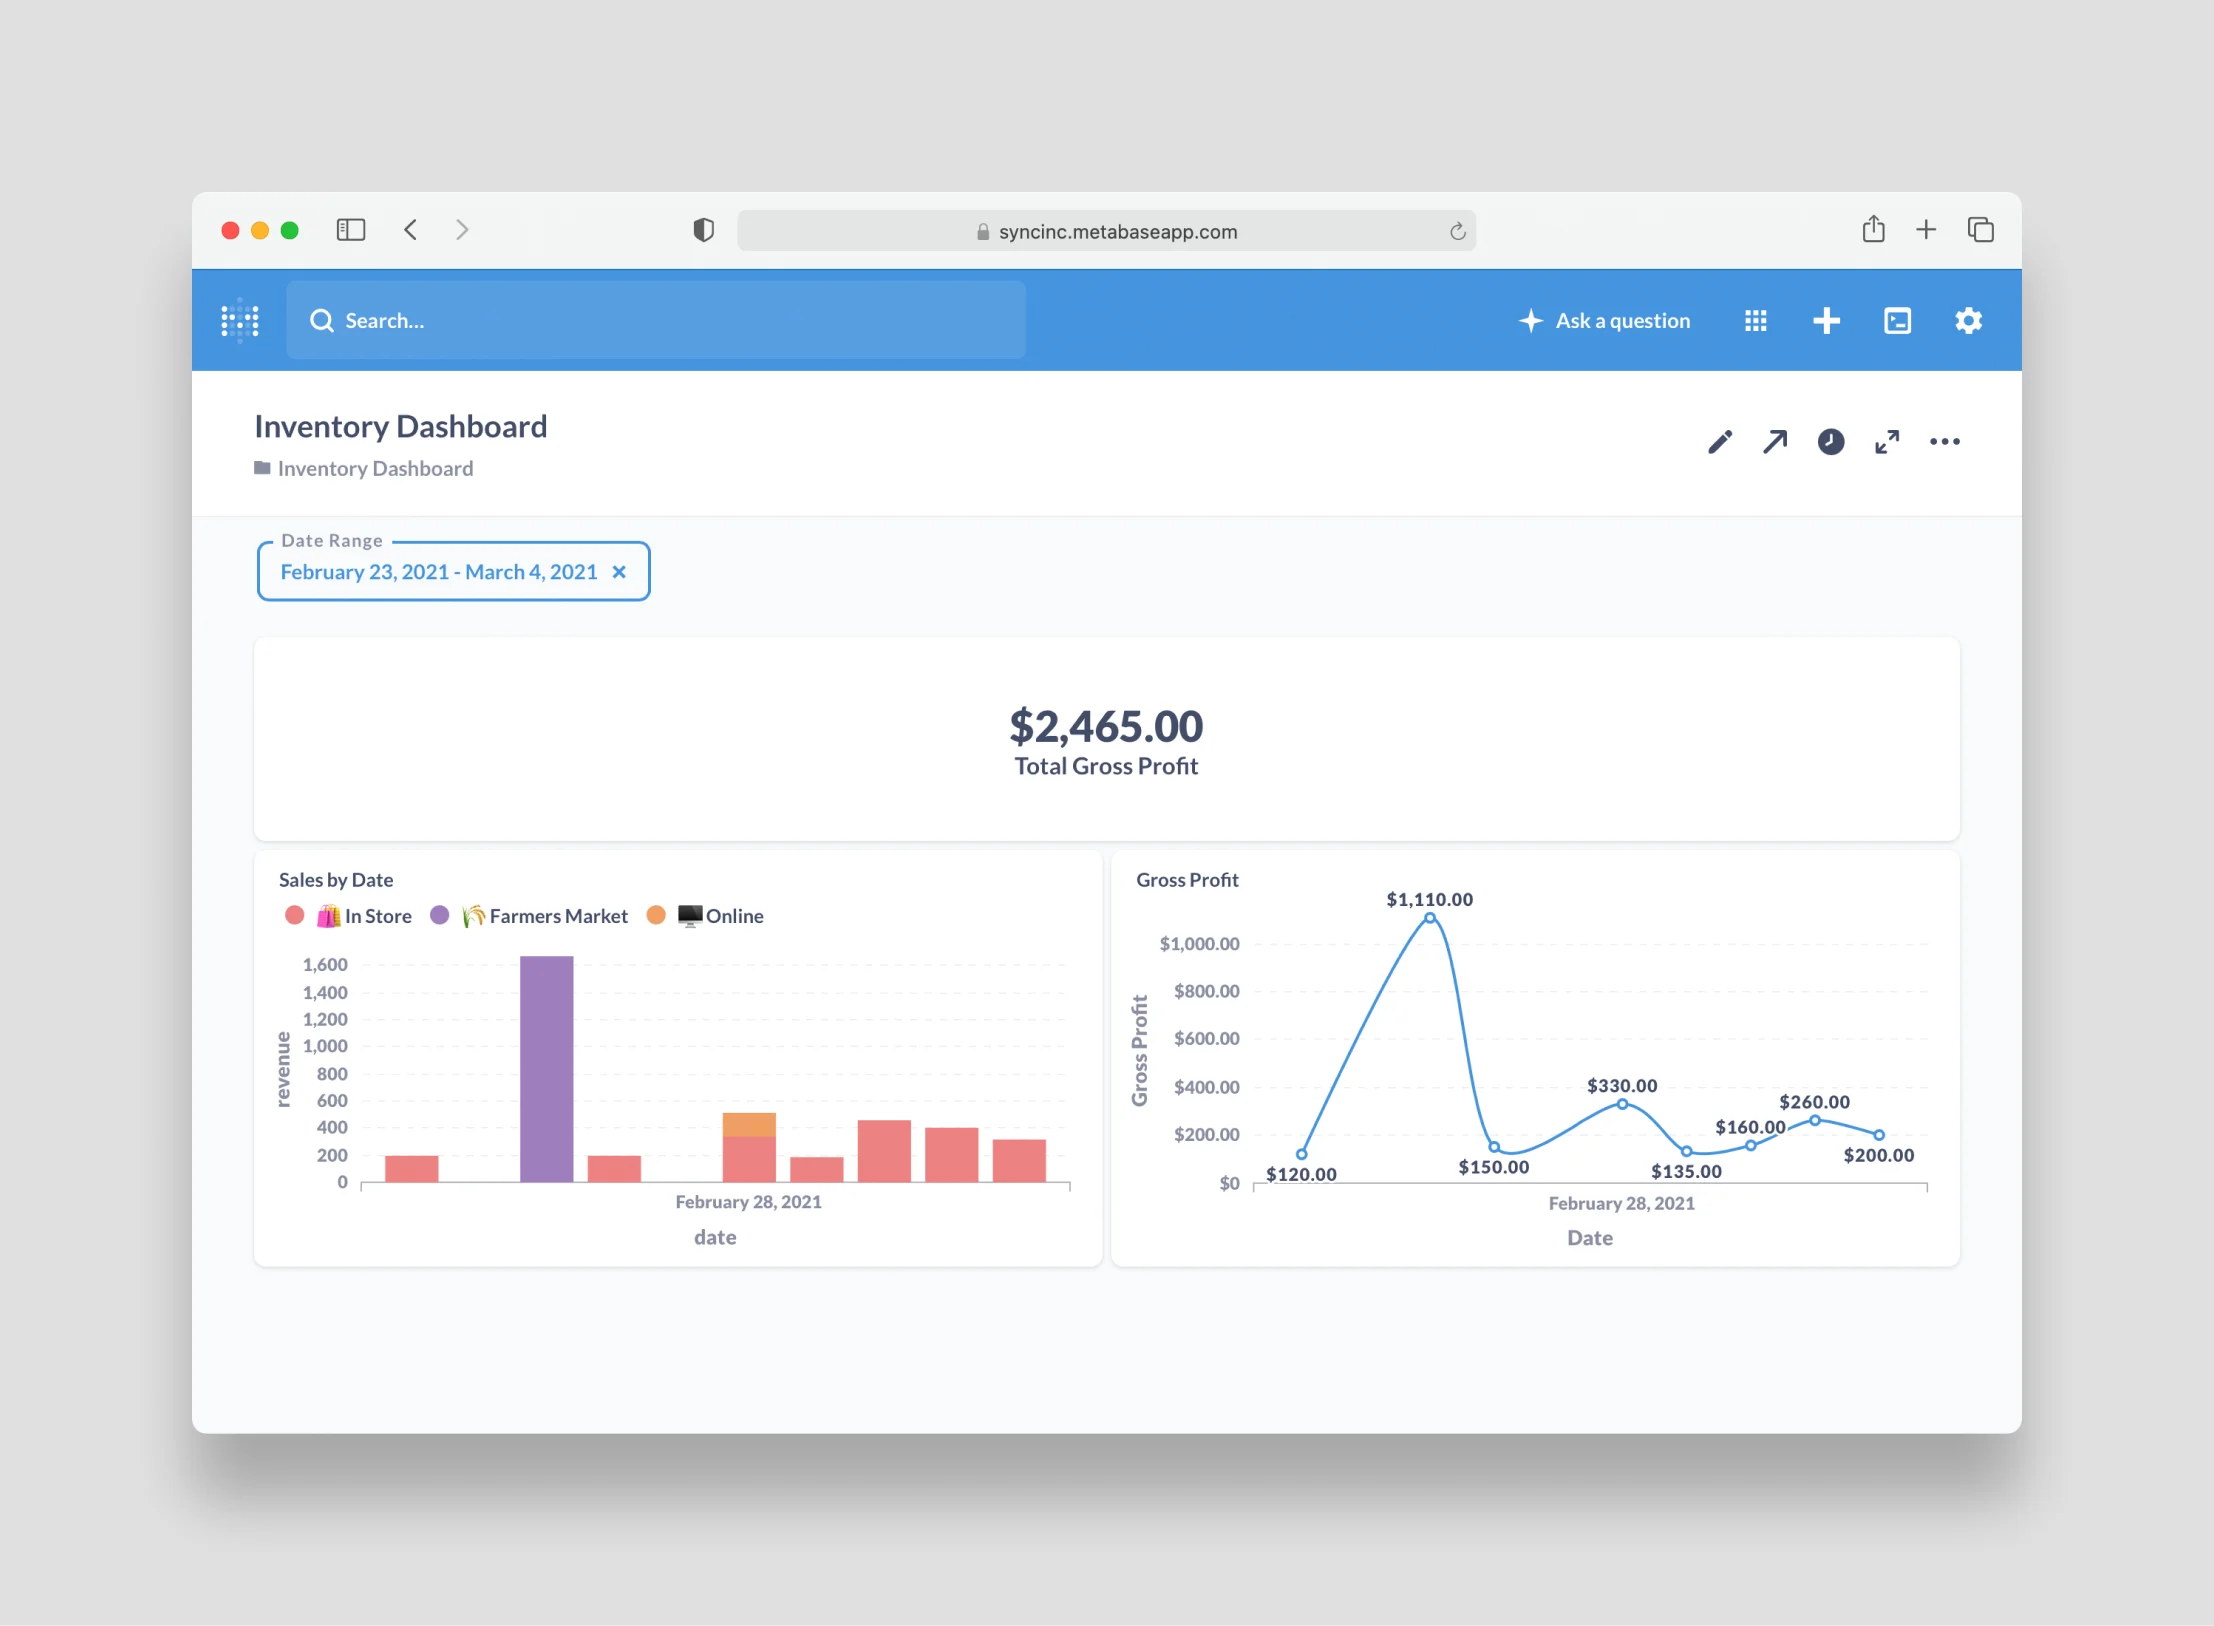
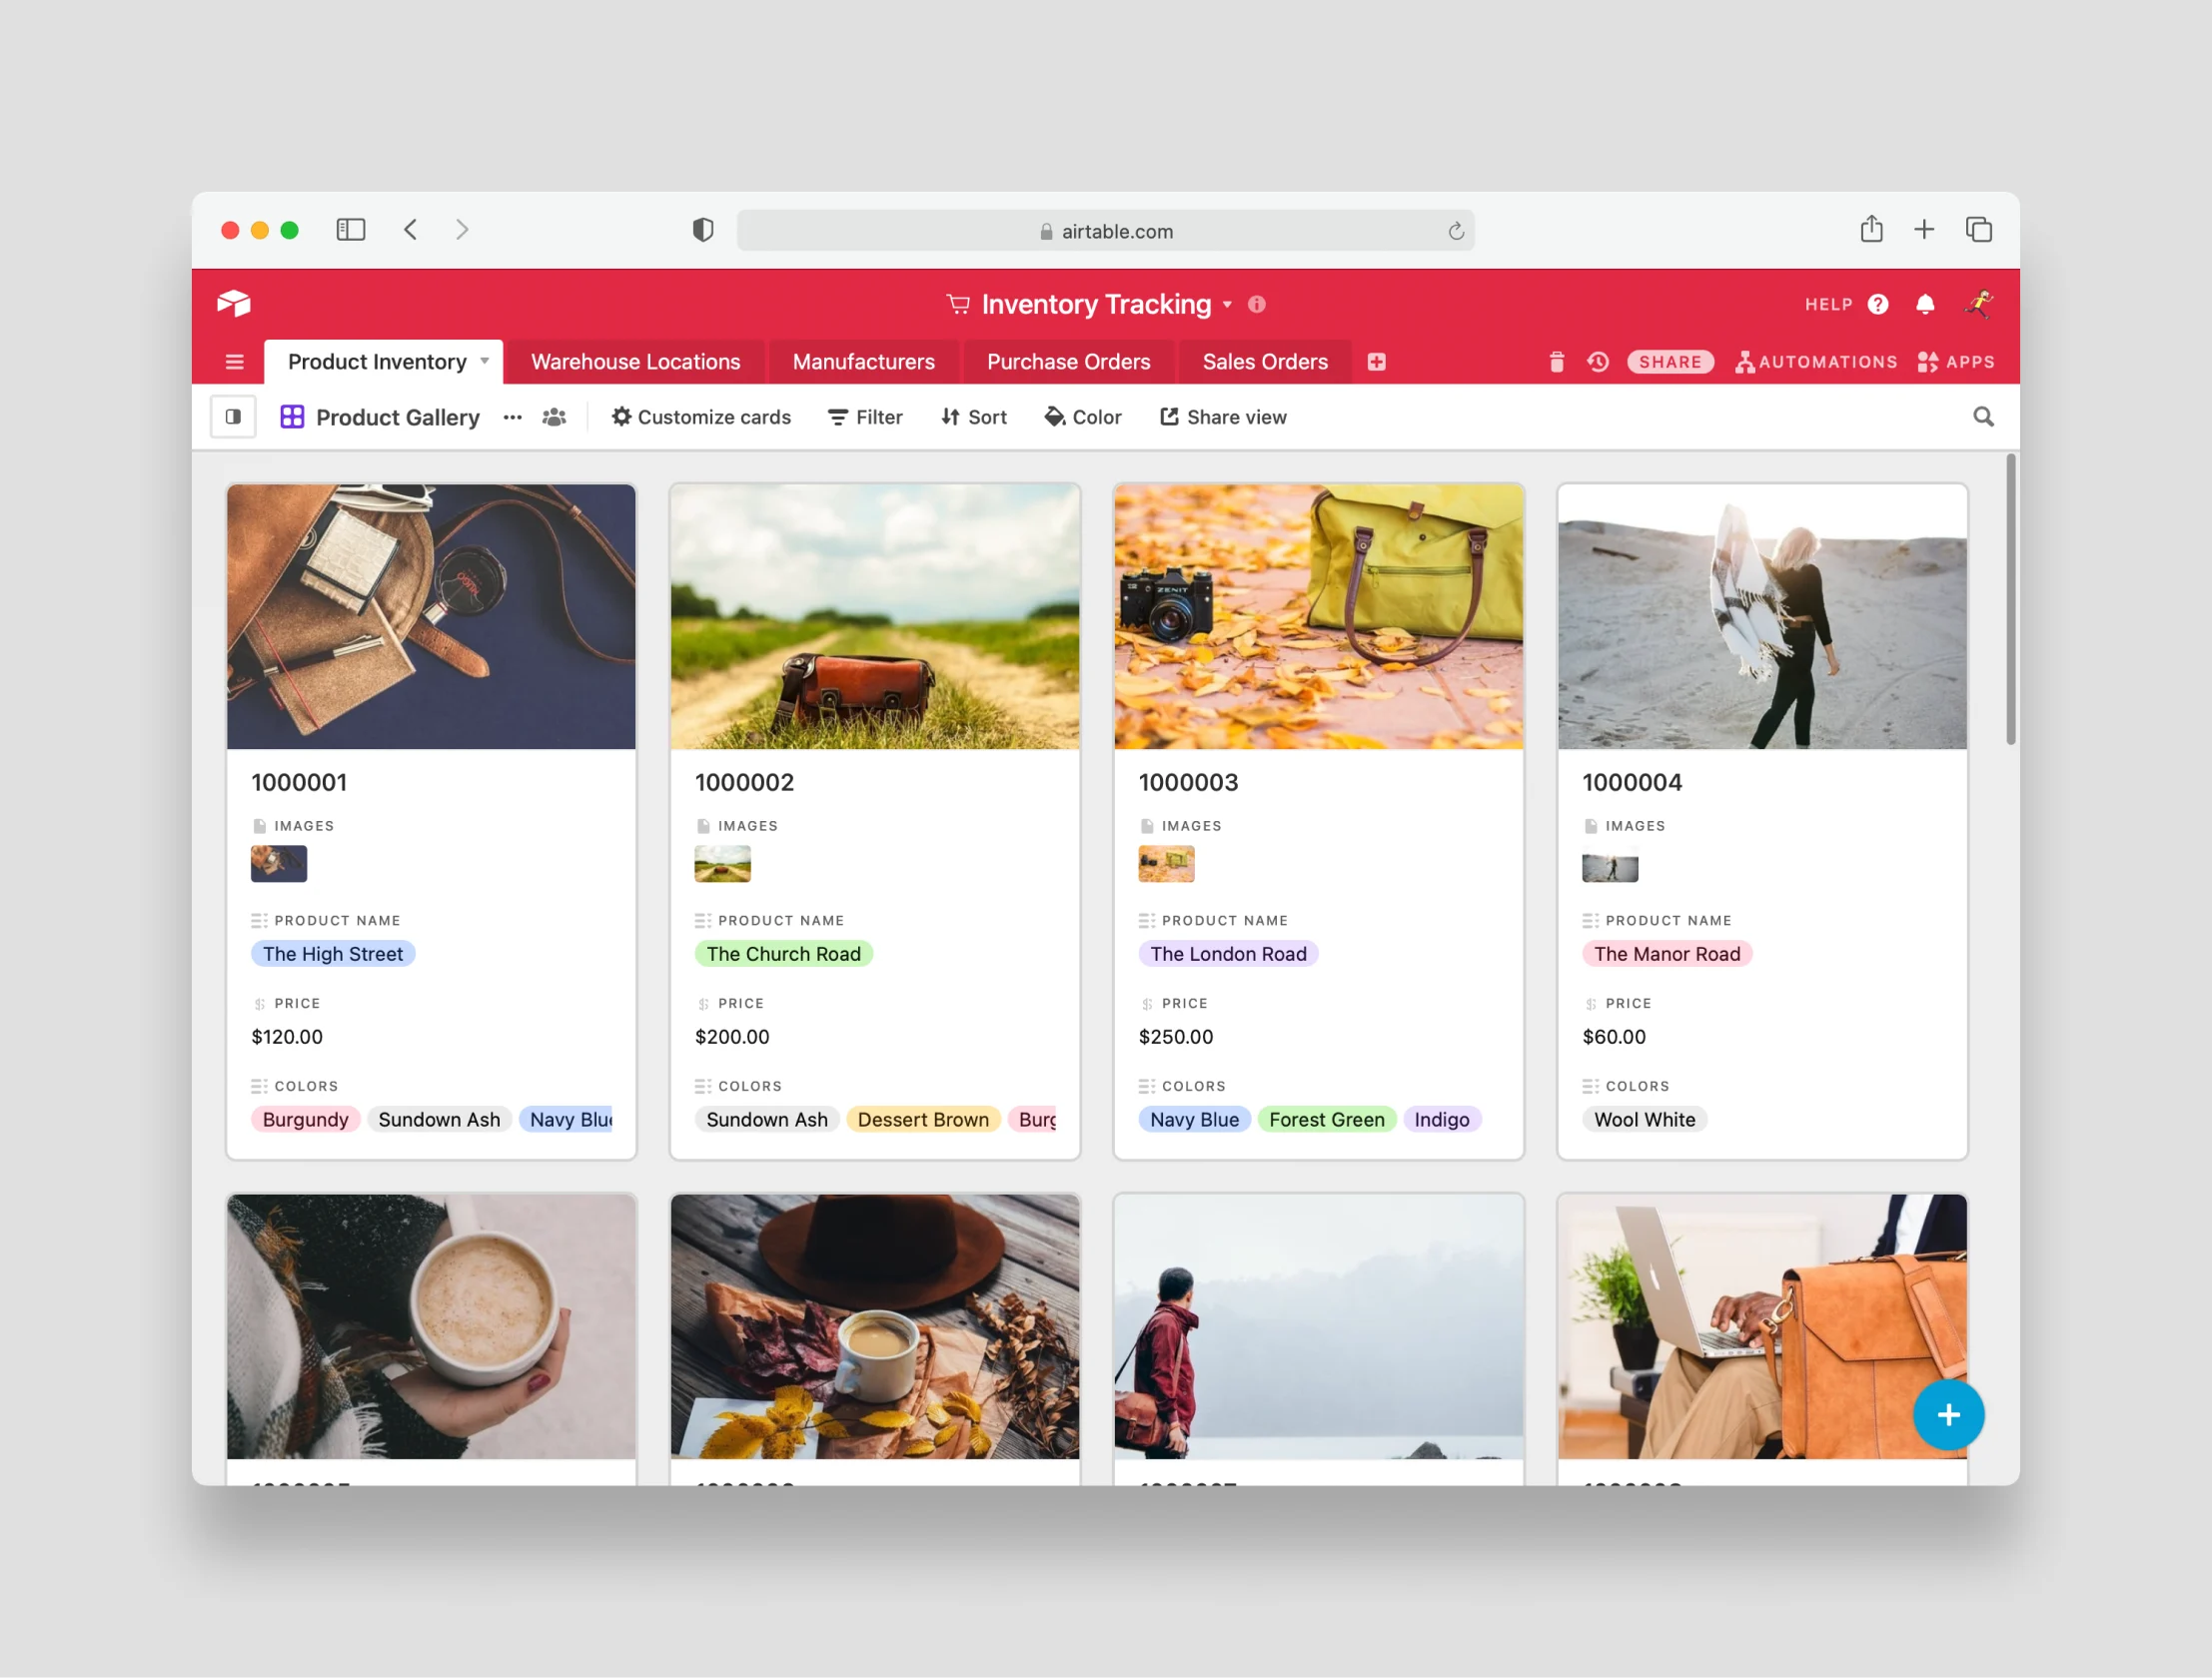 This base contains simple data around inventory, orders, and sales that almost any business selling products or services might work with. You'll use this data to build a dynamic dashboard in Metabase that shows how sales and gross profits are trending:
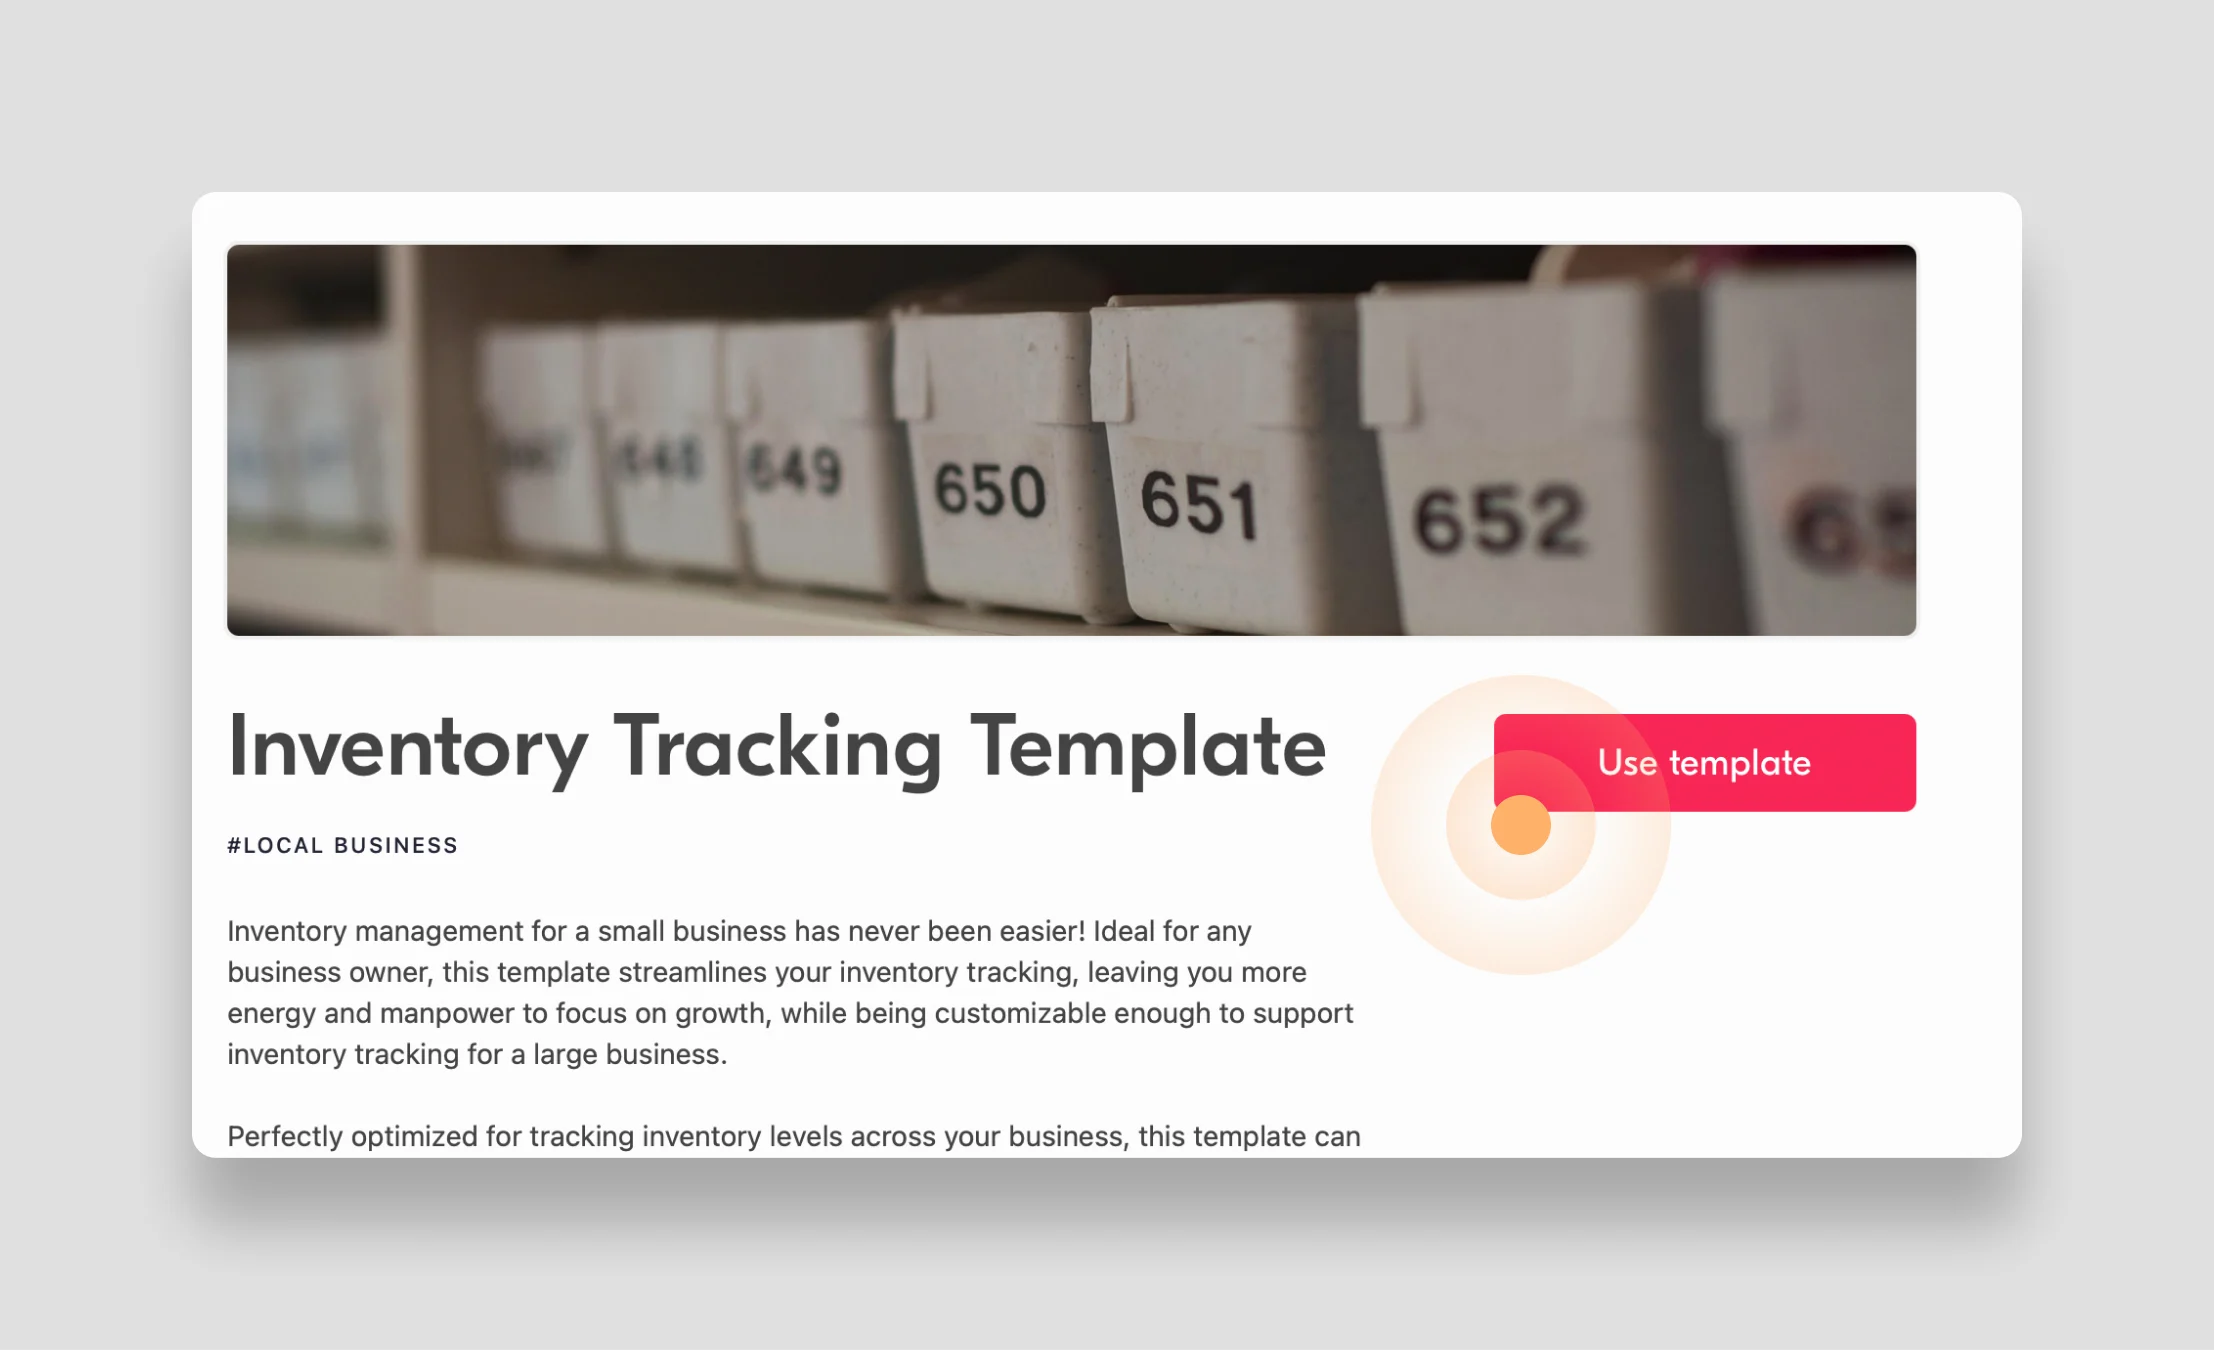
 First, add the Airtable inventory tracking template to your Airtable workspace:
1. Log into your [Airtable workspace](https://airtable.com/) and then open the [inventory tracking template](https://airtable.com/templates/local-business/expDrHGuyjSQlrKTq/inventory-tracking) in a new tab.
2. Click the **Use Template** button to add the inventory tracking template to your workspace.
First, add the Airtable inventory tracking template to your Airtable workspace:
1. Log into your [Airtable workspace](https://airtable.com/) and then open the [inventory tracking template](https://airtable.com/templates/local-business/expDrHGuyjSQlrKTq/inventory-tracking) in a new tab.
2. Click the **Use Template** button to add the inventory tracking template to your workspace.
 ## Sequin Setup
Now, use Sequin to provision a Postgres database that contains all the data in the inventory tracker base:
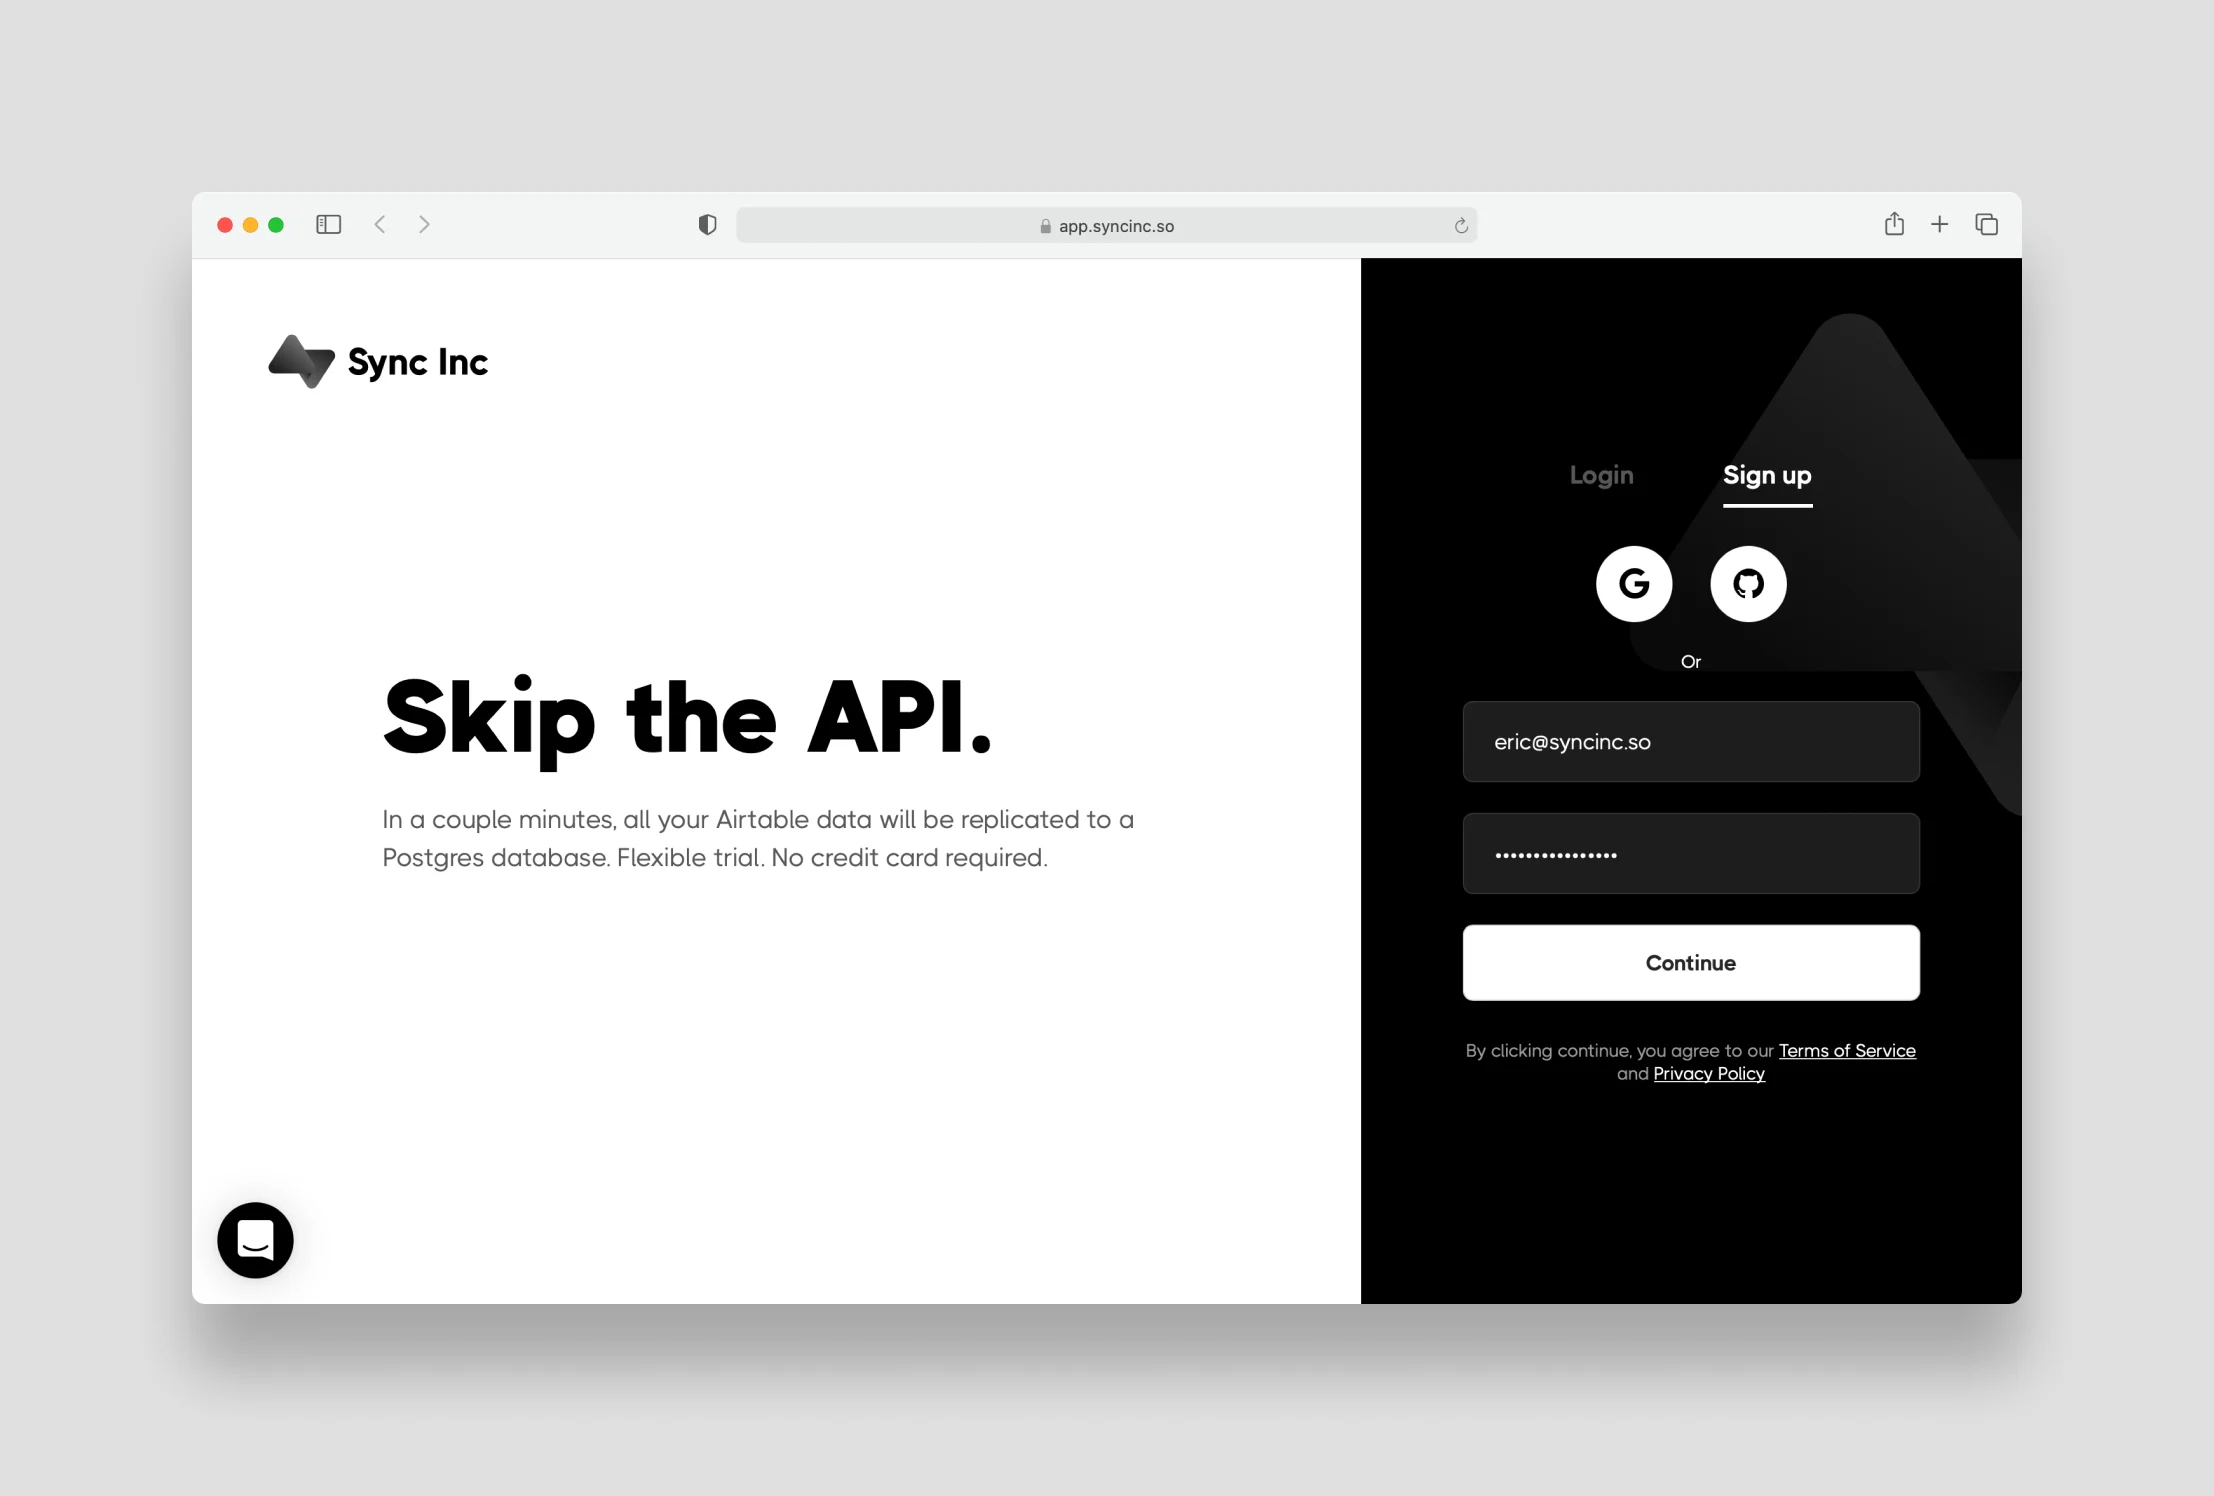
1. Go to [https://console.sequin.io/signup](https://console.sequin.io/signup) and create a Sequin account:
## Sequin Setup
Now, use Sequin to provision a Postgres database that contains all the data in the inventory tracker base:
1. Go to [https://console.sequin.io/signup](https://console.sequin.io/signup) and create a Sequin account:
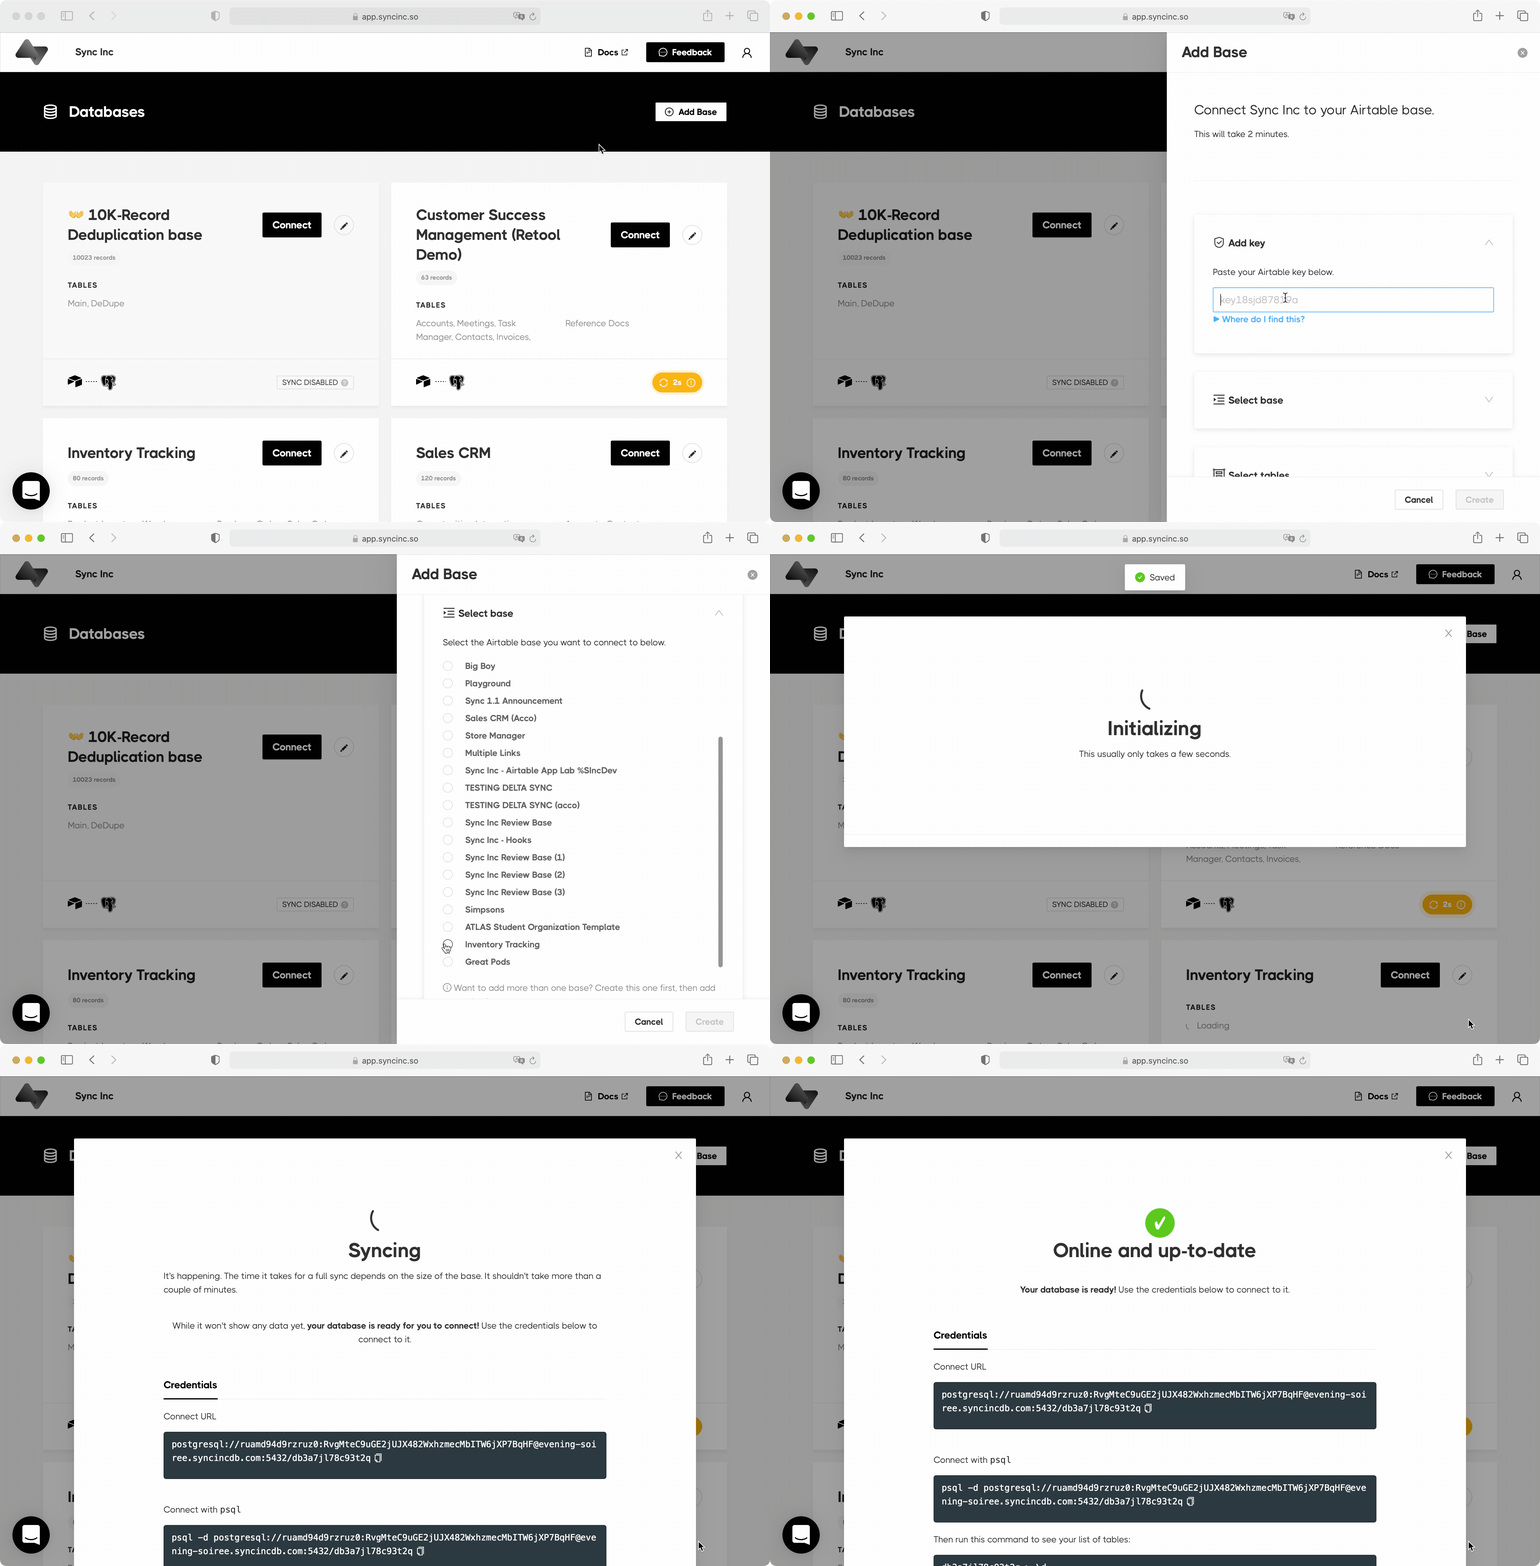
 2. Connect your base to Sequin using the tutorial or check out the [Quickstart guide](https://docs.sequin.io/airtable/setup). It's as easy as copying and pasting your API Key into Sequin, selecting the inventory tracker base you just added to your workspace, and clicking **Create**:
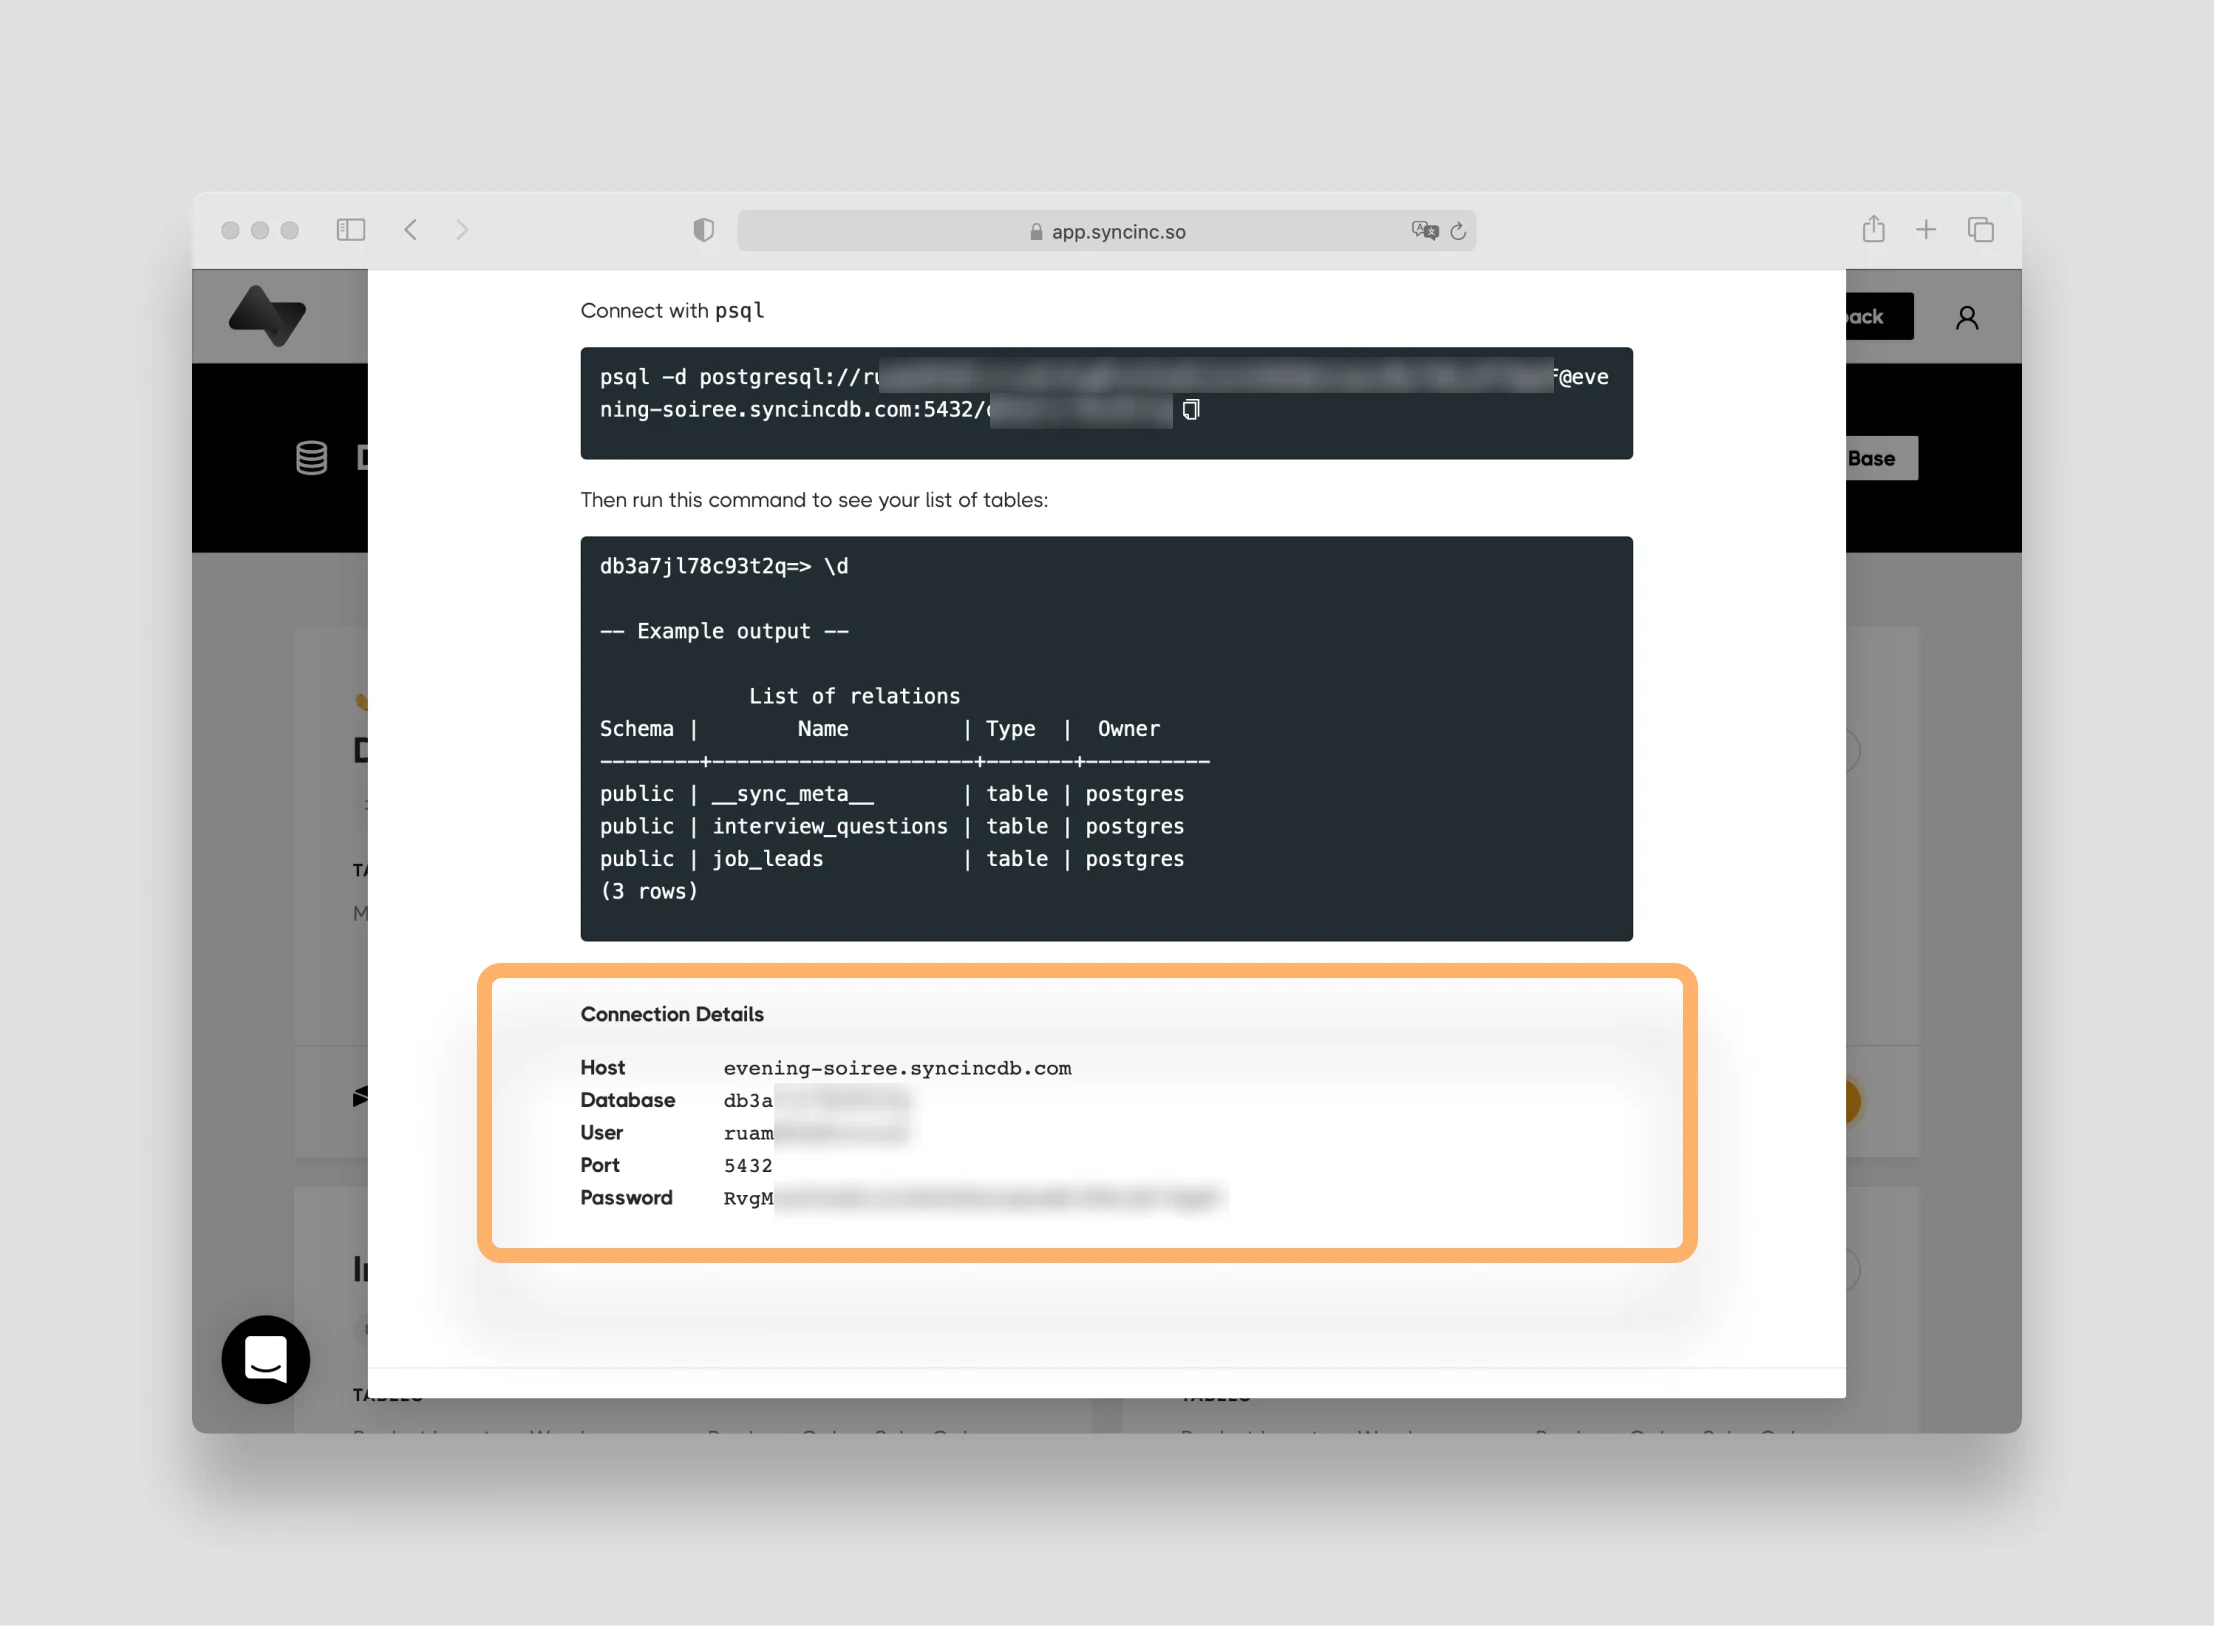
 3. Sequin will immediately provision you a Postgres database and begin syncing all the data in the inventory tracker base. You'll be provided with credentials for you new database. Keep these handy as you'll use them to connect your Sequin database to Metabase:
 ## Metabase Setup
With an Open Source license, you can choose to [install Metabase](https://www.metabase.com/start/) for free if you wish. Or, you can pay to use the hosted version of Metabase - known as [Metabase cloud](https://www.metabase.com/start/).
In this tutorial, we'll us Metabase cloud (which comes with a nice 14 day trial).
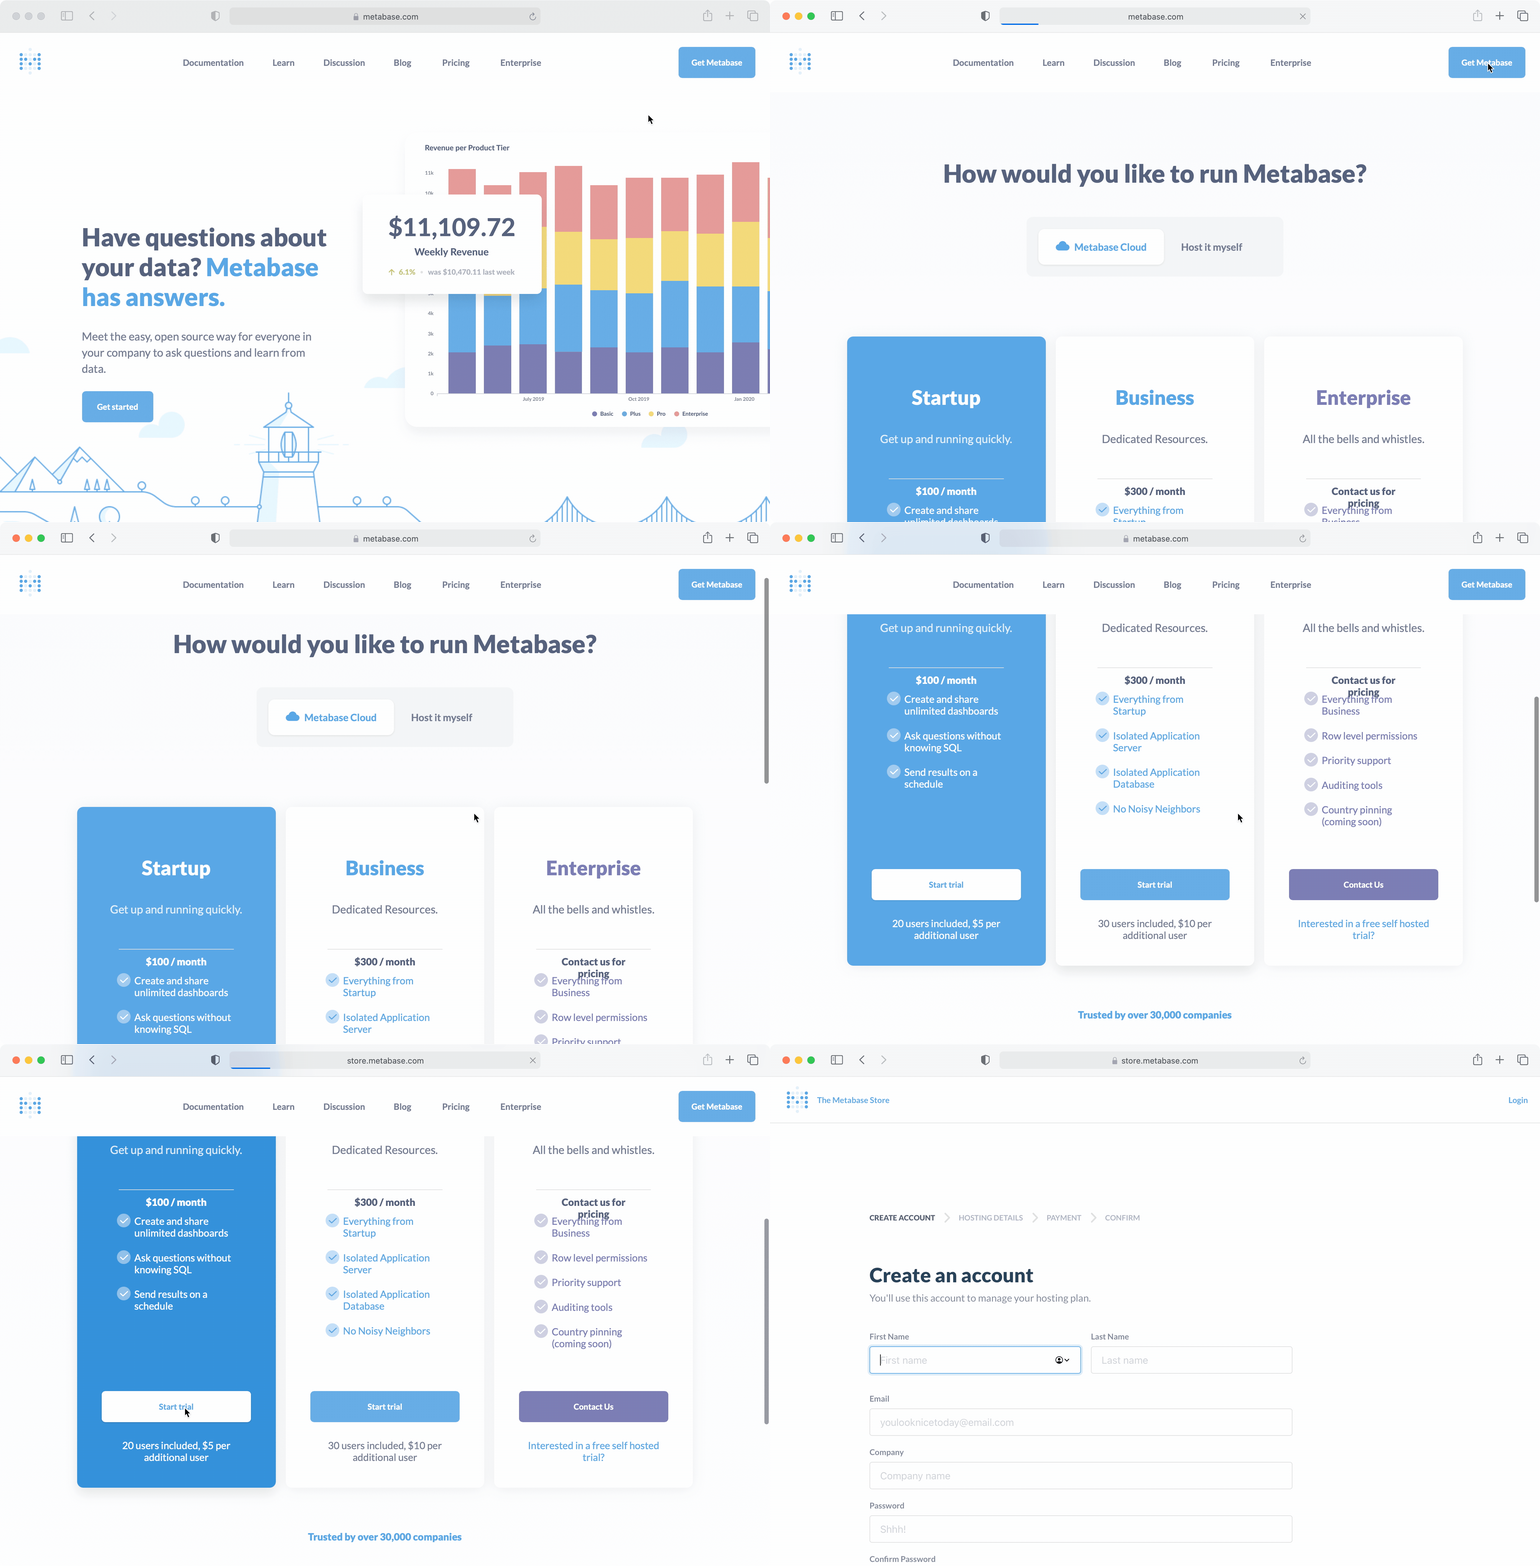
Simply go to [https://www.metabase.com/](https://www.metabase.com/) and create a **Metabase Cloud** account by clicking **Get Metabase** and selecting to start a free trial:
## Metabase Setup
With an Open Source license, you can choose to [install Metabase](https://www.metabase.com/start/) for free if you wish. Or, you can pay to use the hosted version of Metabase - known as [Metabase cloud](https://www.metabase.com/start/).
In this tutorial, we'll us Metabase cloud (which comes with a nice 14 day trial).
Simply go to [https://www.metabase.com/](https://www.metabase.com/) and create a **Metabase Cloud** account by clicking **Get Metabase** and selecting to start a free trial:
 You'll go through several steps to create an account, select your cloud url, and add payment information (you can cancel at any time in the trial).
Metabase will then spin up your cloud instance and email you in a couple minutes when everything is ready.
Then, just login to your new Metabase account.
## Connect Sequin to Metabase
You'll add your Sequin Postgres database to Metabase just as you would any other Postgres database:
1. Click the gear icon in the top right corner and select **Admin**:
You'll go through several steps to create an account, select your cloud url, and add payment information (you can cancel at any time in the trial).
Metabase will then spin up your cloud instance and email you in a couple minutes when everything is ready.
Then, just login to your new Metabase account.
## Connect Sequin to Metabase
You'll add your Sequin Postgres database to Metabase just as you would any other Postgres database:
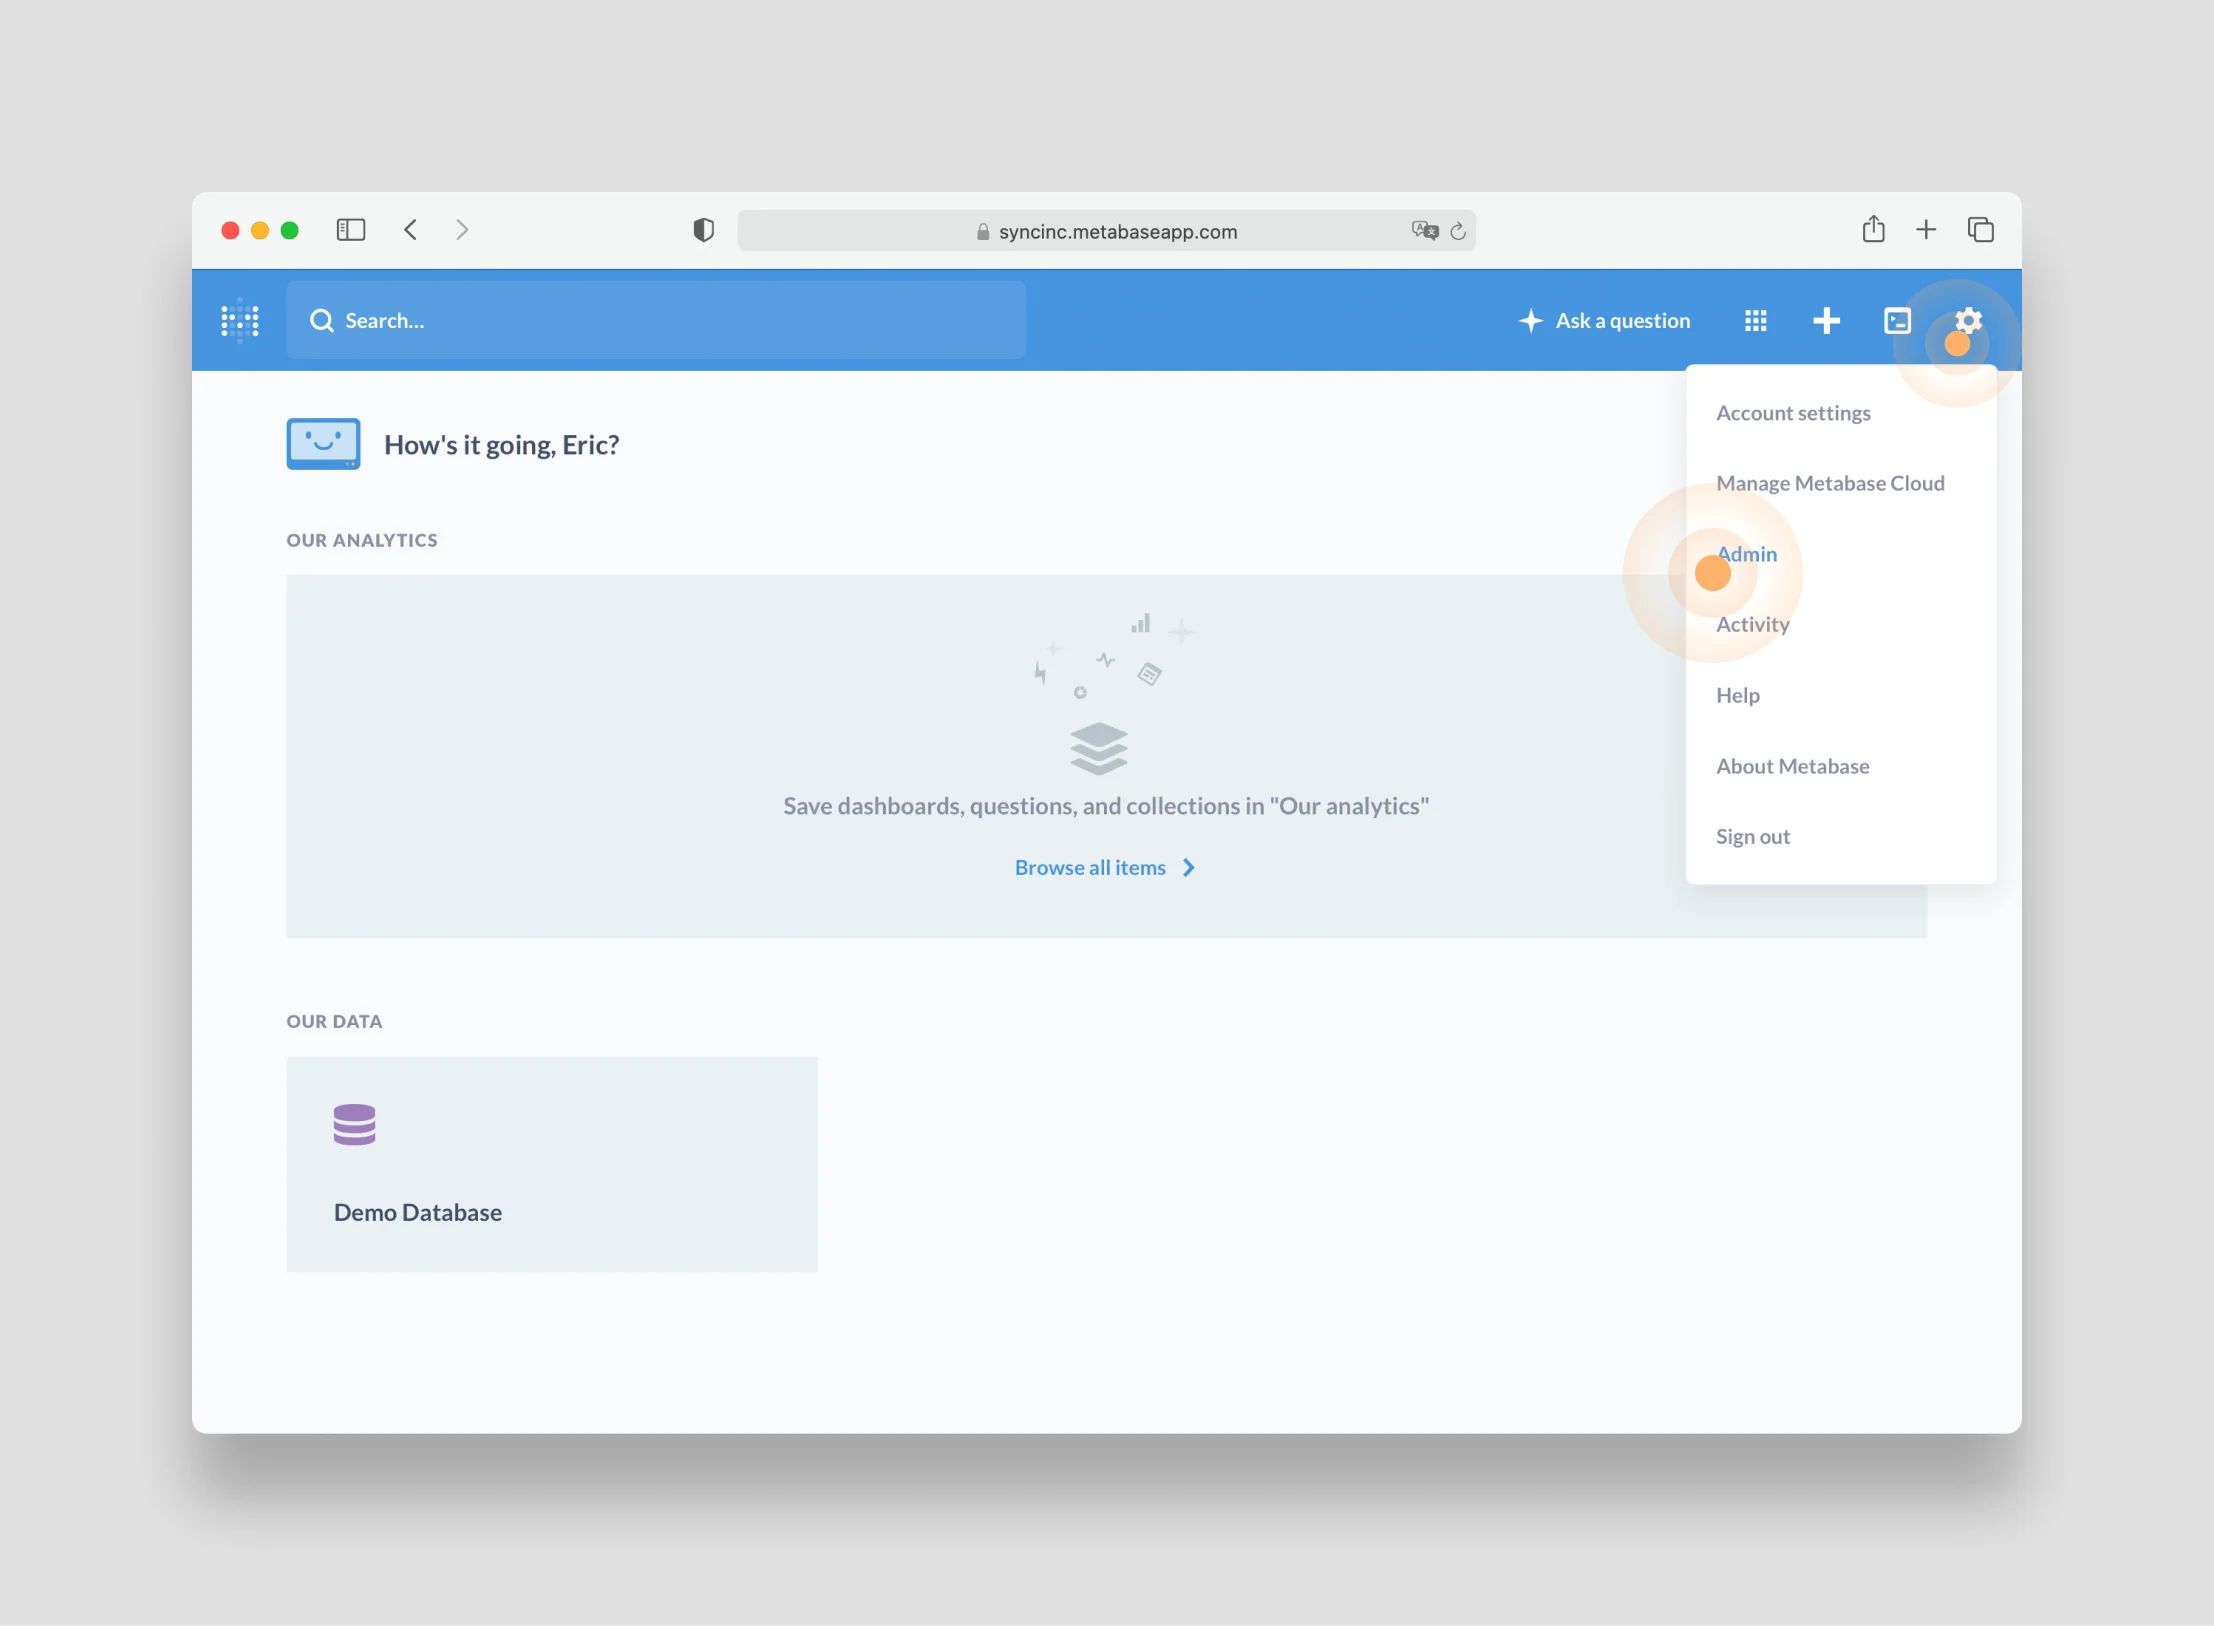
1. Click the gear icon in the top right corner and select **Admin**:
 2. On the Metabase Admin page, select the **Databases** tab and click the blue **Add database** button:
 '
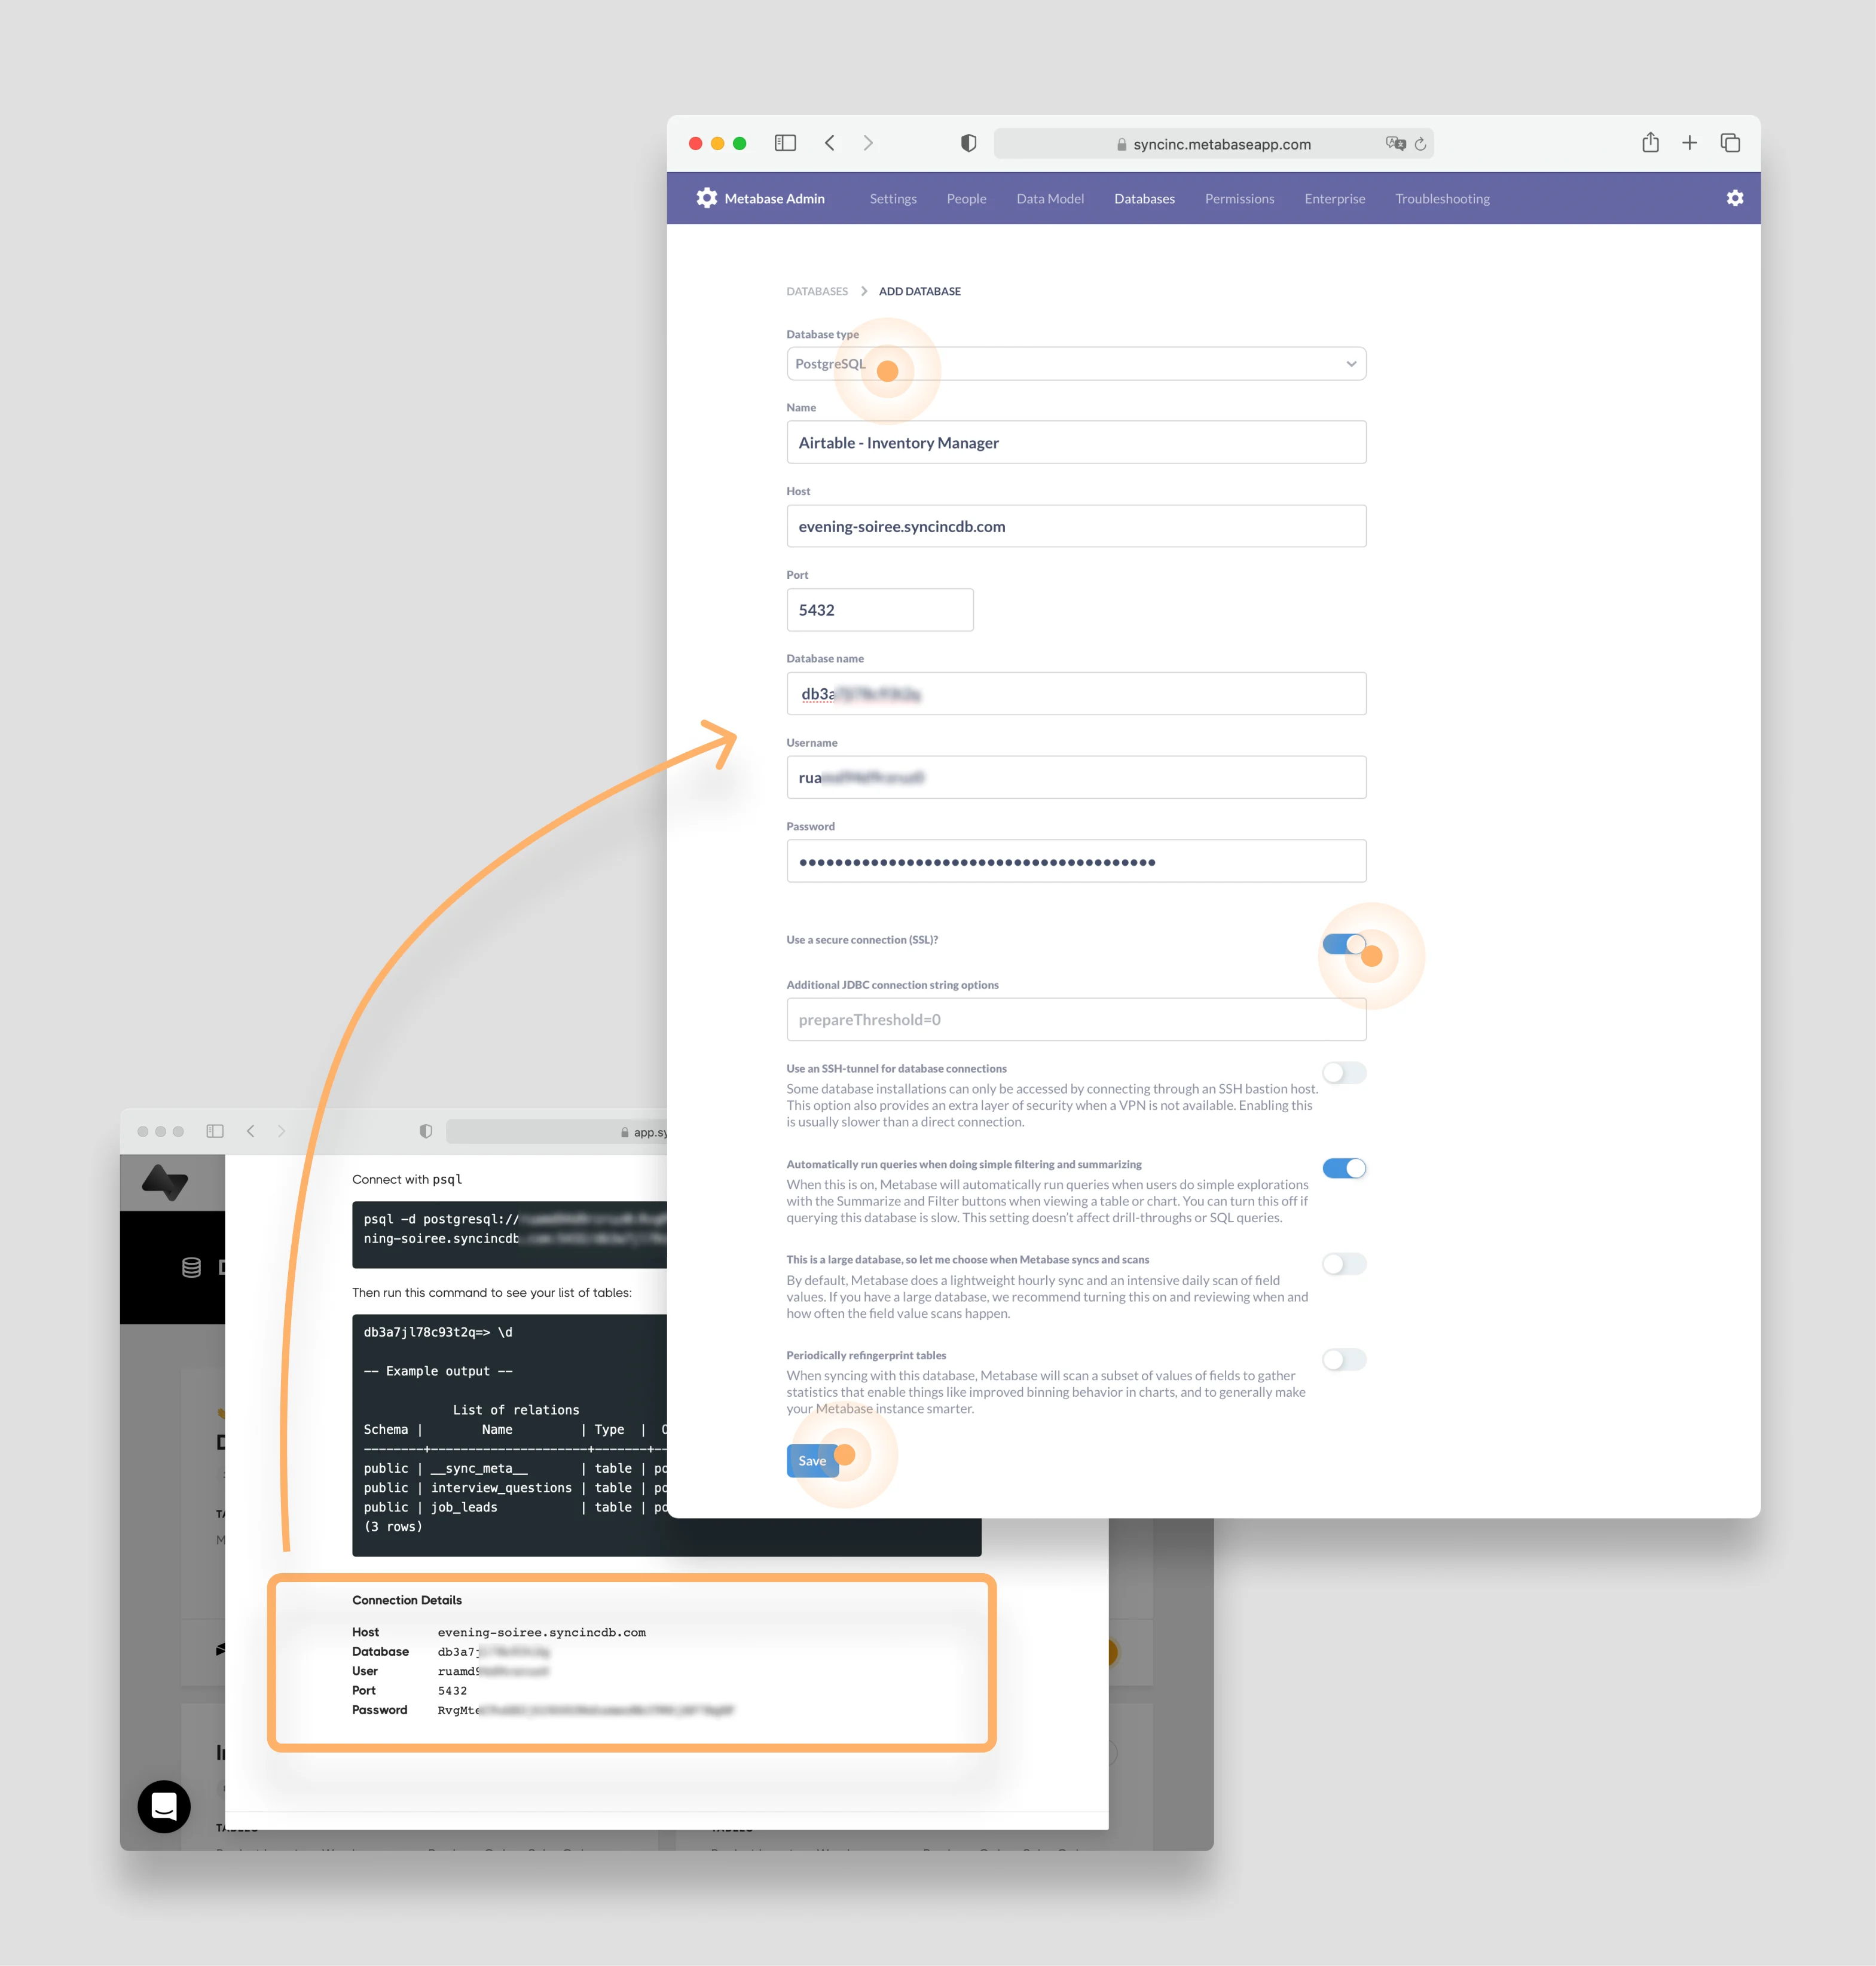
3. On the add database page, select **PostgreSQL** as the database type and give your new database a name - in this case, something like "Airtable - Inventory Manager." Then, enter the **Host**, **Port**, **Database Name**, **Username**, and **Password** for your Sequin database (in case you closed the tab, you can find all this information by clicking the **Connect** button next to the resource in the [Sequin console](https://app.sequin.io)). Lastly, toggle on **SSL** and click the blue **Save** button at the bottom of the page:
'
3. On the add database page, select **PostgreSQL** as the database type and give your new database a name - in this case, something like "Airtable - Inventory Manager." Then, enter the **Host**, **Port**, **Database Name**, **Username**, and **Password** for your Sequin database (in case you closed the tab, you can find all this information by clicking the **Connect** button next to the resource in the [Sequin console](https://app.sequin.io)). Lastly, toggle on **SSL** and click the blue **Save** button at the bottom of the page:
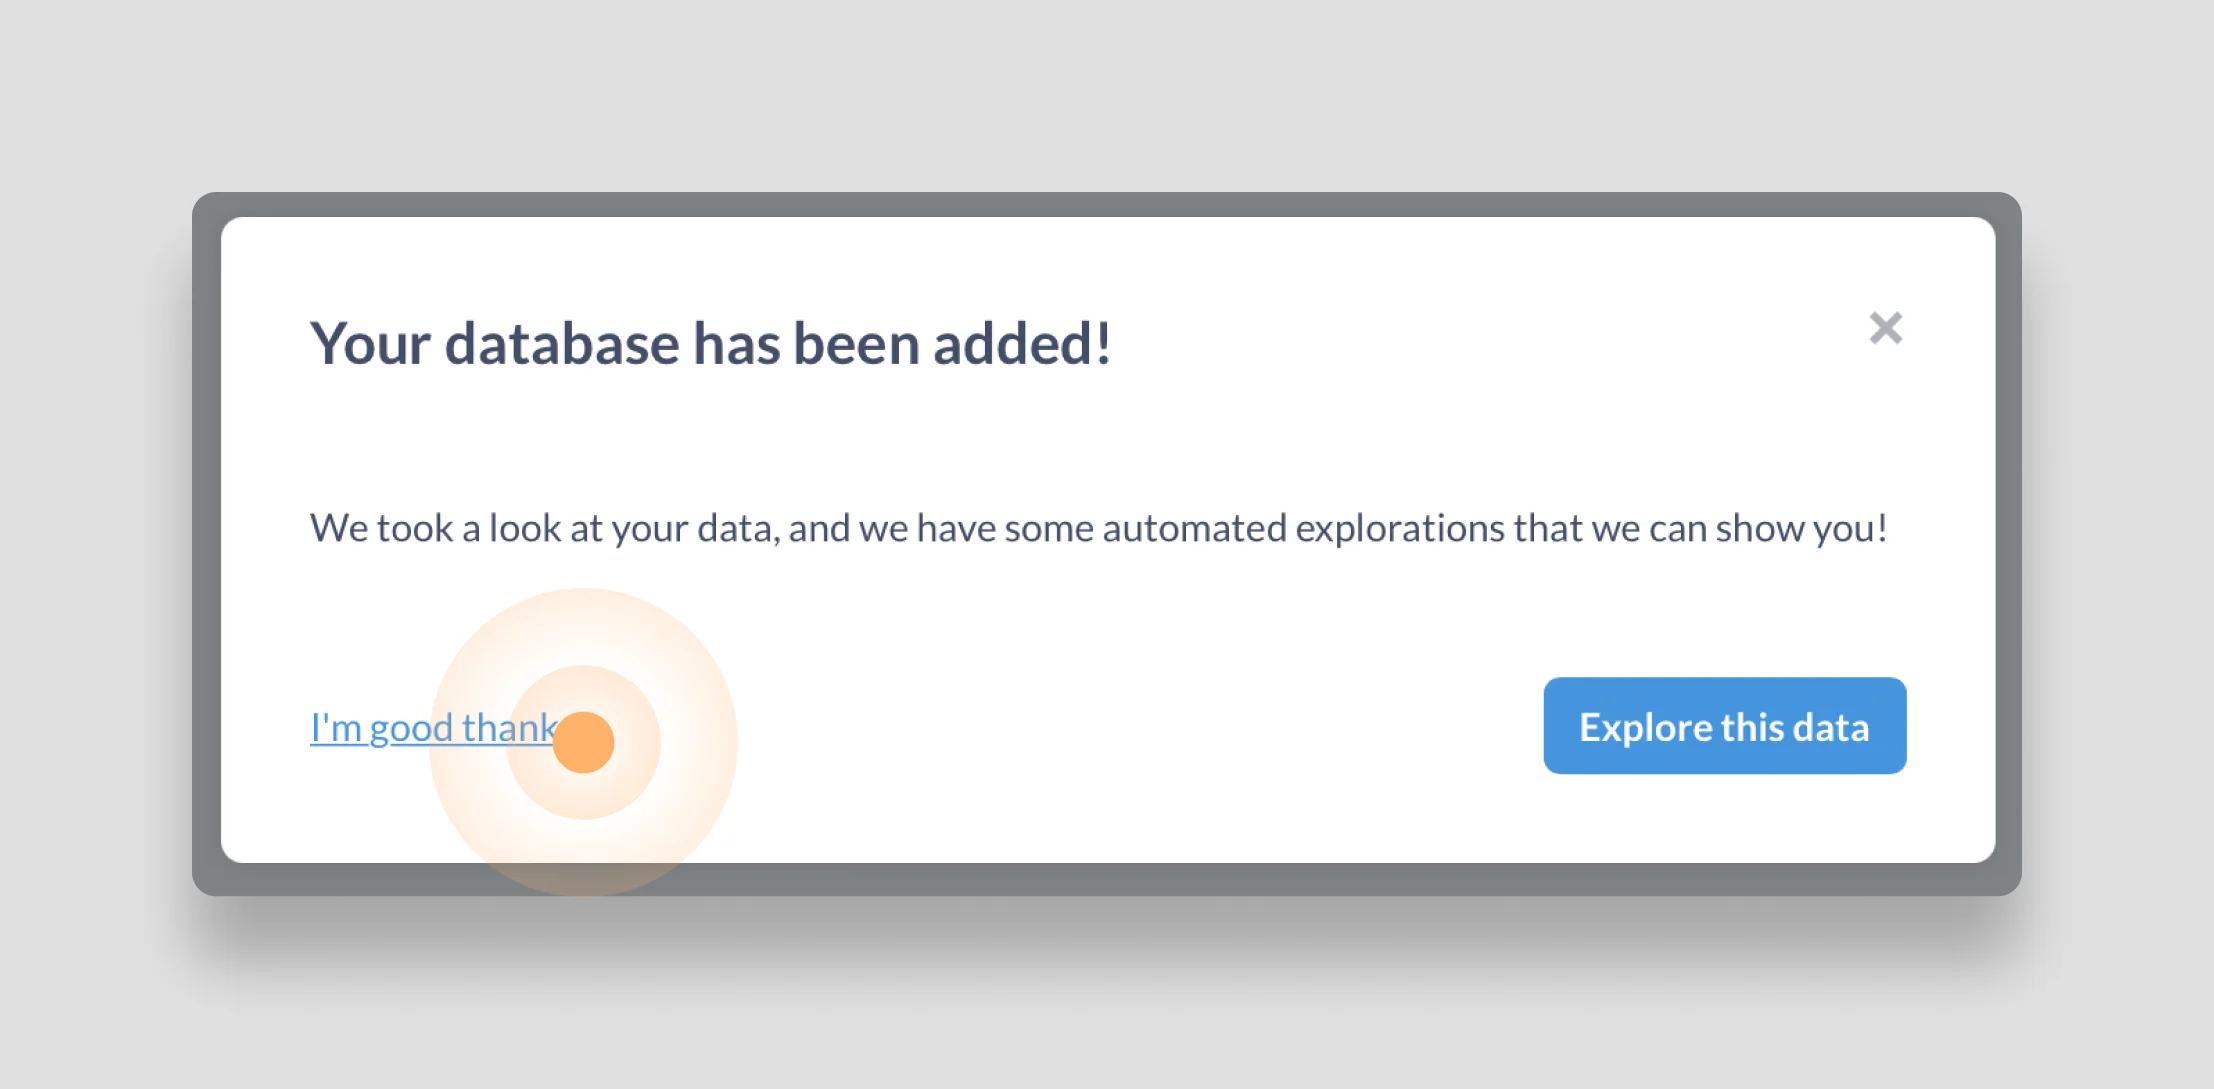
 4. Metabase will confirm it can connect to your Sequin Postgres database and present you with a success modal. Click the **I'm good thanks** link to close the modal:
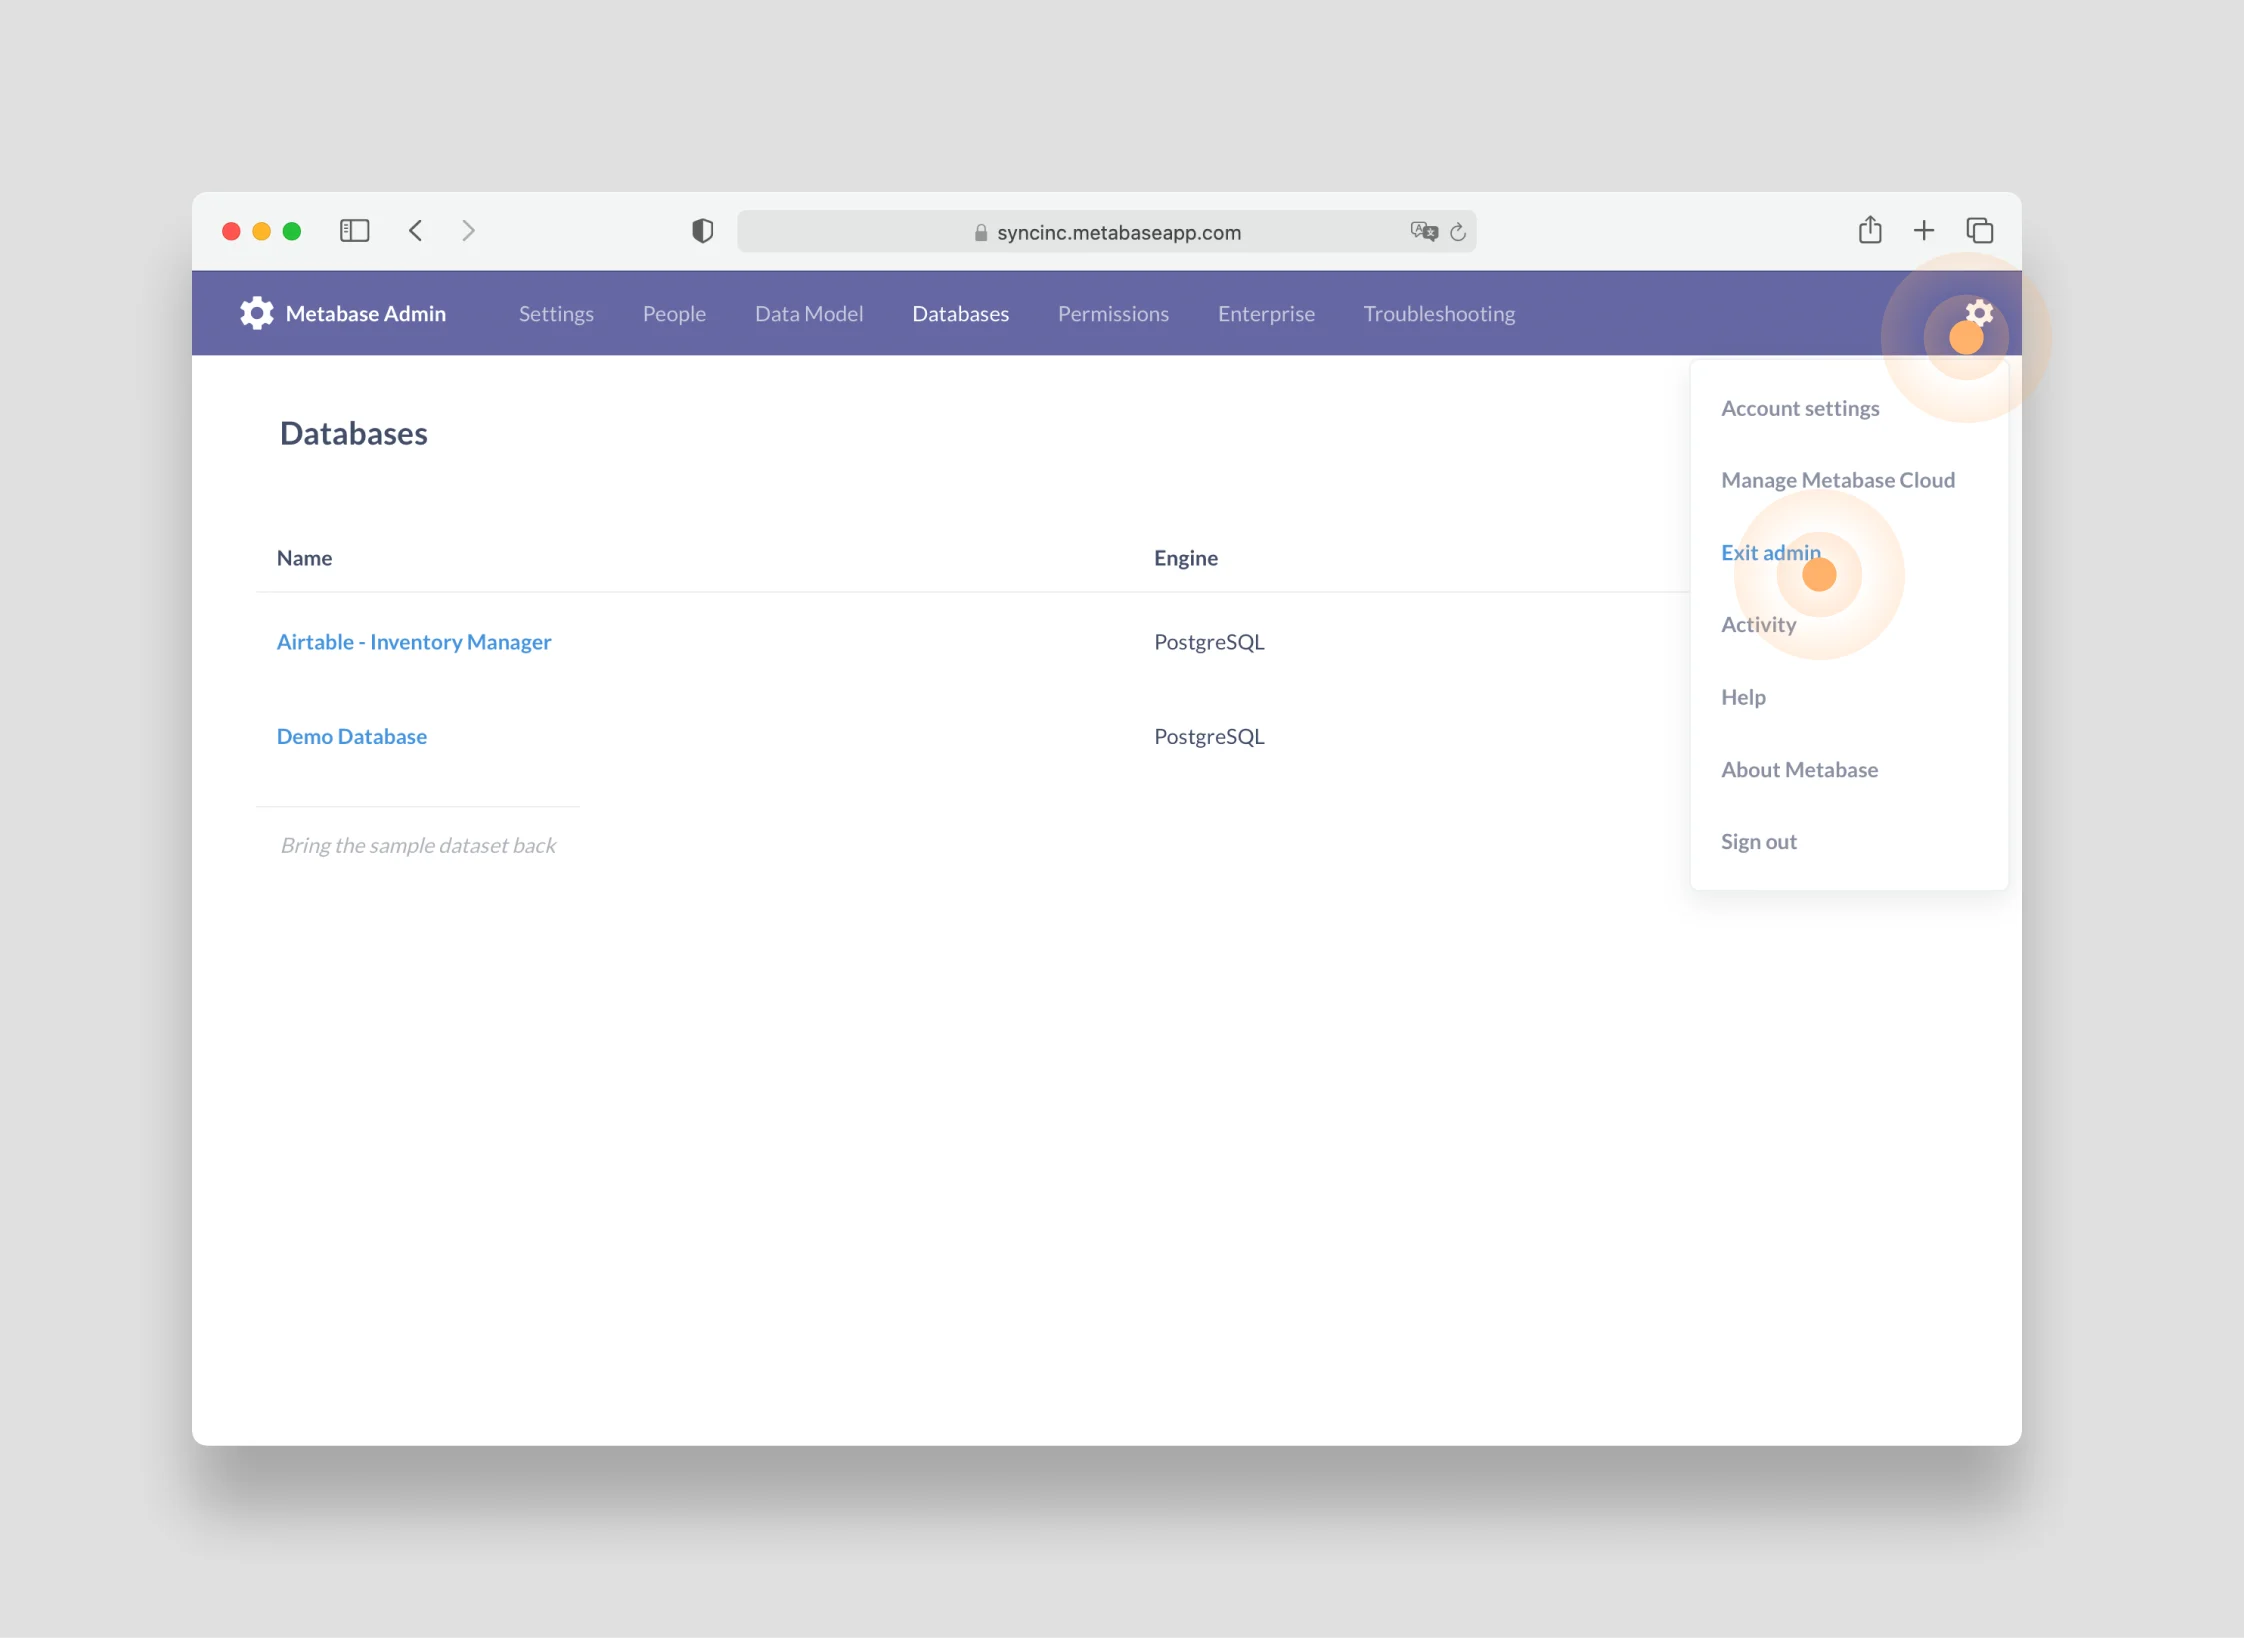
 5. You'll see that your new database has been added! You can now exit the admin page by clicking the gear icon in the top right corner and selecting **Exit admin**:
 ## Create a new dashboard
All your Airtable data is now accessible in Metabase. Now, you'll use Metabase to ask questions of your data and build a dashboard.
Before you start querying your Airtable data and building visualizations, set up your dashboard:
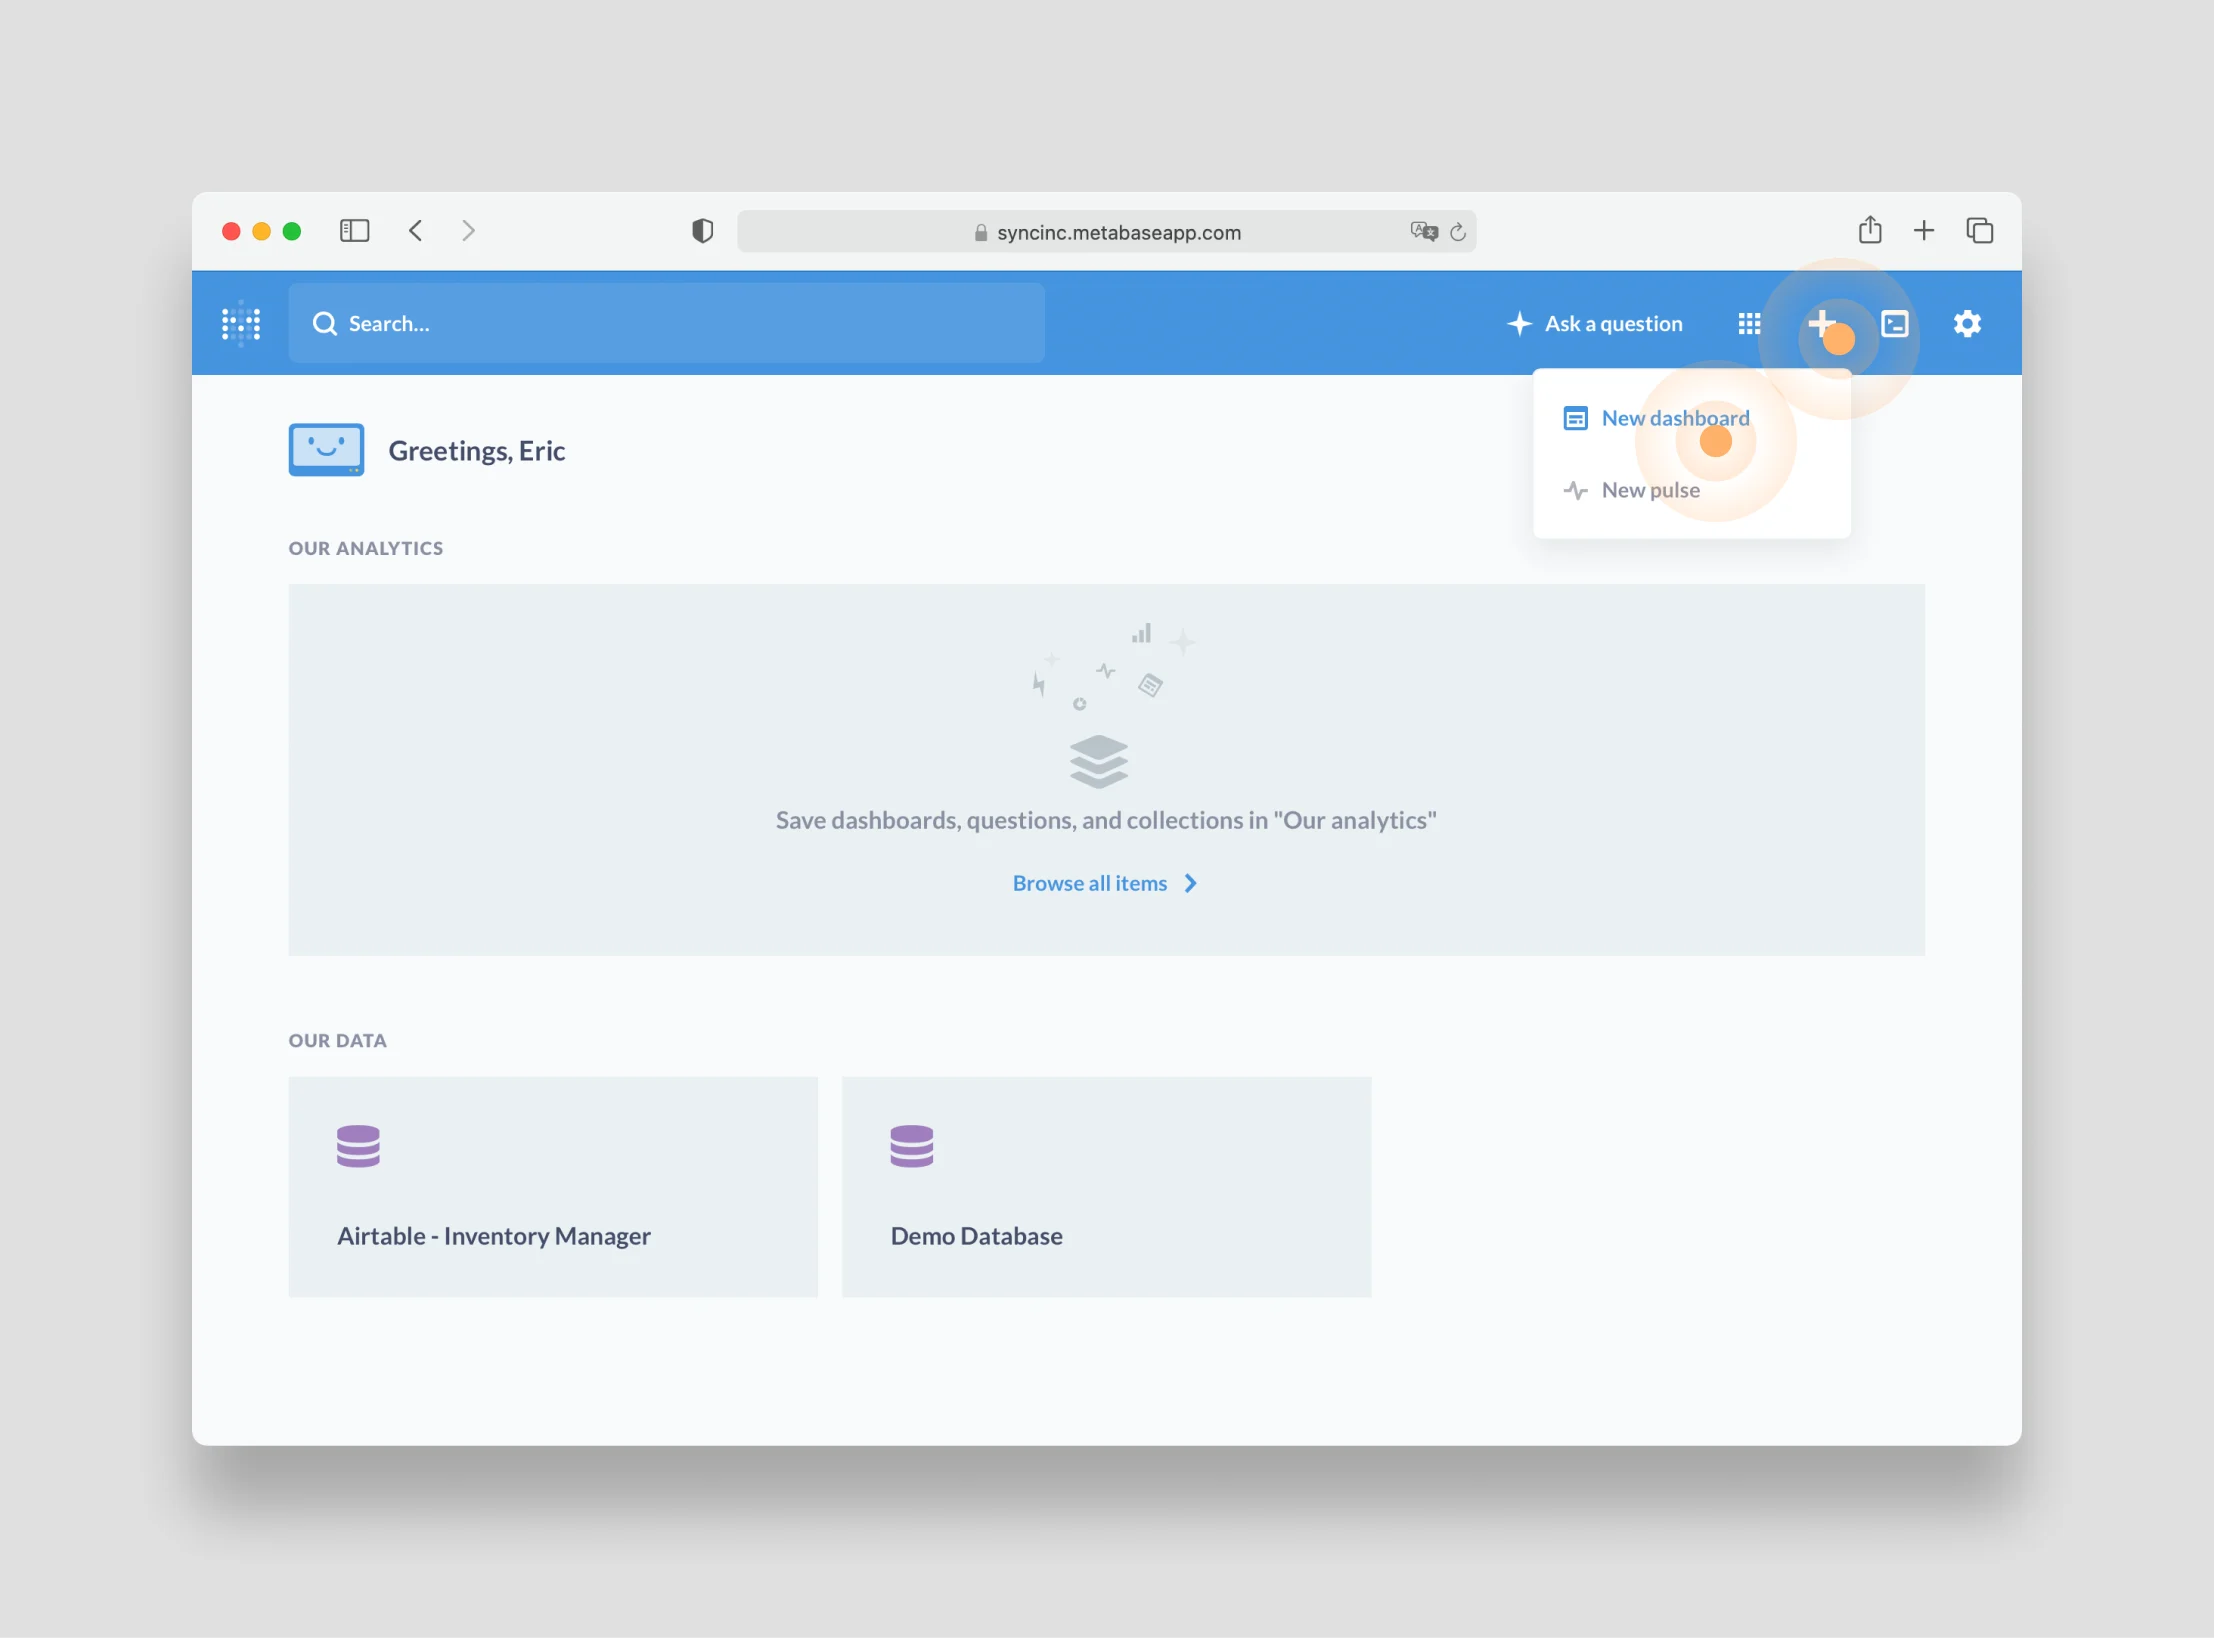
1. Click the plus icon in the top right and select **New dashboard**:
## Create a new dashboard
All your Airtable data is now accessible in Metabase. Now, you'll use Metabase to ask questions of your data and build a dashboard.
Before you start querying your Airtable data and building visualizations, set up your dashboard:
1. Click the plus icon in the top right and select **New dashboard**:
 2. In the modal that appears, give your new dashboard a name - something like "Sequin Tutorial." Then click the blue **Create** button:
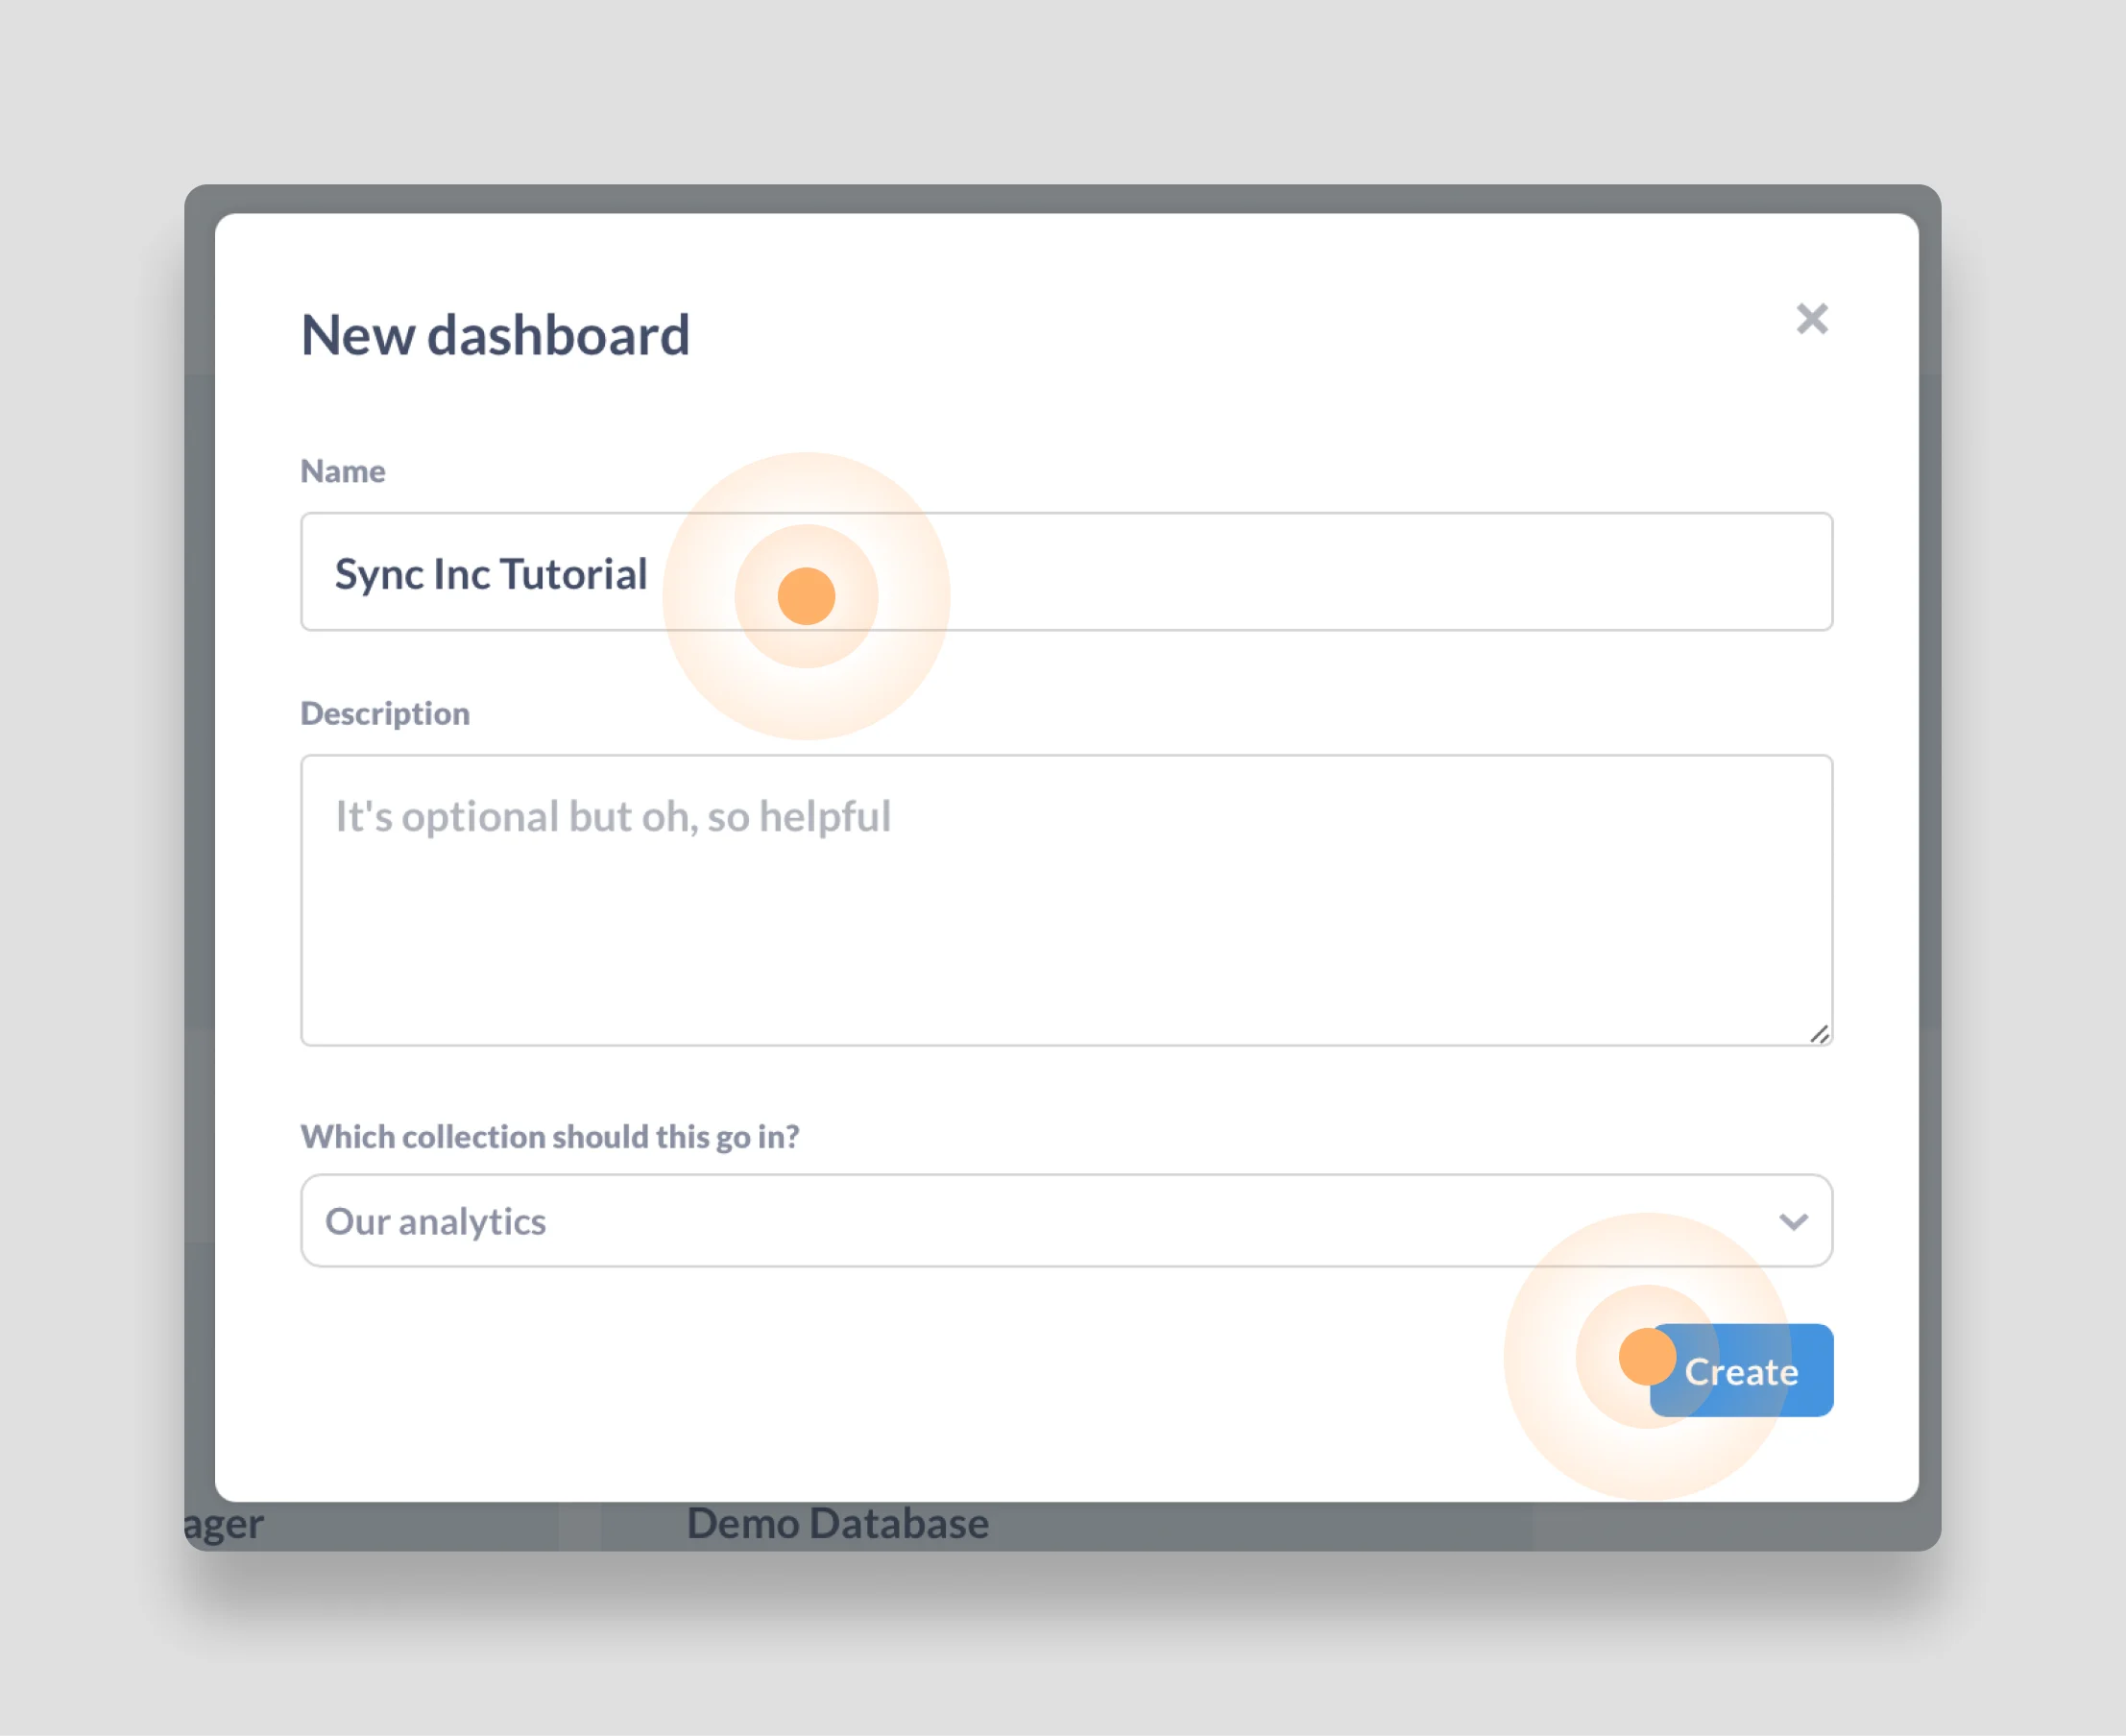 You'll now see an empty dashboard. Let's fill it with some helpful insights.
## Create your first *question*
Metabase calls metrics and visualizations you derive from your data *questions*. While this nomenclature feels a little casual compared to other BI tools, I like the mental model it creates. It encourages you to consider, "what questions do I need to answer from my data?"
Since you are working with inventory data from a small business, the first question you might want to answer is "is the store profitable?" In business language, this metric is called the *gross profit* of the store. It would also be helpful to inspect the gross profit at different time periods to see how it changes.
To calculate gross profit you'll need to sum up all the sales of the store and then subtract any costs. To then inspect the gross profit over different time periods, you'll want to add a date filter that only includes sales and costs from specified time periods.
With your question defined, you can now *ask* it in Metabase.
To do so, click **Ask question** in the navigation bar and then select **Native query** to create a new question. On the new question page, select the **Airtable - Inventory Manager** database that you just added:
You'll now see an empty dashboard. Let's fill it with some helpful insights.
## Create your first *question*
Metabase calls metrics and visualizations you derive from your data *questions*. While this nomenclature feels a little casual compared to other BI tools, I like the mental model it creates. It encourages you to consider, "what questions do I need to answer from my data?"
Since you are working with inventory data from a small business, the first question you might want to answer is "is the store profitable?" In business language, this metric is called the *gross profit* of the store. It would also be helpful to inspect the gross profit at different time periods to see how it changes.
To calculate gross profit you'll need to sum up all the sales of the store and then subtract any costs. To then inspect the gross profit over different time periods, you'll want to add a date filter that only includes sales and costs from specified time periods.
With your question defined, you can now *ask* it in Metabase.
To do so, click **Ask question** in the navigation bar and then select **Native query** to create a new question. On the new question page, select the **Airtable - Inventory Manager** database that you just added:
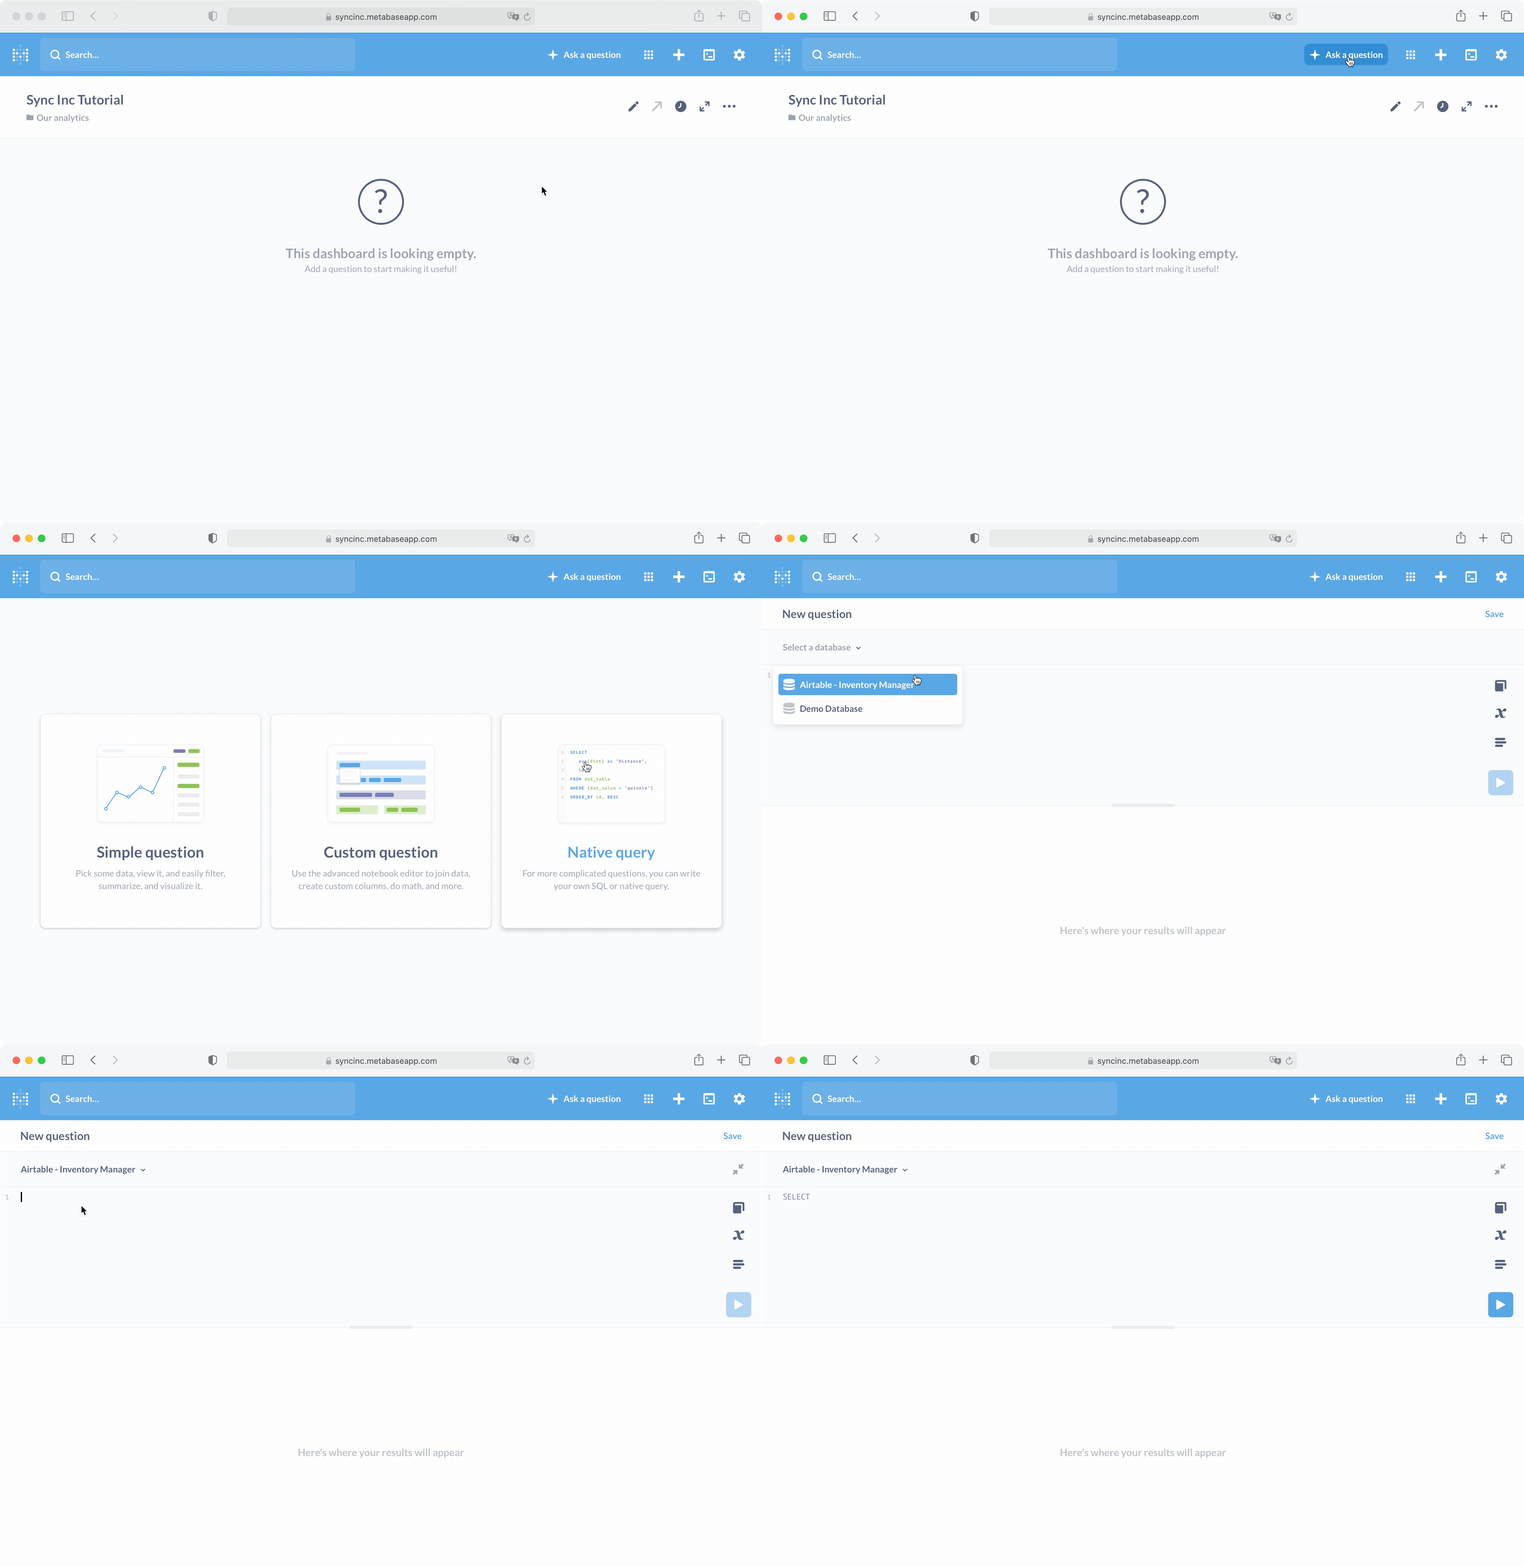 > You might be wondering why you are using the **Native query** builder to create your question instead of the *Simple question* or *Custom question* options. You'll often want to use native queries to build questions on your Airtable data because, as you'll see, your Airtable data will contain more complex data structures like [Postgres arrays](https://www.postgresql.org/docs/current/arrays.html) and [JSON](https://www.postgresql.org/docs/current/datatype-json.html). SQL is an easy way to work with these objects and format your results. You can learn more about how to query your Airtable data in SQL by reading the Sequin [Cheat Sheet](https://docs.sequin.io/cheat-sheet) and [Reference](https://docs.sequin.io/reference#querying-airtable-with-sql).
You can now use SQL to calculate the gross profit. To get started, calculate the gross profit without the ability to filter by date:
```sql theme={null}
select
sum(sales_orders.revenue::numeric - (product_inventory.manufacturer_price * sales_orders.quantity)) as "Gross Profit"
from sales_orders
join product_inventory on sales_orders.product[1] = product_inventory.id;
```
There are several flourishes in this query that are worth unpacking:
1. First, you are selecting the `revenue` column from the `sales_orders` table. Because `revenue` is a calculated field in Airtable, it appears in your Sequin Postgres database as type `text`. Since you can't add and subtract `text` values, you are then casting this to type numeric using `::numeric`.
2. Next, you are calculating the `Gross Profit` by taking the sum of all the revenue and subtracting the costs (i.e. `product_inventory.manufacturer_price * sales_orders.quantity`)
3. Finally, you are joining the `sales_orders` table to the `product_inventory` table. In Airtable, `sales_orders.product` is a linked record to the `product_inventory` table. Linked records appear in your Sequin Postgres database as arrays, because linked records can contain multiple values. So to complete the join, you use `sales_orders.product[1]` to extract the first (and only) value of the array to match it to the corresponding record in the `product_inventory` table.
When you run the query by clicking the blue **play** button, you'll see that the small business is indeed making money:
> You might be wondering why you are using the **Native query** builder to create your question instead of the *Simple question* or *Custom question* options. You'll often want to use native queries to build questions on your Airtable data because, as you'll see, your Airtable data will contain more complex data structures like [Postgres arrays](https://www.postgresql.org/docs/current/arrays.html) and [JSON](https://www.postgresql.org/docs/current/datatype-json.html). SQL is an easy way to work with these objects and format your results. You can learn more about how to query your Airtable data in SQL by reading the Sequin [Cheat Sheet](https://docs.sequin.io/cheat-sheet) and [Reference](https://docs.sequin.io/reference#querying-airtable-with-sql).
You can now use SQL to calculate the gross profit. To get started, calculate the gross profit without the ability to filter by date:
```sql theme={null}
select
sum(sales_orders.revenue::numeric - (product_inventory.manufacturer_price * sales_orders.quantity)) as "Gross Profit"
from sales_orders
join product_inventory on sales_orders.product[1] = product_inventory.id;
```
There are several flourishes in this query that are worth unpacking:
1. First, you are selecting the `revenue` column from the `sales_orders` table. Because `revenue` is a calculated field in Airtable, it appears in your Sequin Postgres database as type `text`. Since you can't add and subtract `text` values, you are then casting this to type numeric using `::numeric`.
2. Next, you are calculating the `Gross Profit` by taking the sum of all the revenue and subtracting the costs (i.e. `product_inventory.manufacturer_price * sales_orders.quantity`)
3. Finally, you are joining the `sales_orders` table to the `product_inventory` table. In Airtable, `sales_orders.product` is a linked record to the `product_inventory` table. Linked records appear in your Sequin Postgres database as arrays, because linked records can contain multiple values. So to complete the join, you use `sales_orders.product[1]` to extract the first (and only) value of the array to match it to the corresponding record in the `product_inventory` table.
When you run the query by clicking the blue **play** button, you'll see that the small business is indeed making money:
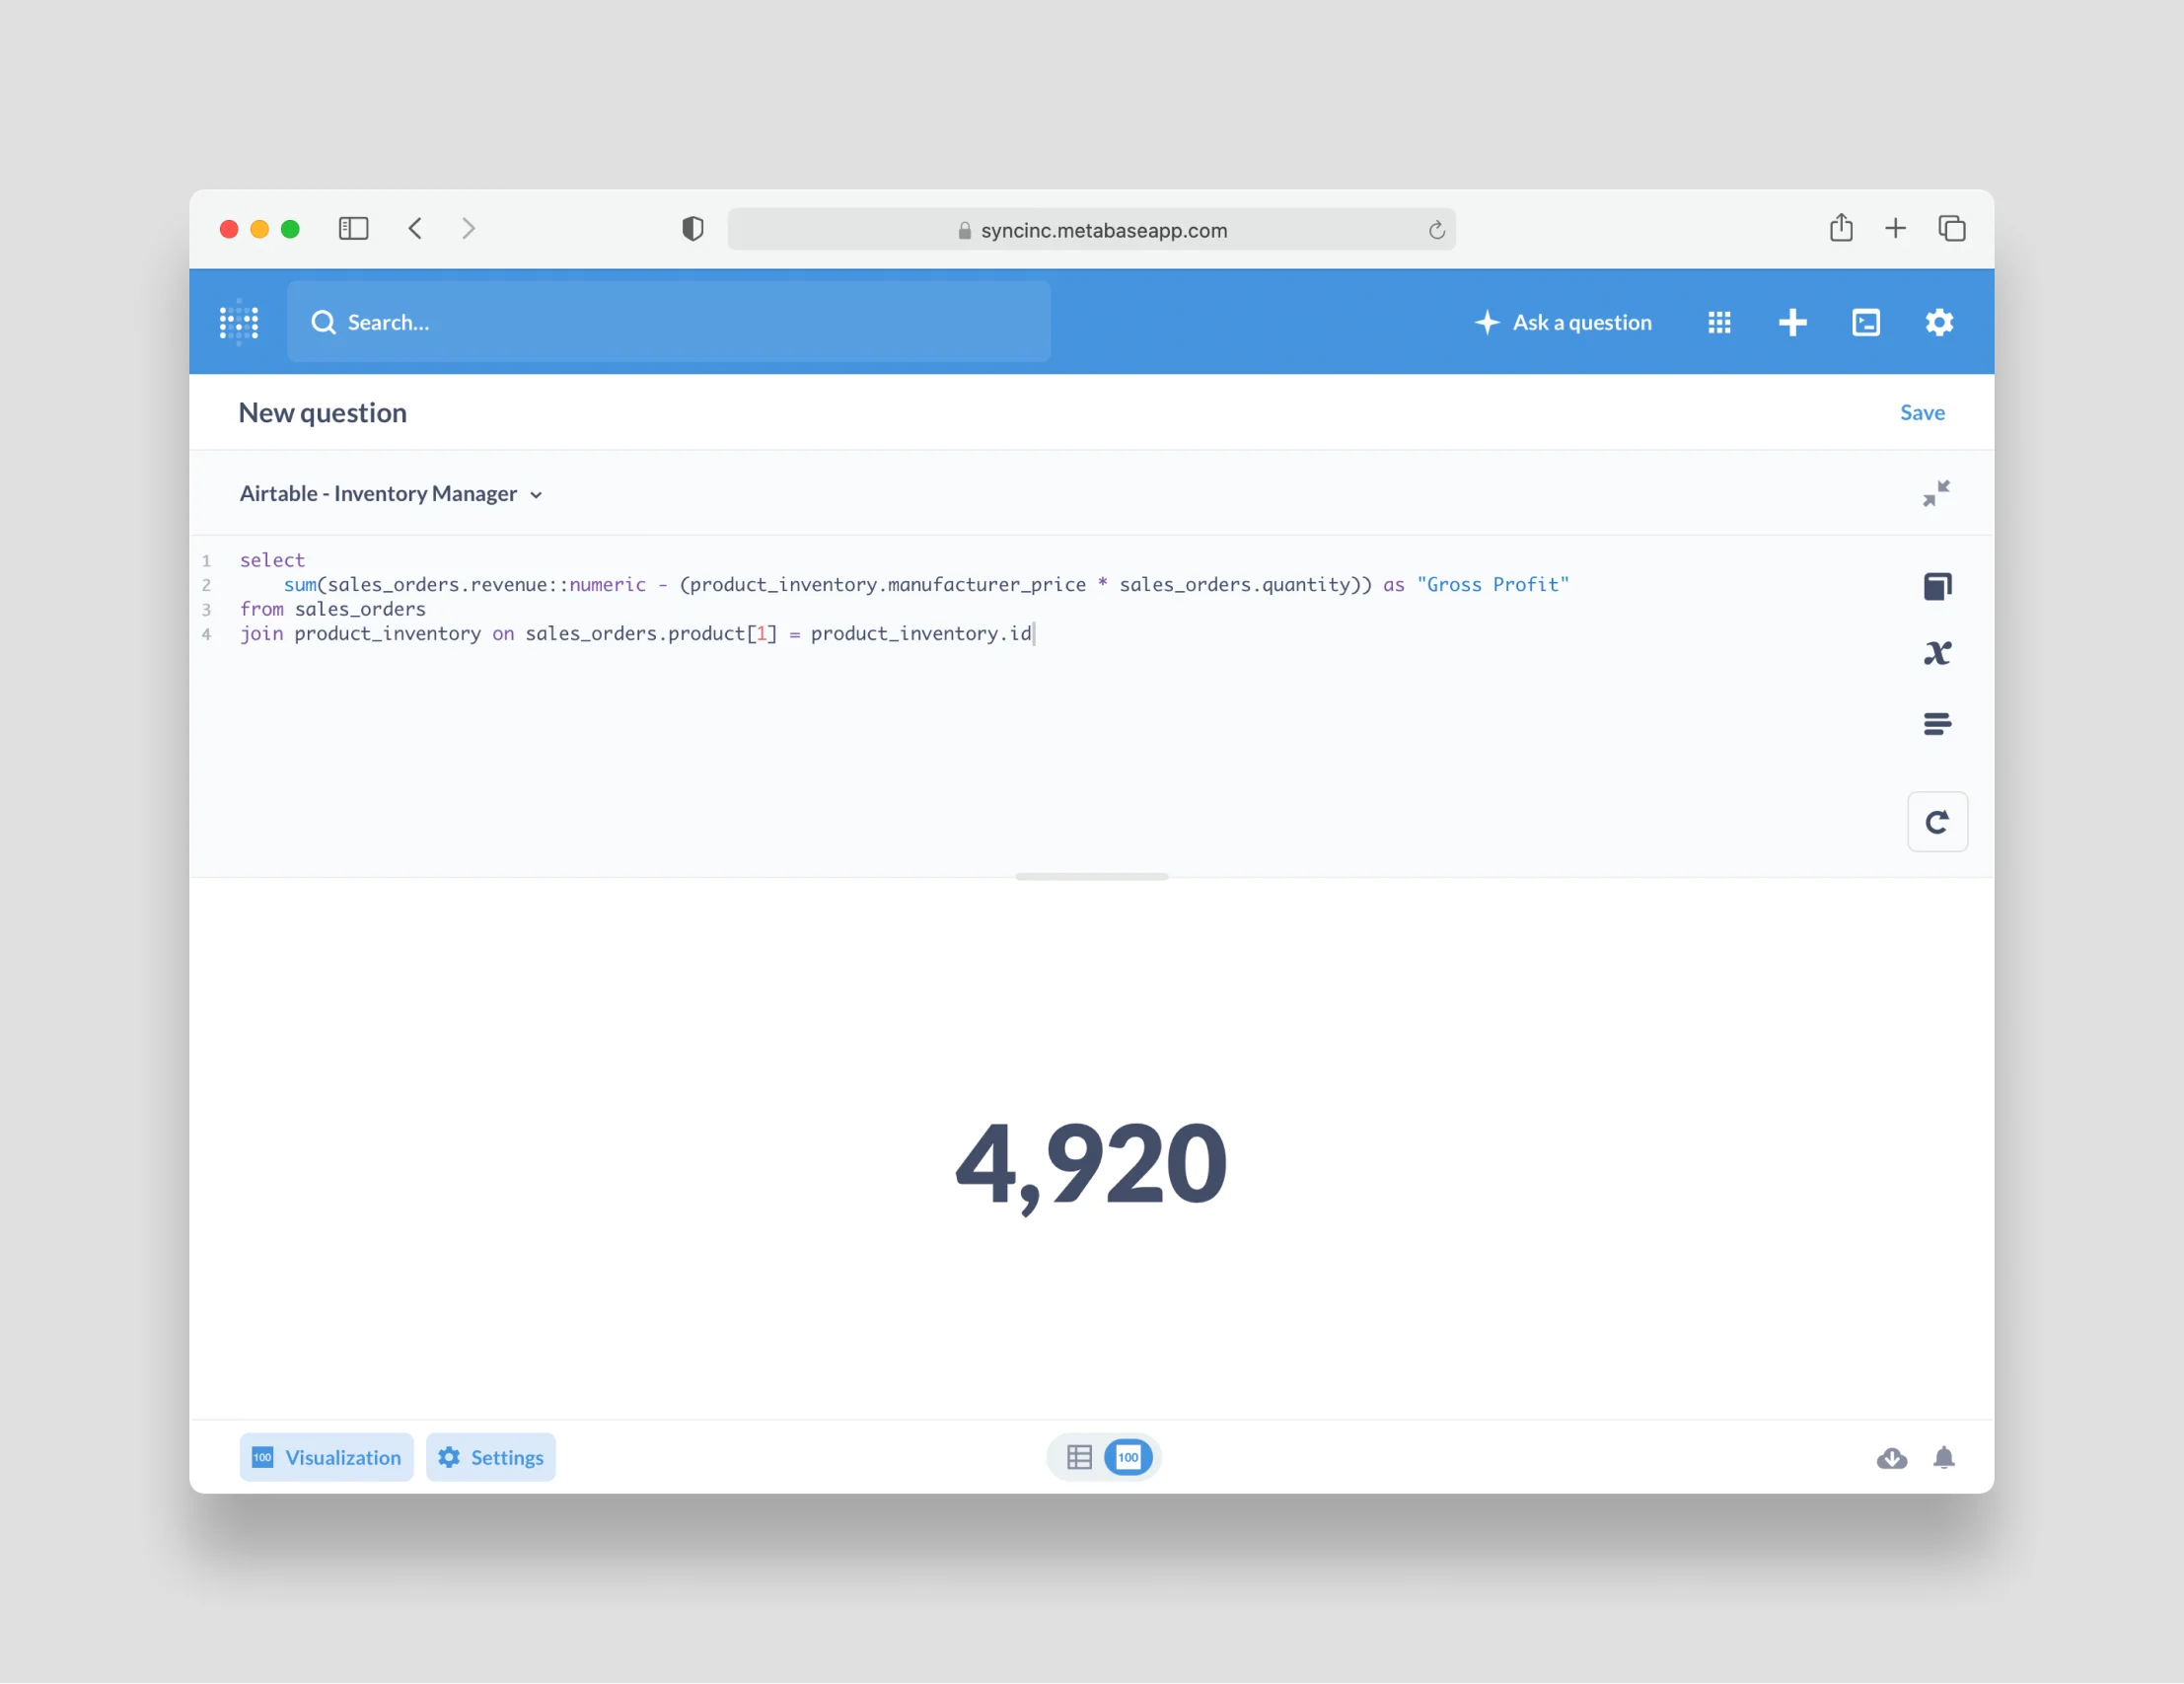 Since gross profit is a dollar value, adjust the settings for this question to add a dollar sign as well as two decimal places:
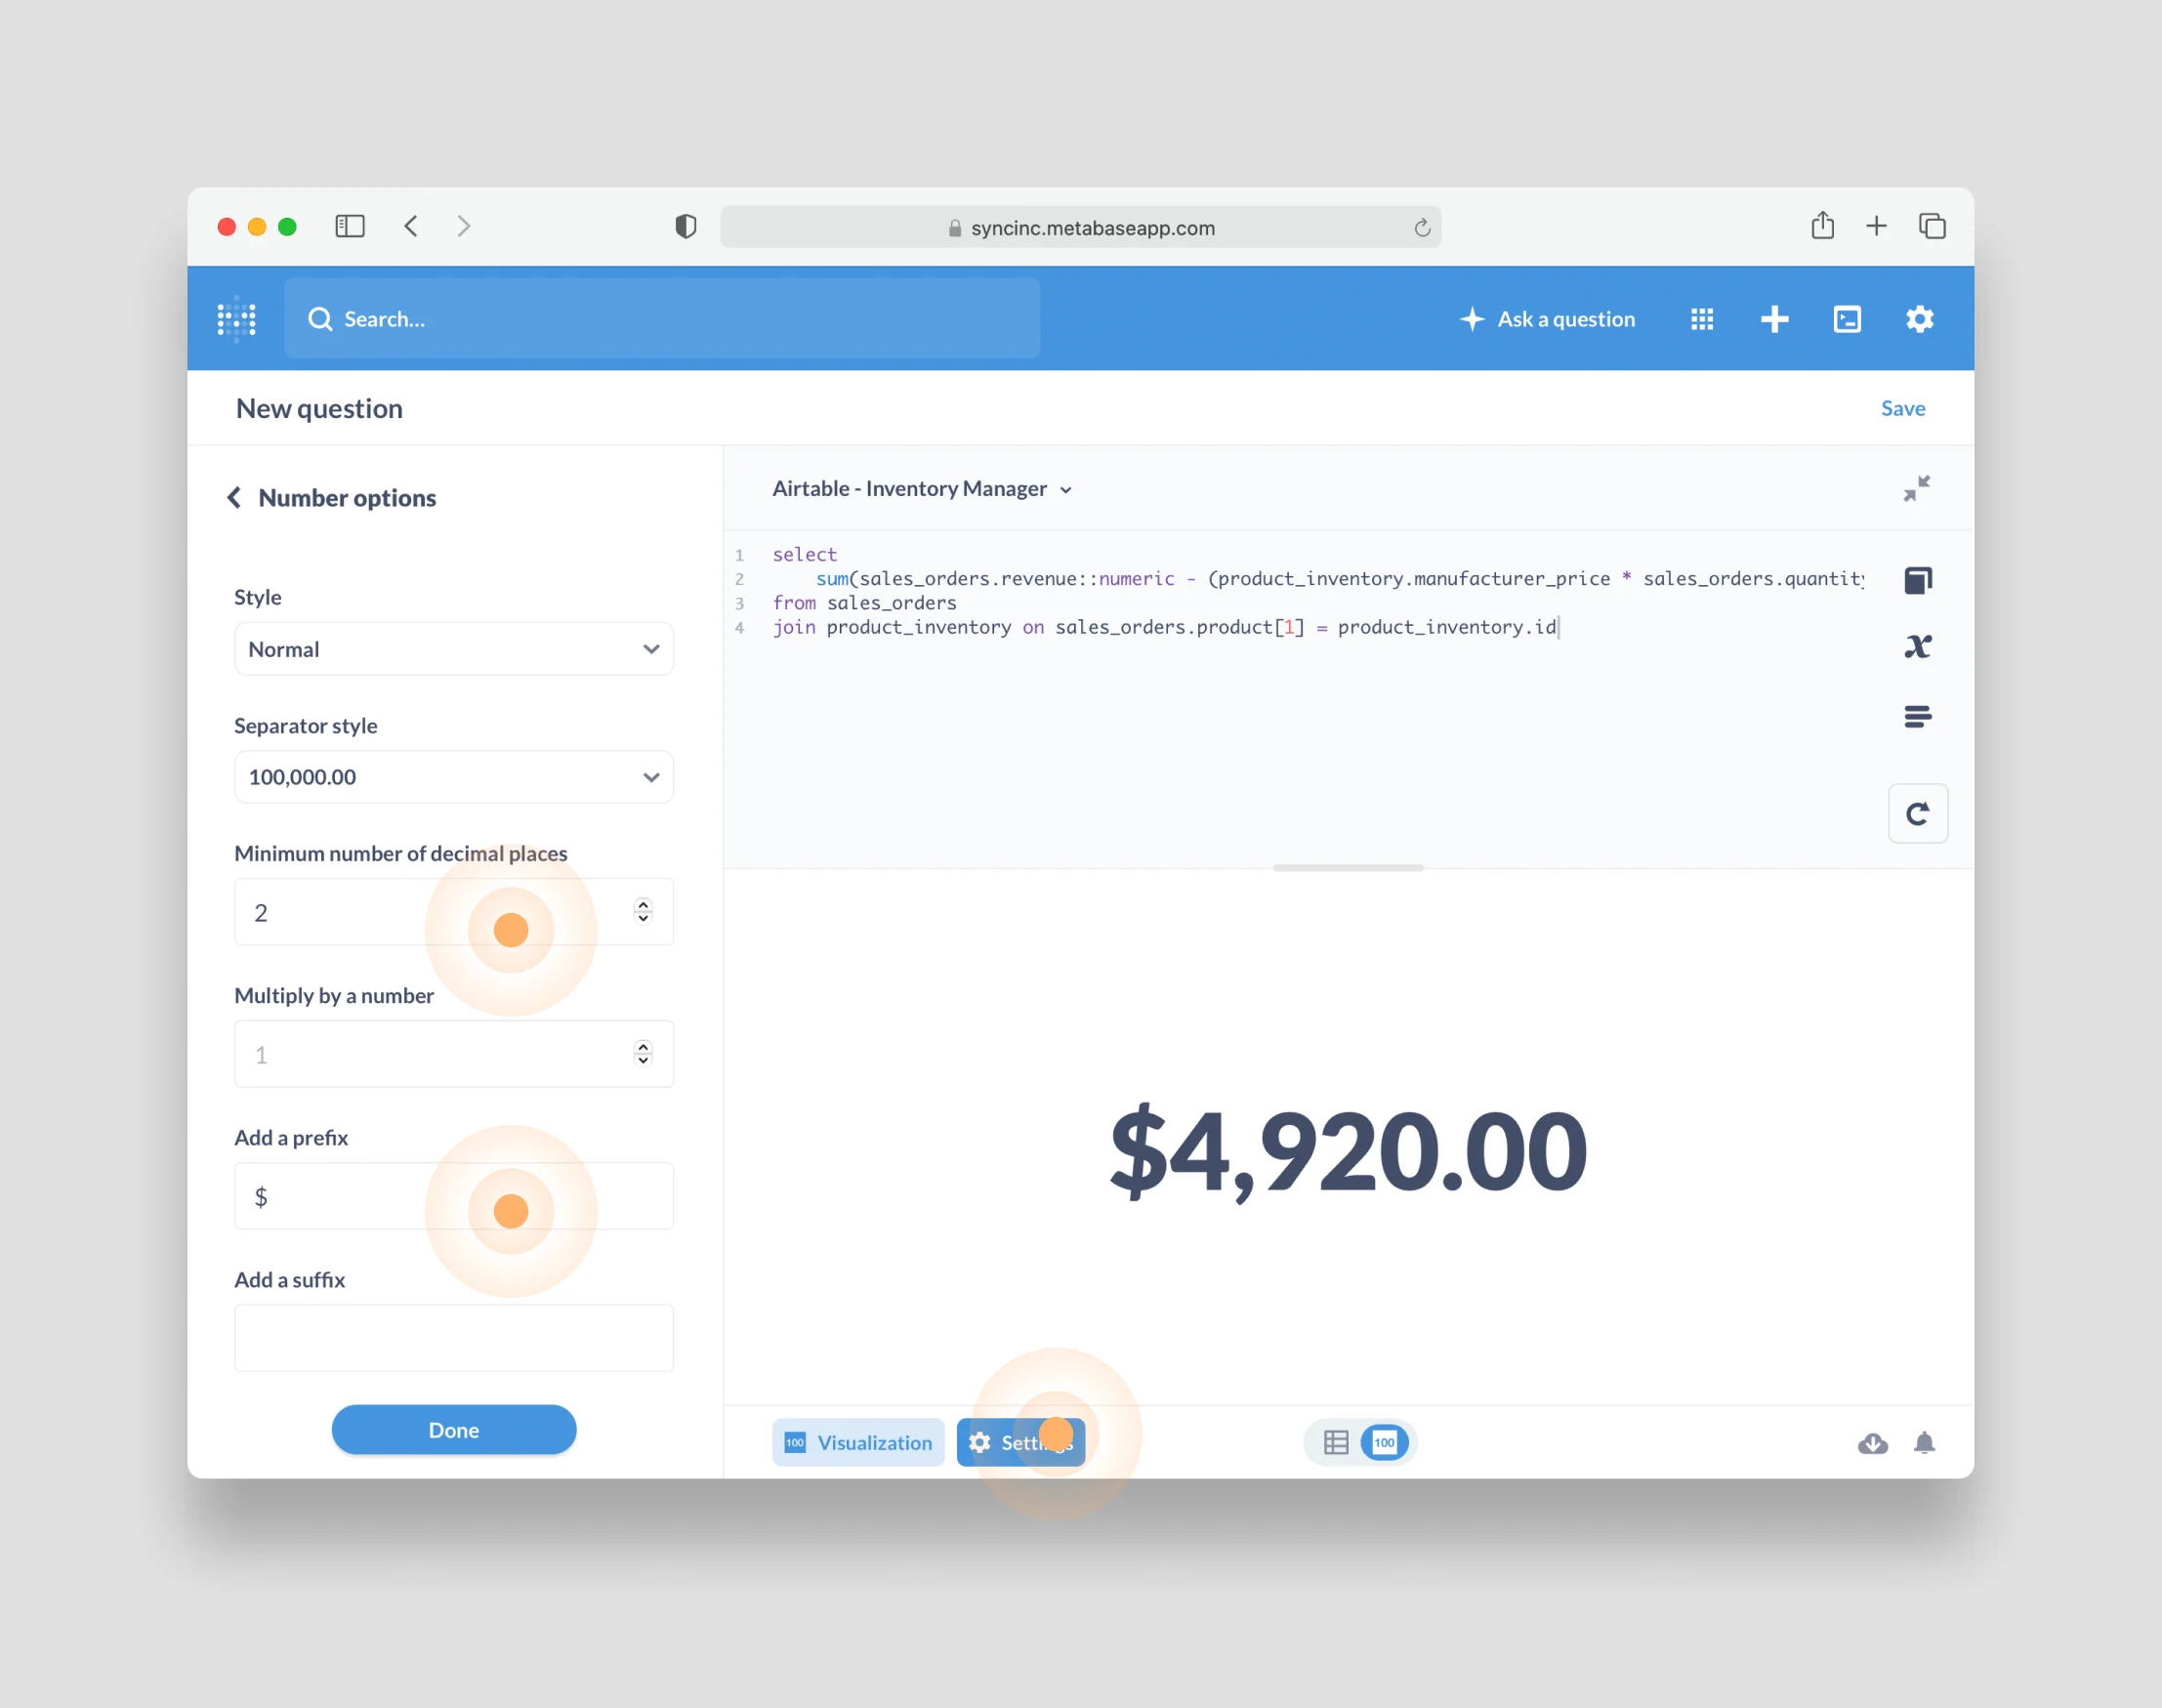 That looks more like it! As a last step, recall that you want to be able to inspect the gross profit over different time periods. To do this in Metabase, you'll edit your underlying SQL query to add a `WHERE` clause with a **variable**:
```sql theme={null}
select
sum(sales_orders.revenue::numeric - (product_inventory.manufacturer_price * sales_orders.quantity)) as "Gross Profit"
from sales_orders
join product_inventory on sales_orders.product[1] = product_inventory.identity
[[where {{date}}]];
```
Breaking this down. The `{{date}}` syntax creates the variable. Then, you wrap the entire `WHERE` clause in brackets (`[[where {{date}}]]`) to make this statement optional in case no `date` is provided (you can learn more about variable in the [Metabase documentation](https://www.metabase.com/docs/latest/users-guide/13-sql-parameters.html)).
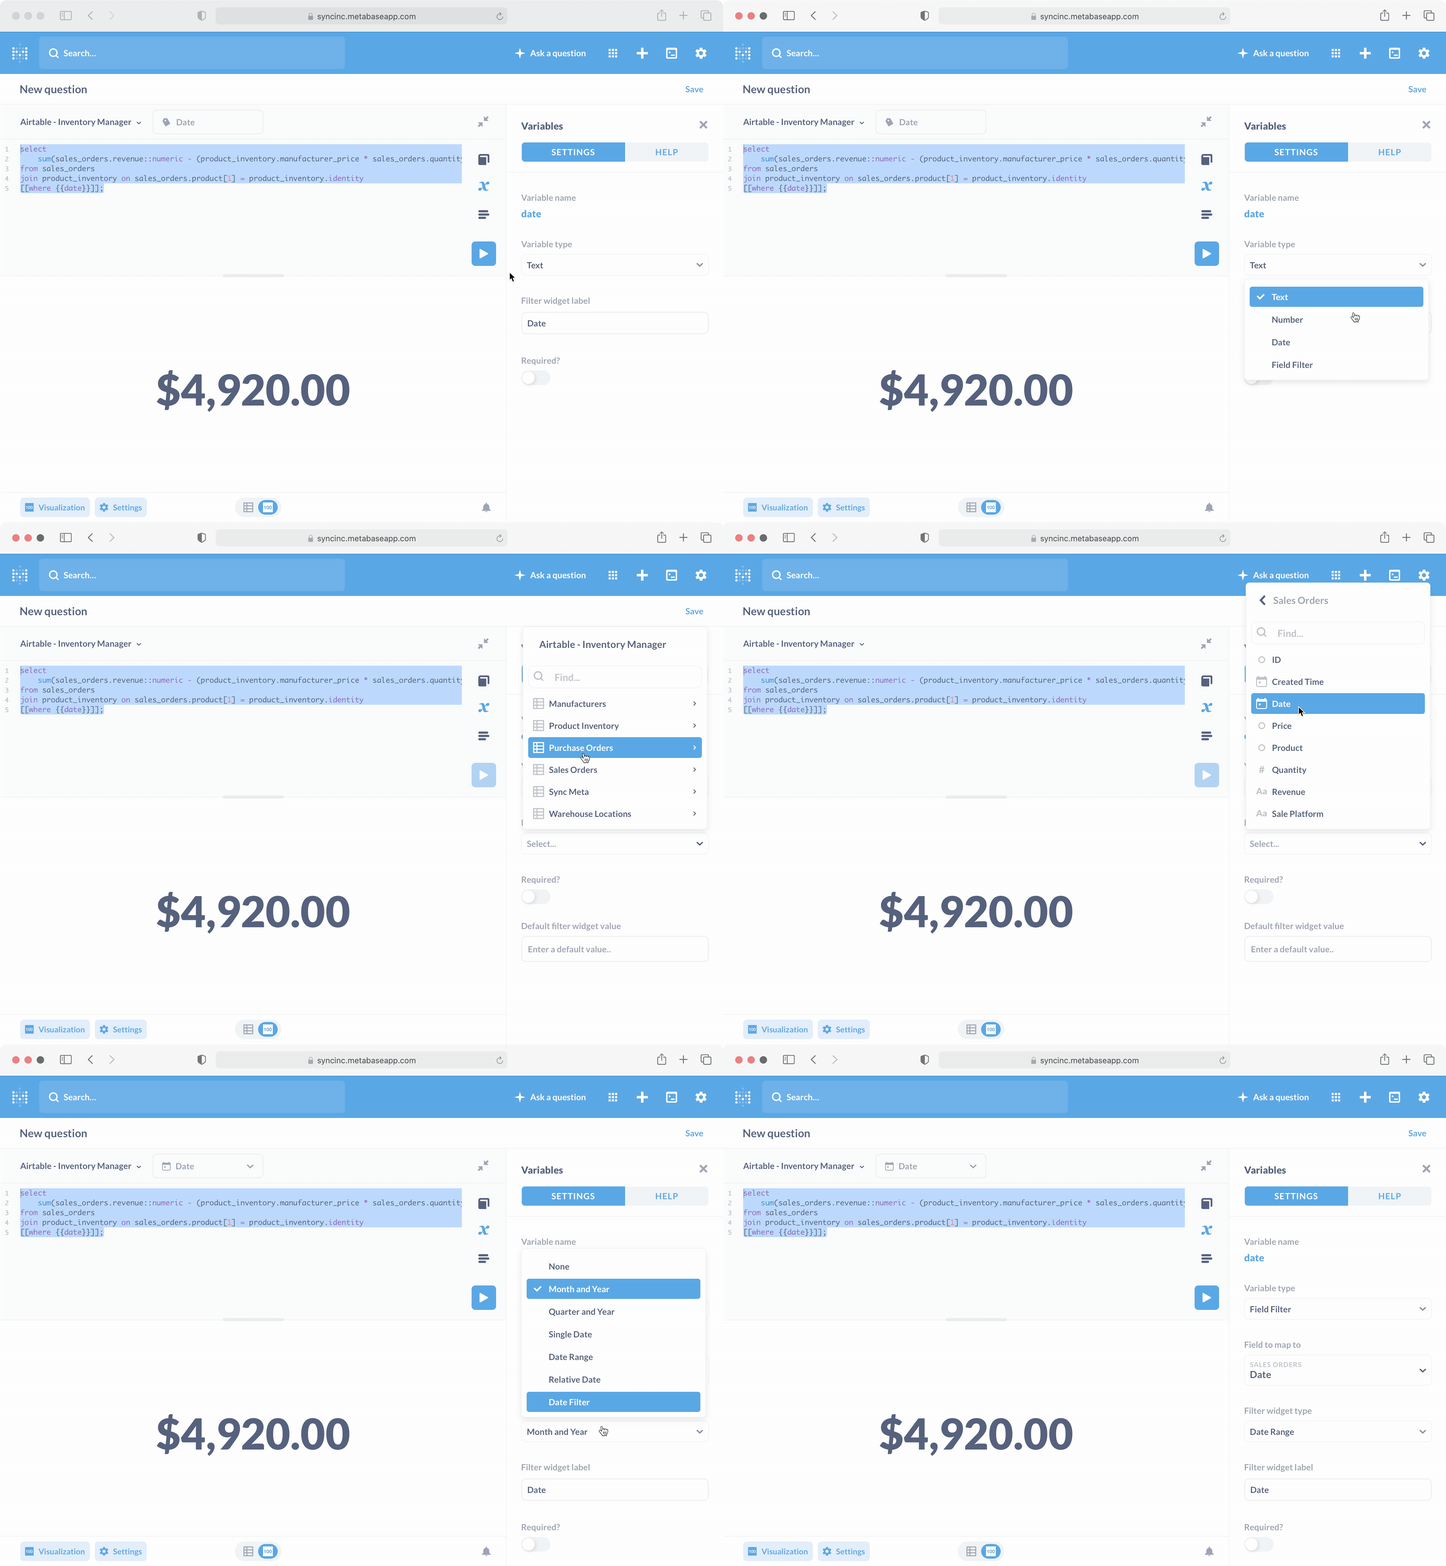
Metabase will detect the `{{date}}` variable in the query and open the variable settings to the right. Since the gross profit question you are building will live in a dashboard - you will configure the date variable to be a **Field Filter**.
To do so, you'll select **Field Filter** as the variable type. Since your `date` variable is actually filtering the `date` column of the `sales_orders` table, you'll then map the variable accordingly. Last, since you want to be able to select different time periods, you'll set the widget type to **Date Range**:
That looks more like it! As a last step, recall that you want to be able to inspect the gross profit over different time periods. To do this in Metabase, you'll edit your underlying SQL query to add a `WHERE` clause with a **variable**:
```sql theme={null}
select
sum(sales_orders.revenue::numeric - (product_inventory.manufacturer_price * sales_orders.quantity)) as "Gross Profit"
from sales_orders
join product_inventory on sales_orders.product[1] = product_inventory.identity
[[where {{date}}]];
```
Breaking this down. The `{{date}}` syntax creates the variable. Then, you wrap the entire `WHERE` clause in brackets (`[[where {{date}}]]`) to make this statement optional in case no `date` is provided (you can learn more about variable in the [Metabase documentation](https://www.metabase.com/docs/latest/users-guide/13-sql-parameters.html)).
Metabase will detect the `{{date}}` variable in the query and open the variable settings to the right. Since the gross profit question you are building will live in a dashboard - you will configure the date variable to be a **Field Filter**.
To do so, you'll select **Field Filter** as the variable type. Since your `date` variable is actually filtering the `date` column of the `sales_orders` table, you'll then map the variable accordingly. Last, since you want to be able to select different time periods, you'll set the widget type to **Date Range**:
 You'll now see a date selector in the question, and if you select a new date range the value of the gross profit will update:
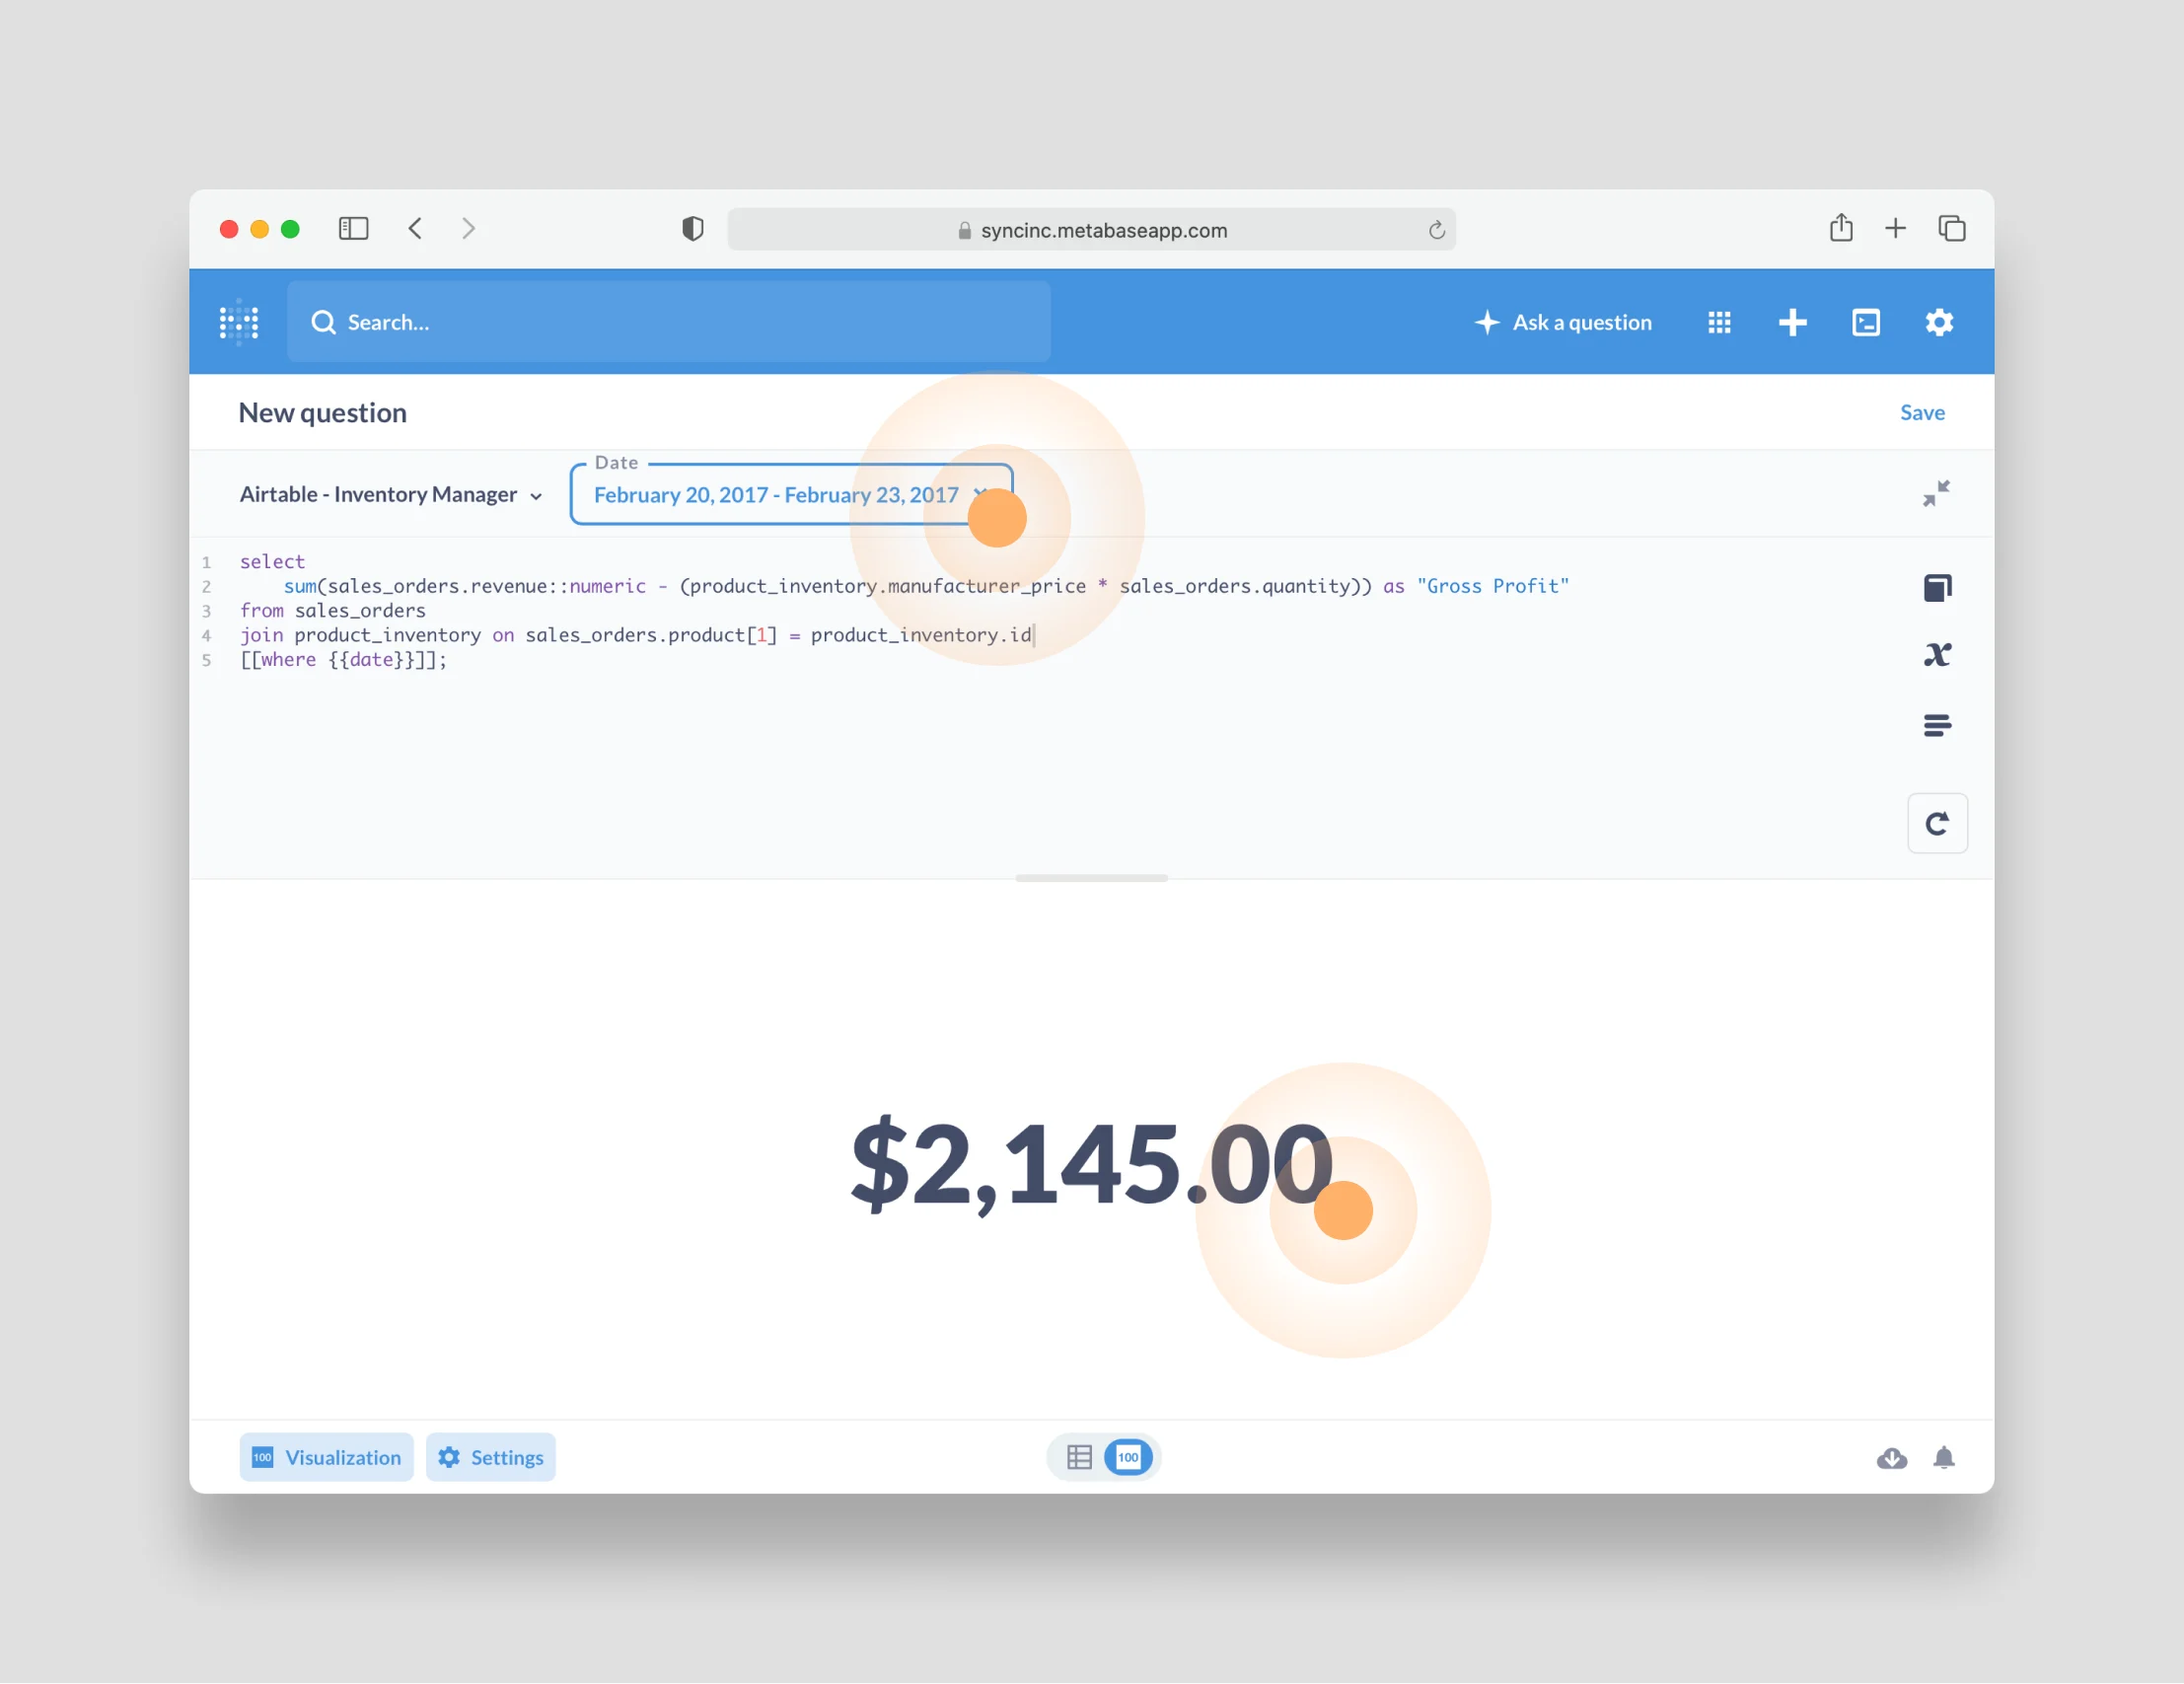 > Keep in mind that in the Airtable template we are using, the date range is from February 17, 2017 to February 27, 2017 :)
With everything looking good, save your question by clicking **Save** and naming your new question something like "Gross Profit." After saving, you'll return to the Metabase home page.
## Add your question to the dashboard
Finally, add the gross profit question as well as a date range filter to your dashboard:
> Keep in mind that in the Airtable template we are using, the date range is from February 17, 2017 to February 27, 2017 :)
With everything looking good, save your question by clicking **Save** and naming your new question something like "Gross Profit." After saving, you'll return to the Metabase home page.
## Add your question to the dashboard
Finally, add the gross profit question as well as a date range filter to your dashboard:
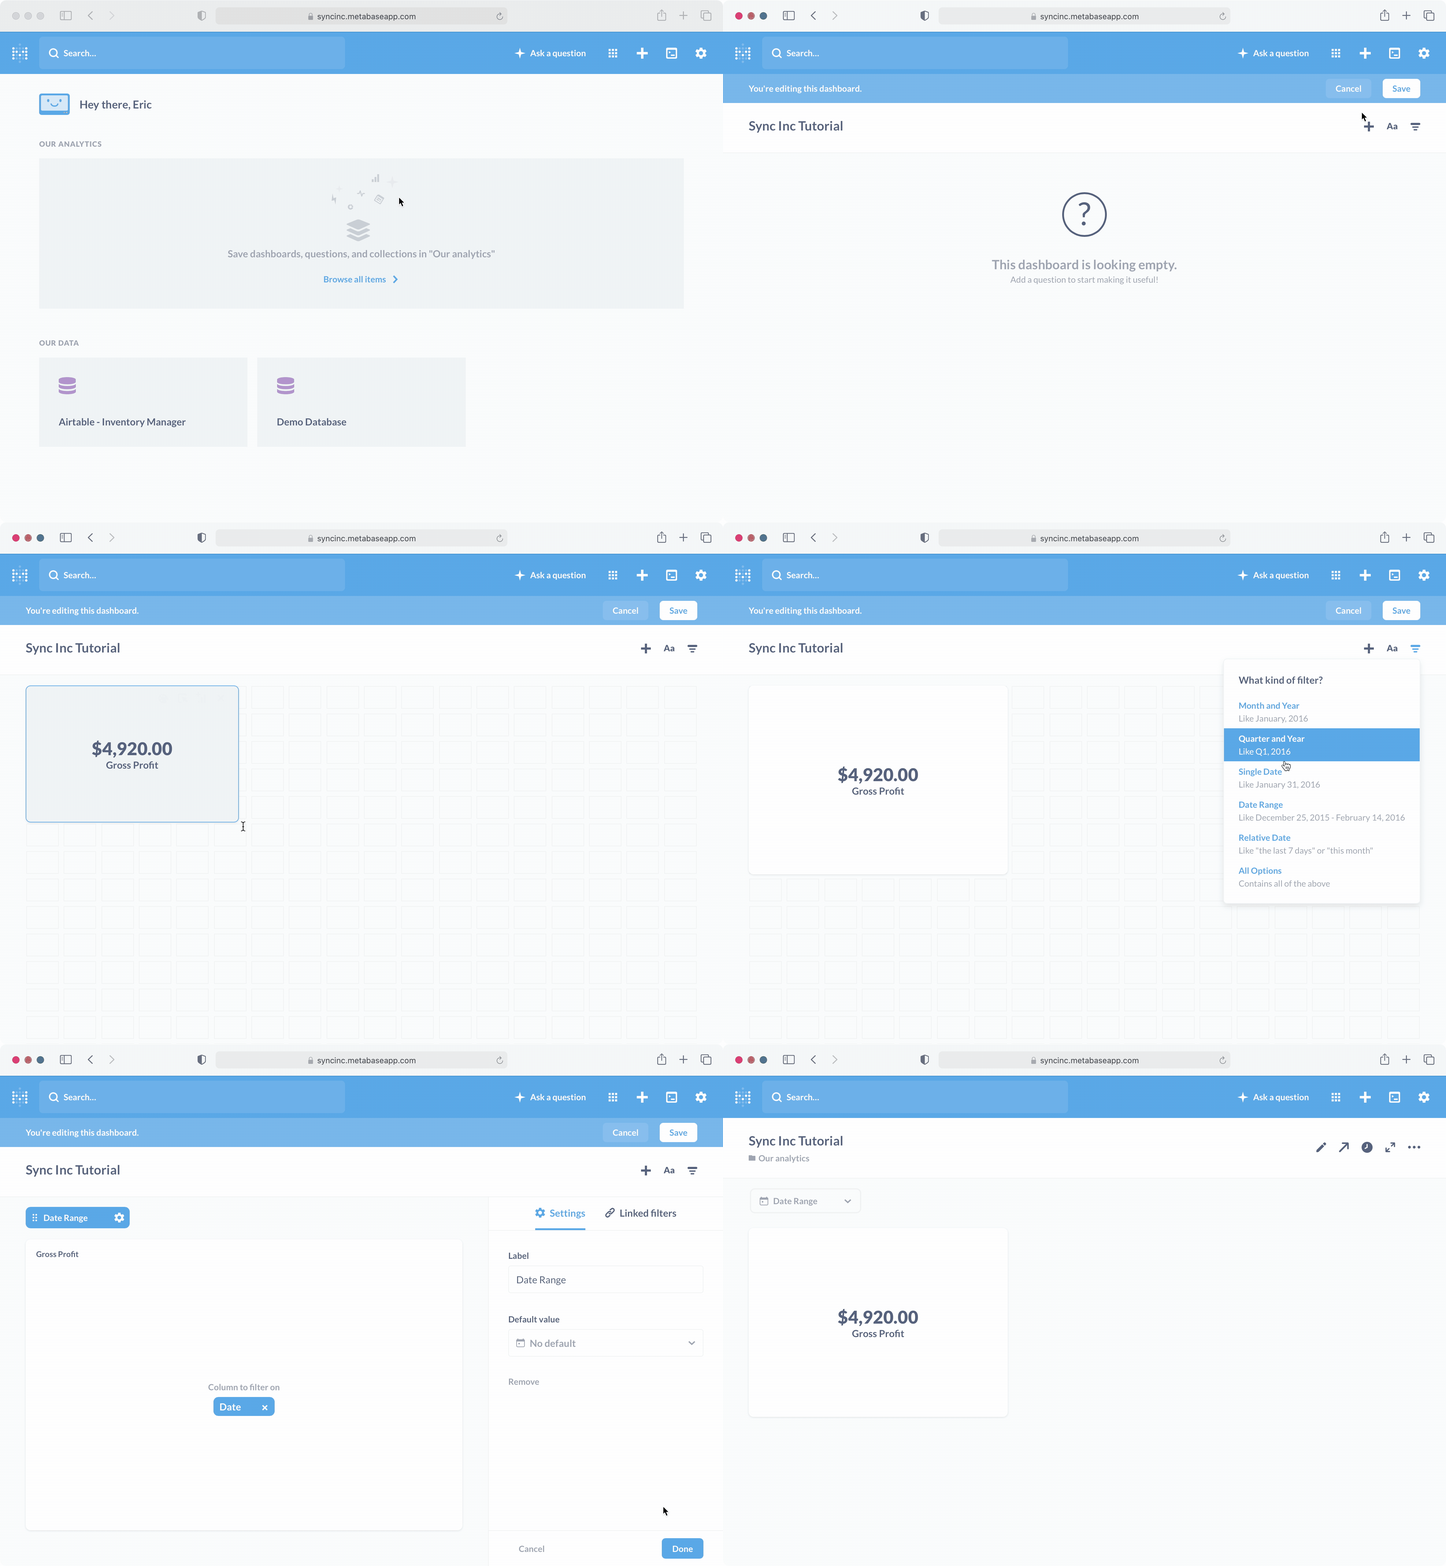 1. First, open up your dashboard by clicking **Browse all items** from the home screen and then selecting the **Sequin Tutorial** dashboard.
2. Edit the dashboard by clicking the pencil icon in the top right.
3. Add your **Gross Profit** question to the dashboard by clicking the plus icon and selecting it from the modal. Resize and position as you would like.
4. Then, add a date range filter to the dashboard by clicking the **Add a filter** icon, selecting **Time**, and then selecting **Date Range**.
5. Finally, **map the date range filter to the date variable** in your gross profit question and then click the **Done** button.
6. Last but not least, click **Save**.
You've now created a new dashboard with a **Gross Profit** question that you can filter by date. The foundations of your dashboard are now in place.
## Add a graph
Now, add some graphs to your dashboard to reveal more about the small business.
Starting with a Metabase *question*, it would be nice to know how many sales happen each day and on which sales platform. A stacked bar chart might tell this story well.
To build the question, click the **Ask a question** button and then select **Native query** just as you did before. Select your **Airtable - Inventory Manager** database.
Now write the SQL that answers this question:
```sql theme={null}
select
sales_orders.date::DATE,
sales_orders.revenue::NUMERIC,
sales_orders.sale_platform
from
sales_orders
[[where {{date}}]];
```
This query should look more familiar to you now:
* You'll notice that in the `SELECT` statement you are again using `CAST` (i.e. the `::`) to ensure that the data returned is the right type.
* You are then adding an optional `WHERE` clause with the `{{date}}` variable so that your date range picker will also affect this data as well.
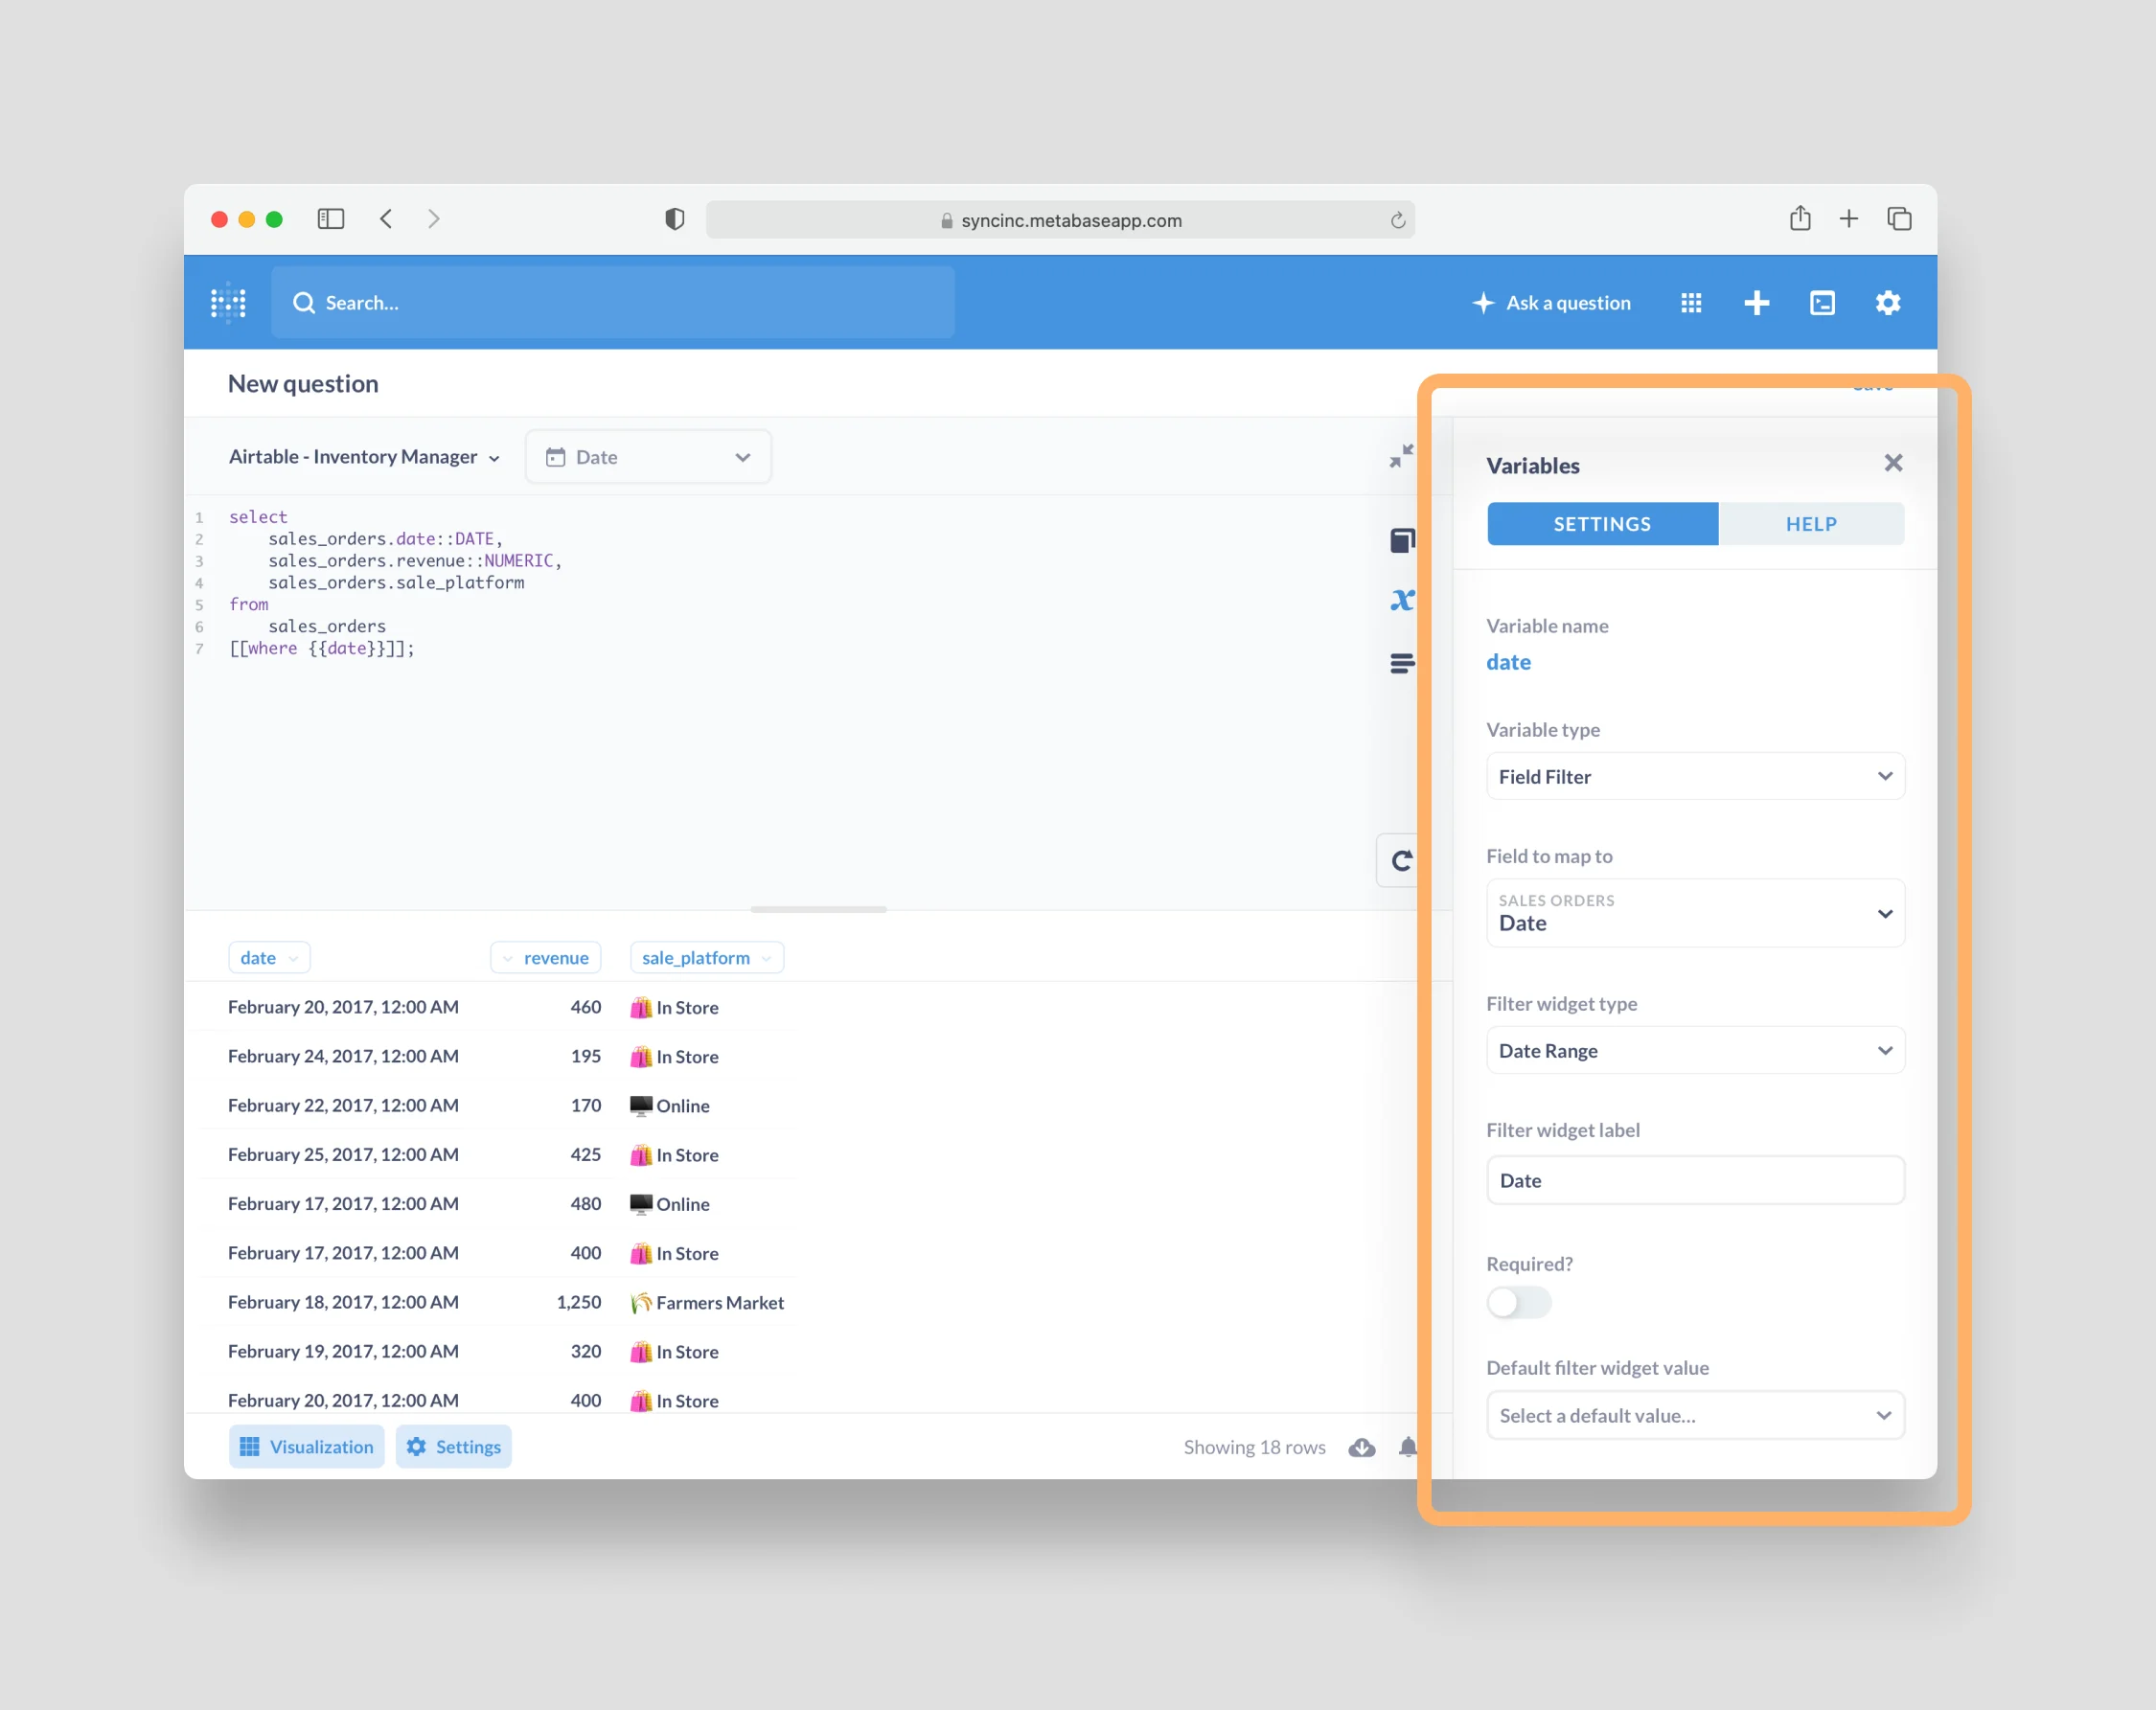
When you add the SQL to your question, you'll first configure the `{{date}}` variable just as you did with your gross profit question:
1. First, open up your dashboard by clicking **Browse all items** from the home screen and then selecting the **Sequin Tutorial** dashboard.
2. Edit the dashboard by clicking the pencil icon in the top right.
3. Add your **Gross Profit** question to the dashboard by clicking the plus icon and selecting it from the modal. Resize and position as you would like.
4. Then, add a date range filter to the dashboard by clicking the **Add a filter** icon, selecting **Time**, and then selecting **Date Range**.
5. Finally, **map the date range filter to the date variable** in your gross profit question and then click the **Done** button.
6. Last but not least, click **Save**.
You've now created a new dashboard with a **Gross Profit** question that you can filter by date. The foundations of your dashboard are now in place.
## Add a graph
Now, add some graphs to your dashboard to reveal more about the small business.
Starting with a Metabase *question*, it would be nice to know how many sales happen each day and on which sales platform. A stacked bar chart might tell this story well.
To build the question, click the **Ask a question** button and then select **Native query** just as you did before. Select your **Airtable - Inventory Manager** database.
Now write the SQL that answers this question:
```sql theme={null}
select
sales_orders.date::DATE,
sales_orders.revenue::NUMERIC,
sales_orders.sale_platform
from
sales_orders
[[where {{date}}]];
```
This query should look more familiar to you now:
* You'll notice that in the `SELECT` statement you are again using `CAST` (i.e. the `::`) to ensure that the data returned is the right type.
* You are then adding an optional `WHERE` clause with the `{{date}}` variable so that your date range picker will also affect this data as well.
When you add the SQL to your question, you'll first configure the `{{date}}` variable just as you did with your gross profit question:
 Finally, let's present this data as a stacked bar chart. Metabase makes this pretty easy:
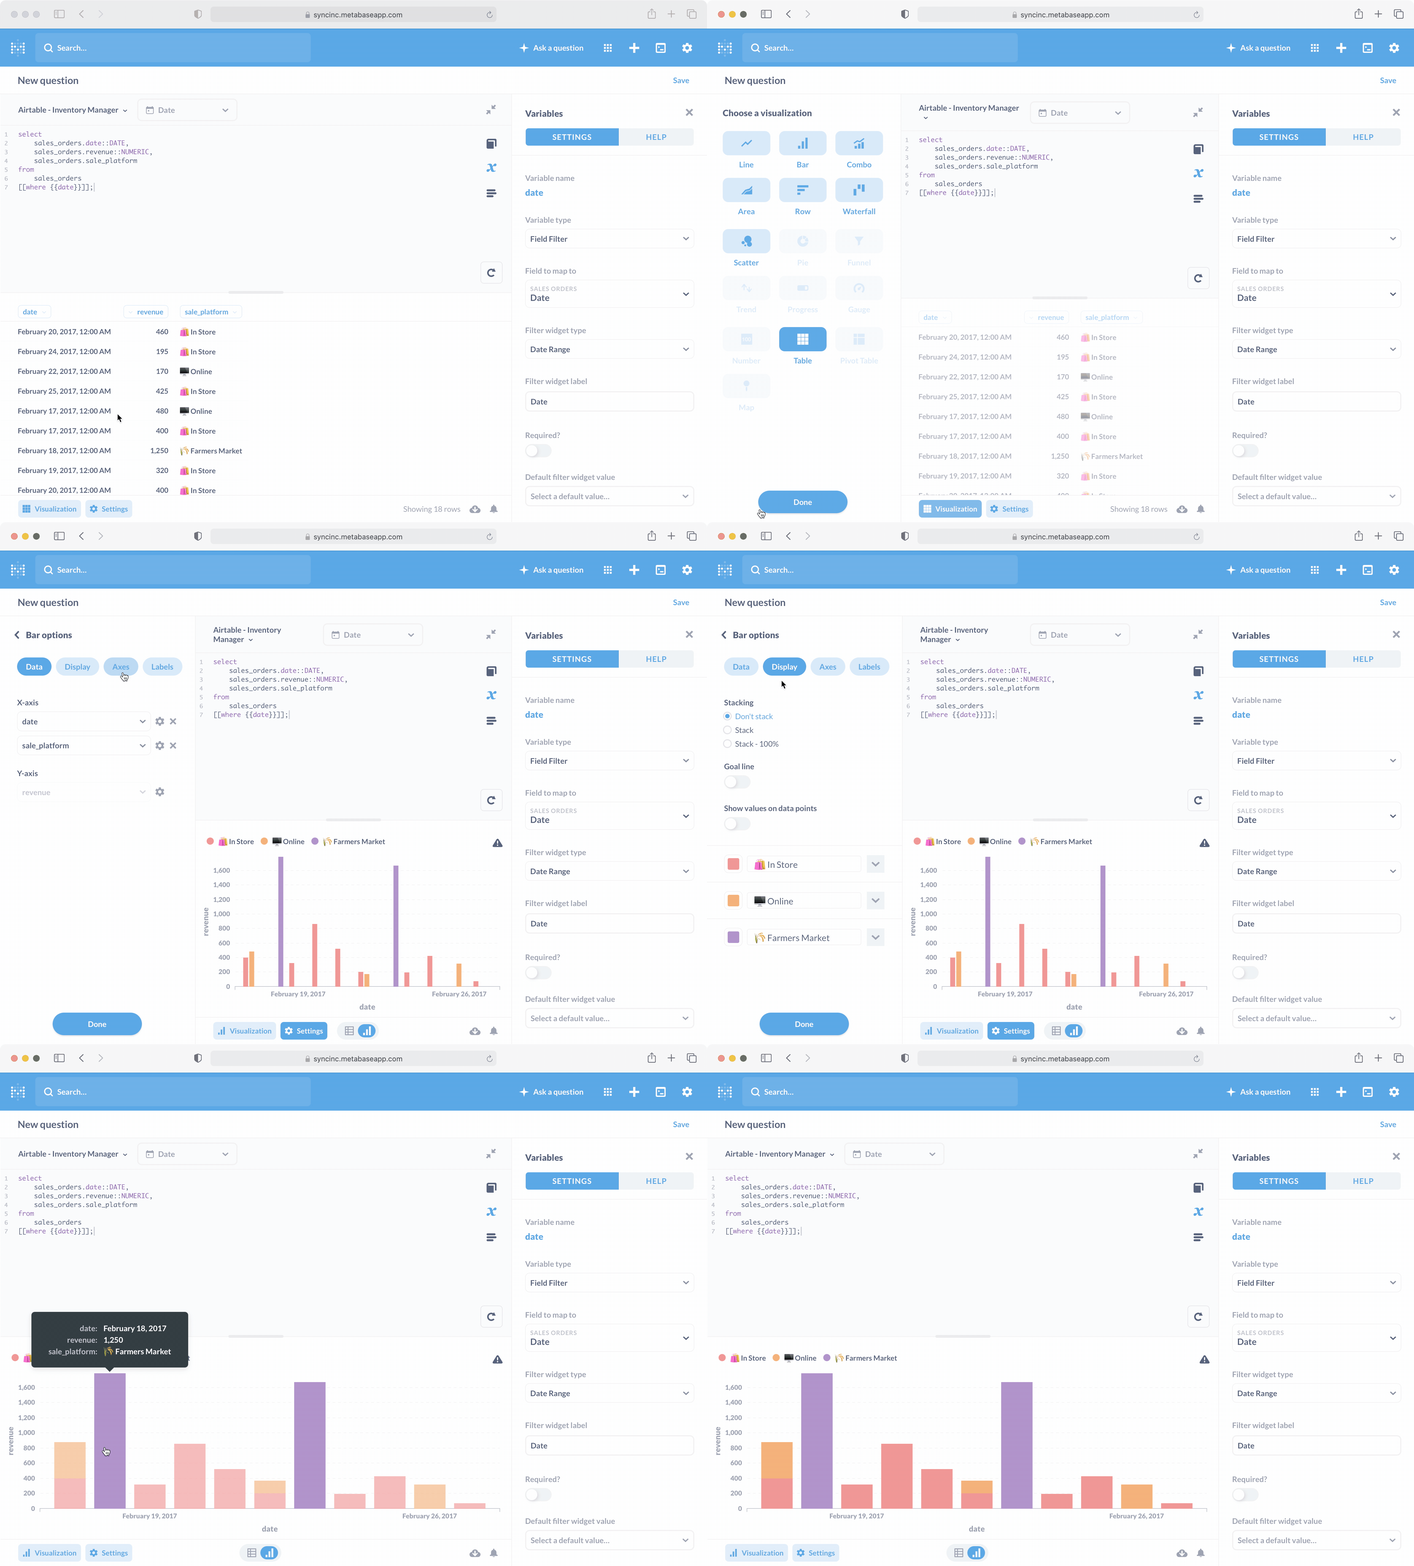 1. Click the **Visualize** button in the lower right corner and select the **Bar** option.
2. The settings pane will open and Metabase will detect the data types to auto format the axis. All you need to do is toggle the chart to be a *stacked* bar chart by clicking the **Display** tab and selecting **Stack**.
The chart looks great. Save it by naming it something like "Sales by Date and Platform." Then repeat the steps you performed with the gross profit question to add it to your **Sequin Tutorial** dashboard.
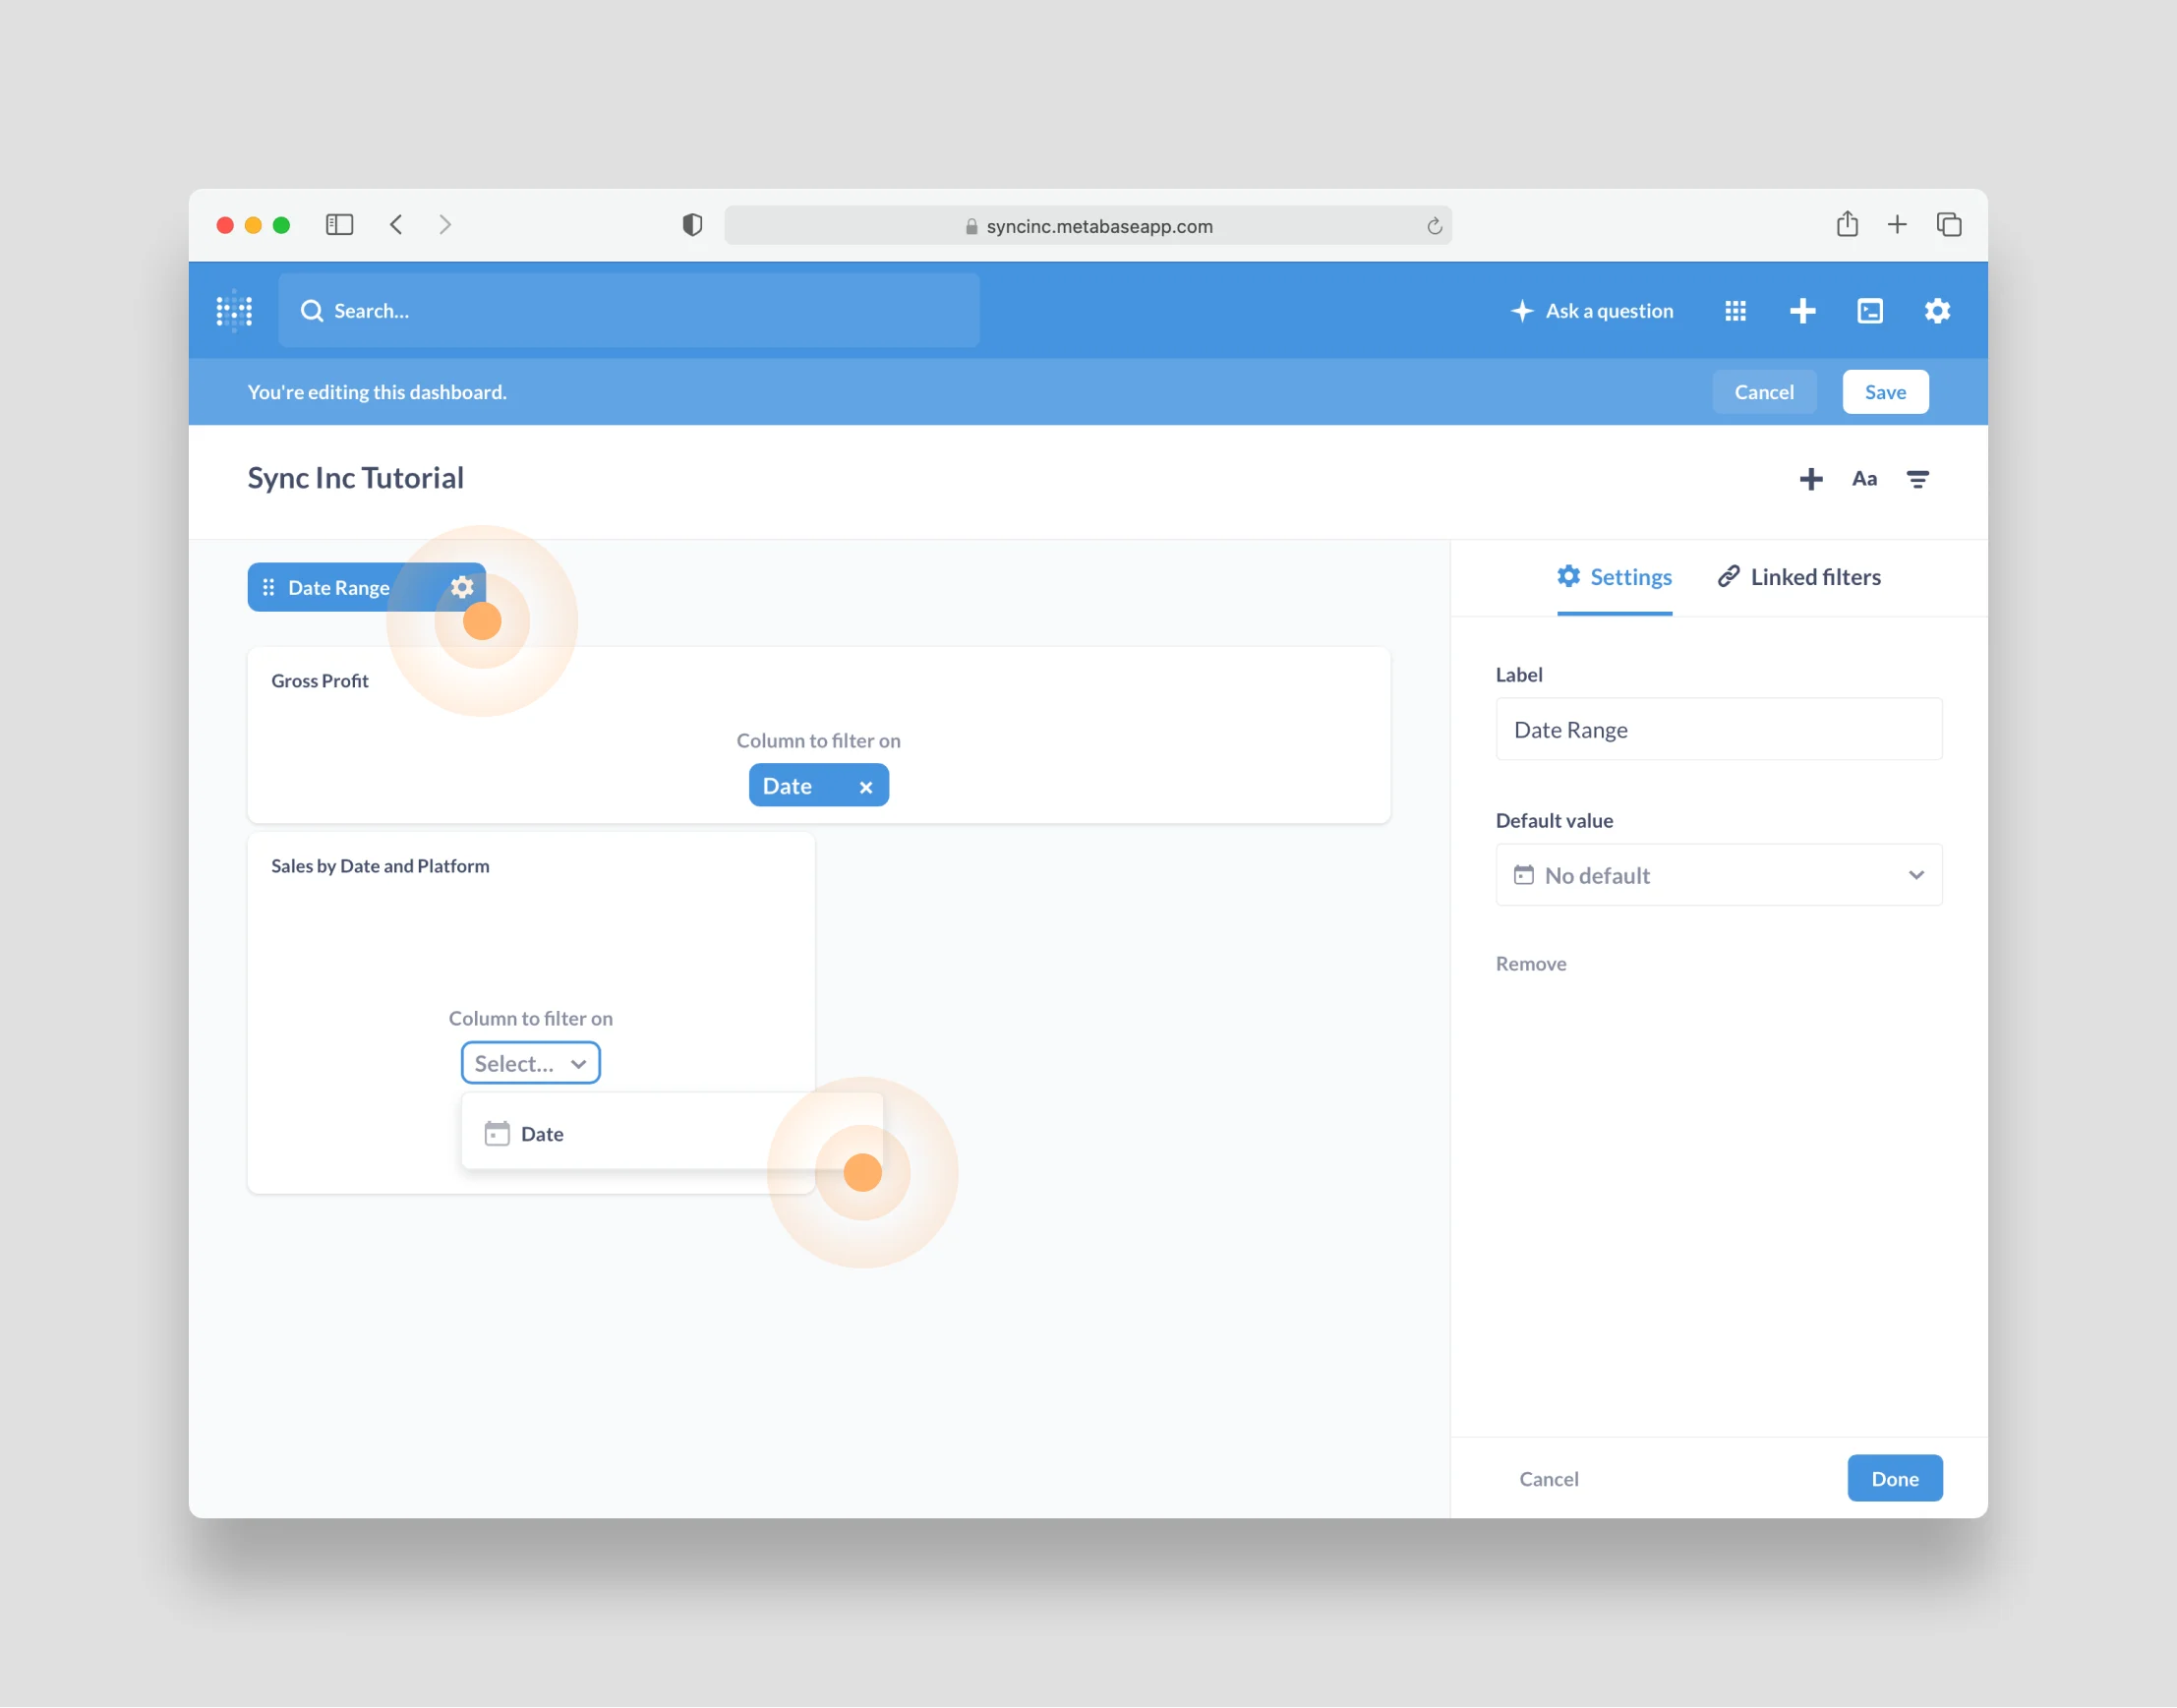
As a last step, you'll need to map the **Date Range** filter to the **Date Variable** in your new graph by clicking the **Date Range Filter** and then selecting the **Date** variable in the "Sales by Date and Platform" graph:
1. Click the **Visualize** button in the lower right corner and select the **Bar** option.
2. The settings pane will open and Metabase will detect the data types to auto format the axis. All you need to do is toggle the chart to be a *stacked* bar chart by clicking the **Display** tab and selecting **Stack**.
The chart looks great. Save it by naming it something like "Sales by Date and Platform." Then repeat the steps you performed with the gross profit question to add it to your **Sequin Tutorial** dashboard.
As a last step, you'll need to map the **Date Range** filter to the **Date Variable** in your new graph by clicking the **Date Range Filter** and then selecting the **Date** variable in the "Sales by Date and Platform" graph:
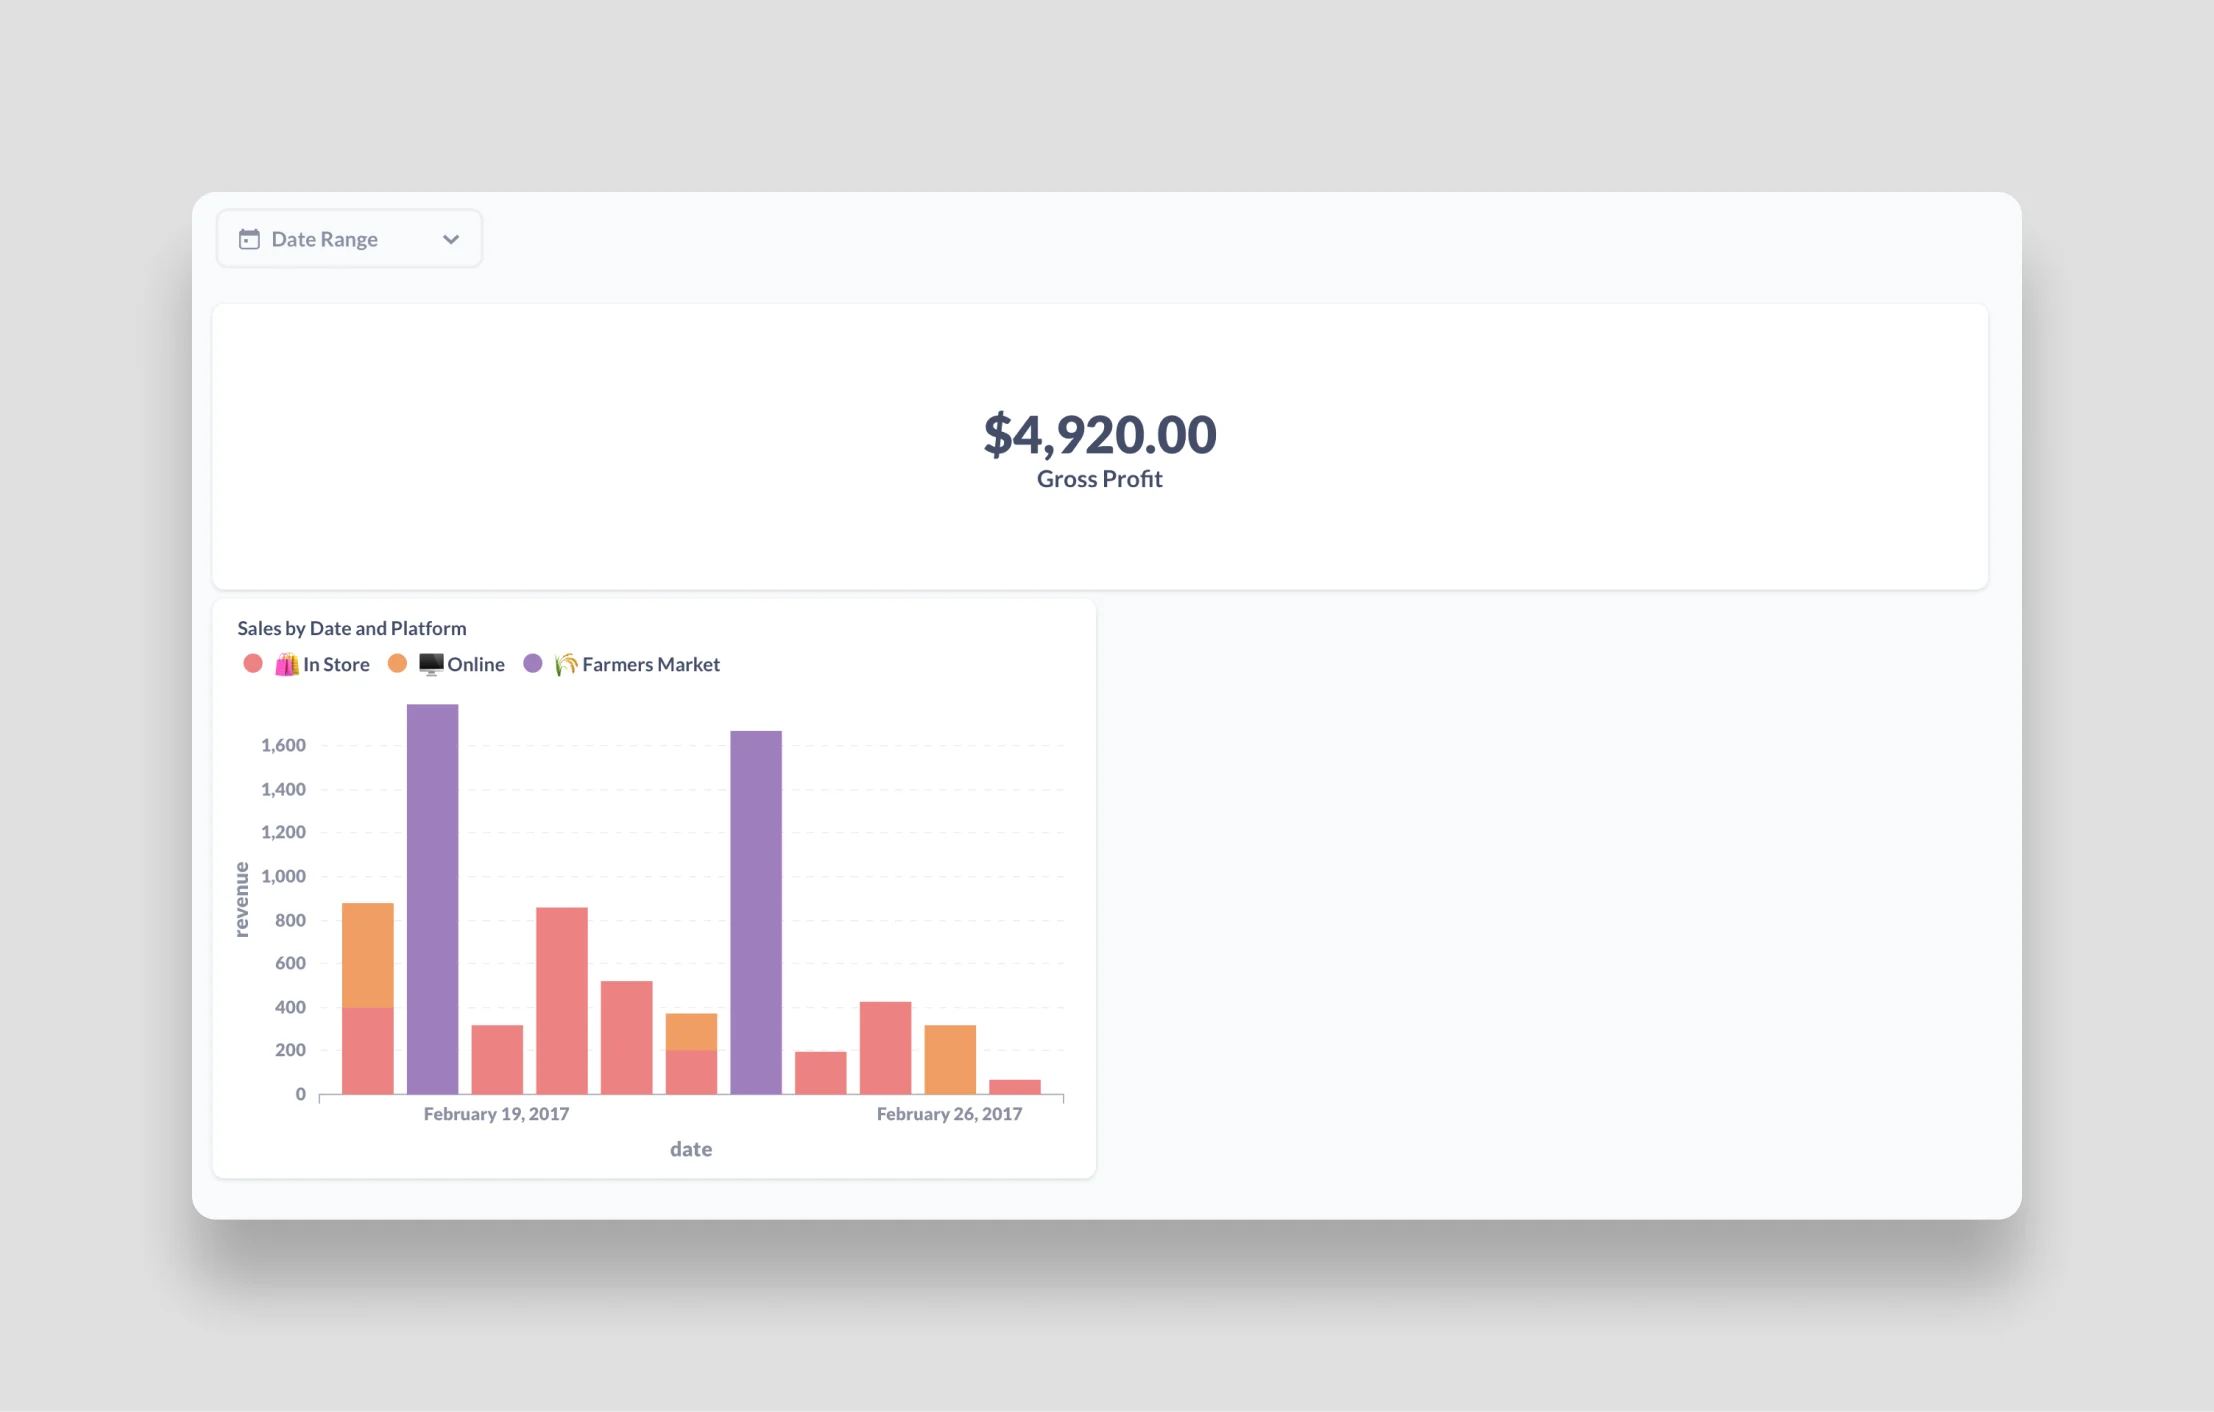
 When you're done, click the **Save** button and you'll see the beginnings of a dashboard that quickly tells the story of this small business:
 ## Conclusion
In this tutorial you've learned how to build a dynamic dashboard in Metabase using Sequin and Airtable. From this starting point, you can use SQL to answer almost any question hiding in your Airtable base and present it in a clean dashboard that you can easily share.
## Conclusion
In this tutorial you've learned how to build a dynamic dashboard in Metabase using Sequin and Airtable. From this starting point, you can use SQL to answer almost any question hiding in your Airtable base and present it in a clean dashboard that you can easily share.