> ## Documentation Index
> Fetch the complete documentation index at: https://sequin.io/docs/llms.txt
> Use this file to discover all available pages before exploring further.
# Heroku
> [Heroku](https://heroku.com/) is a popular platform for hosting web applications and databases. Heroku takes care of the details of infrastructure management so you can focus on building your app.
However, Heroku's abstractions come with some limitations. Notably, you can't create new database users directly in the database. So to connect a Heroku Postgres to Sequin, you need to create a database user using the Heroku CLI or dashboard.
This guide will explain how to set up a Heroku Postgres database and connect it to Sequin.
## Create a Heroku Postgres database[](#create-a-heroku-postgres-database "Direct link to Create a Heroku Postgres database")
First, you'll [provision](https://devcenter.heroku.com/articles/provisioning-heroku-postgres) a Heroku Postgres database. You can do this through the Heroku CLI or the Heroku dashboard. Here are the steps:
To use a Heroku Postgres instance with Sequin, you'll need a "production-class" plan (i.e. Standard, Premium, Private, and Shield). At lower tiers, you can't [manage the credentials](https://devcenter.heroku.com/articles/heroku-postgresql-credentials) for your database, which is required for Sequin to work.
### Heroku CLI[](#heroku-cli "Direct link to Heroku CLI")
**Step 1:** Create a new Heroku app by running the [heroku create](https://devcenter.heroku.com/articles/heroku-cli-commands#heroku-create) CLI command:
```sql theme={null}
$ heroku create example-app
Creating ⬢ example-app... done
https://example-app.herokuapp.com/ | https://git.heroku.com/example.git
```
**Step 2:** Provision a Heroku Postgres database by running the [heroku addons:create](https://devcenter.heroku.com/articles/heroku-cli-commands#heroku-addons-create) command:
```
$ heroku addons:create heroku-postgresql: -a example-app
```
### Heroku Dashboard[](#heroku-dashboard "Direct link to Heroku Dashboard")
**Step 1:** Login to Heroku and [create new Heroku app](https://devcenter.heroku.com/articles/quick-start-heroku-connect#step-1-create-a-heroku-app-and-heroku-postgres-databases).
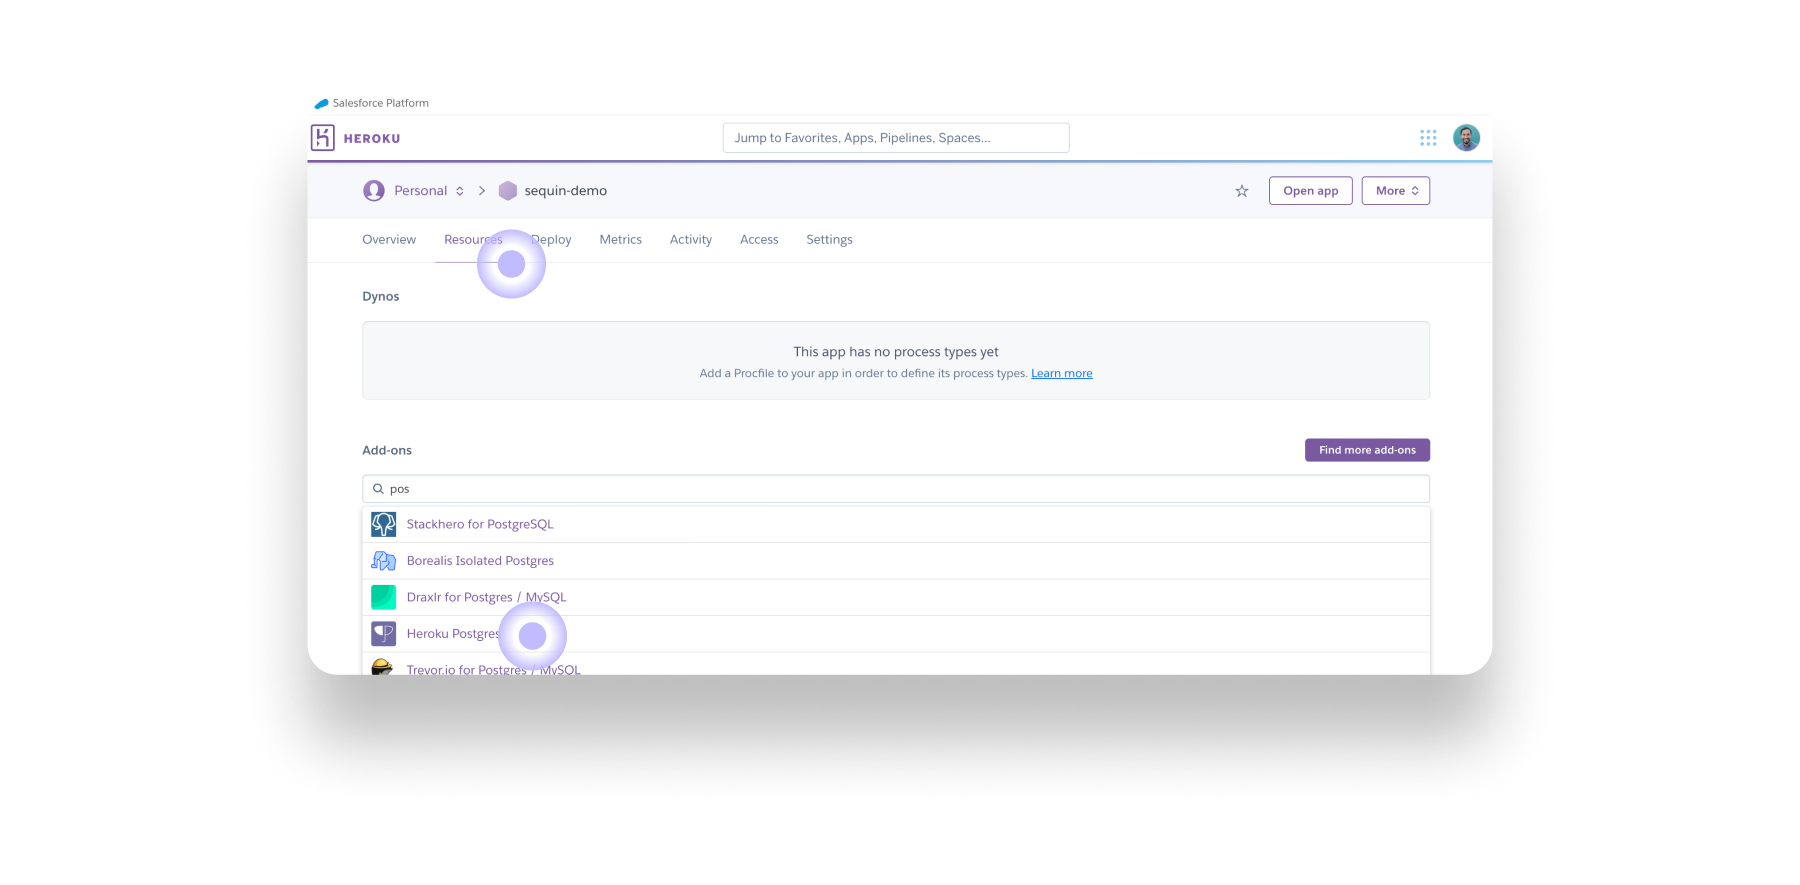
**Step 2:** Navigate to the **Resources** tab of your new app and search for "Postgres". Then select **Heroku Postgres** and select the plan you want to use:
 ## Create a Sequin database user[](#create-a-sequin-database-user "Direct link to Create a Sequin database user")
With your Heroku Postgres instance provisioned, you'll now create a database user for Sequin. As with provisioning the database, you can create a new user via the Heroku CLI or the Heroku dashboard.
### Heroku CLI[](#heroku-cli-1 "Direct link to Heroku CLI")
**Step 1:** Create a new database user by running the [pg:credentials:create](https://devcenter.heroku.com/articles/heroku-cli-commands#heroku-pg-credentials-create-database) CLI command:
```sql theme={null}
$ heroku pg:credentials:create postgresql-addon-name --name sequin_user -a example-app
Creating credential sequin_user... done
```
You'll replace `postgresql-addon-name` with the name of your Heroku Postgres add on. You can find this name by running the [pg:info](https://devcenter.heroku.com/articles/heroku-cli-commands#heroku-pg-info) command.
**Step 2:** Check that the `sequin_user` was created by running the [pg:credentials](https://devcenter.heroku.com/articles/heroku-cli-commands#heroku-pg-credentials) CLI command:
```sql theme={null}
$ heroku pg:credentials --app example-app
Credential State
──────────────────────────────────── ──────
default active
└─ as DATABASE on ⬢ example-app
sequin_user active
```
**Step 3:** Once you've confirmed the `sequin_user` was created, you'll need to grant the proper permissions to the user using the `pg:psql` CLI command and standard postgres permission grants:
```sql theme={null}
$ heroku pg:psql postgresql-addon-name -a example-app
--> Connecting to postgresql-addon-name
psql (13.2, server 11.12 (Ubuntu 11.12-1.pgdg16.04+1))
SSL connection (protocol: TLSv1.2, cipher: ECDHE-RSA-AES256-GCM-SHA384, bits: 256, compression: off)
Type "help" for help.
example-app::CYAN=> grant connect, create on database YOUR_DB_NAME to sequin_user;
```
**Step 4:** Finally, retrieve the connection details (including `password`, `host`, `database`, and `port`) for the `sequin_user` by running the [pg:credentials:url](https://devcenter.heroku.com/articles/heroku-cli-commands#heroku-pg-credentials-url) CLI command:
```sql theme={null}
$ heroku pg:credentials:url --name sequin_user --app example-app
Connection information for sequin_user credential.
Connection info string:
"dbname=d3e6▒▒▒▒▒▒▒▒▒▒ host=▒▒▒▒▒▒▒▒▒▒▒▒▒▒▒.compute-1.amazonaws.com port=5432 user=sequin_user password=▒▒▒▒▒▒▒▒▒▒▒▒▒▒▒▒▒▒▒▒ sslmode=require"
Connection URL:
postgres://sequin_user:▒▒▒▒▒▒▒▒▒▒▒▒▒▒▒@▒▒▒▒▒▒▒▒▒▒.compute-1.amazonaws.com:5432/d3e6▒▒▒▒▒▒▒▒▒▒
```
### Heroku Dashboard[](#heroku-dashboard-1 "Direct link to Heroku Dashboard")
**Step 1:** Navigate to the **Resources** tab and select your Heroku Postgres database.
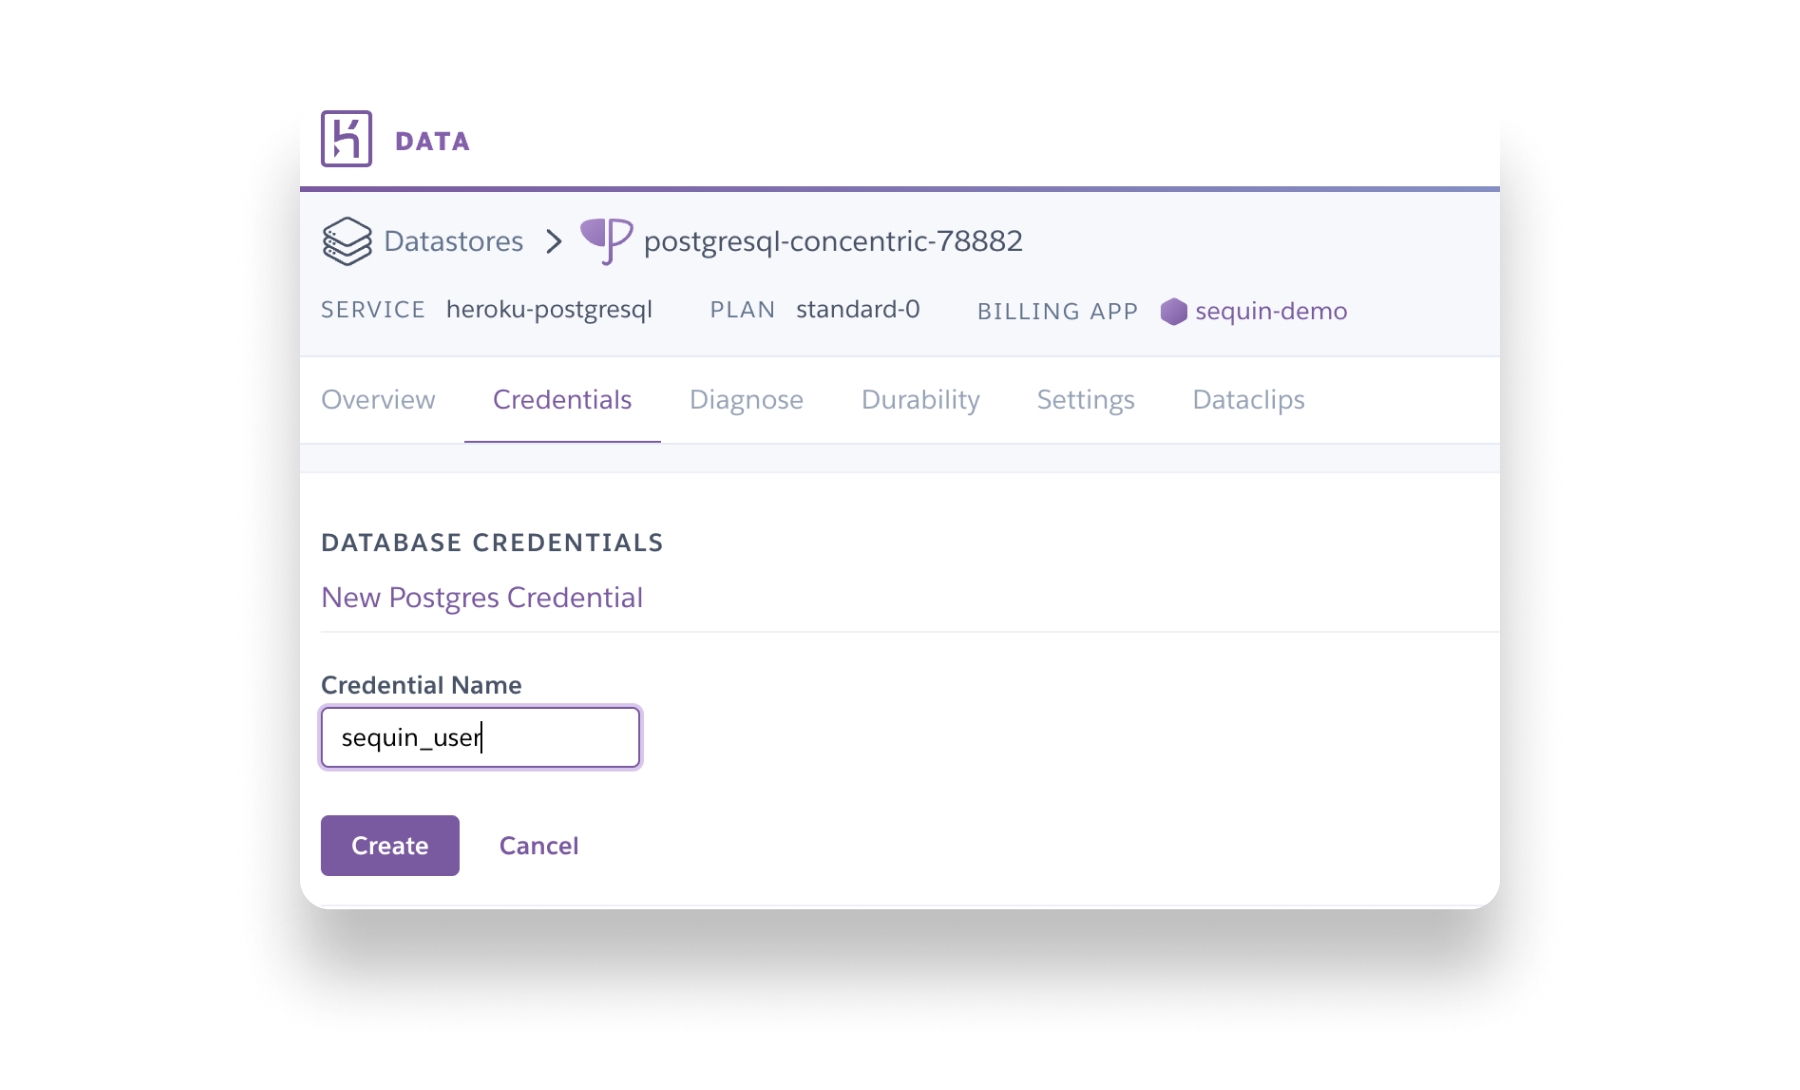
**Step 2:** Select the **Credentials** tab and click the **Create Credential** button.
**Step 3:** Enter `sequin_user` for the **Credential Name** and click **Create**. It may take a couple minutes for Heroku to create the user:
## Create a Sequin database user[](#create-a-sequin-database-user "Direct link to Create a Sequin database user")
With your Heroku Postgres instance provisioned, you'll now create a database user for Sequin. As with provisioning the database, you can create a new user via the Heroku CLI or the Heroku dashboard.
### Heroku CLI[](#heroku-cli-1 "Direct link to Heroku CLI")
**Step 1:** Create a new database user by running the [pg:credentials:create](https://devcenter.heroku.com/articles/heroku-cli-commands#heroku-pg-credentials-create-database) CLI command:
```sql theme={null}
$ heroku pg:credentials:create postgresql-addon-name --name sequin_user -a example-app
Creating credential sequin_user... done
```
You'll replace `postgresql-addon-name` with the name of your Heroku Postgres add on. You can find this name by running the [pg:info](https://devcenter.heroku.com/articles/heroku-cli-commands#heroku-pg-info) command.
**Step 2:** Check that the `sequin_user` was created by running the [pg:credentials](https://devcenter.heroku.com/articles/heroku-cli-commands#heroku-pg-credentials) CLI command:
```sql theme={null}
$ heroku pg:credentials --app example-app
Credential State
──────────────────────────────────── ──────
default active
└─ as DATABASE on ⬢ example-app
sequin_user active
```
**Step 3:** Once you've confirmed the `sequin_user` was created, you'll need to grant the proper permissions to the user using the `pg:psql` CLI command and standard postgres permission grants:
```sql theme={null}
$ heroku pg:psql postgresql-addon-name -a example-app
--> Connecting to postgresql-addon-name
psql (13.2, server 11.12 (Ubuntu 11.12-1.pgdg16.04+1))
SSL connection (protocol: TLSv1.2, cipher: ECDHE-RSA-AES256-GCM-SHA384, bits: 256, compression: off)
Type "help" for help.
example-app::CYAN=> grant connect, create on database YOUR_DB_NAME to sequin_user;
```
**Step 4:** Finally, retrieve the connection details (including `password`, `host`, `database`, and `port`) for the `sequin_user` by running the [pg:credentials:url](https://devcenter.heroku.com/articles/heroku-cli-commands#heroku-pg-credentials-url) CLI command:
```sql theme={null}
$ heroku pg:credentials:url --name sequin_user --app example-app
Connection information for sequin_user credential.
Connection info string:
"dbname=d3e6▒▒▒▒▒▒▒▒▒▒ host=▒▒▒▒▒▒▒▒▒▒▒▒▒▒▒.compute-1.amazonaws.com port=5432 user=sequin_user password=▒▒▒▒▒▒▒▒▒▒▒▒▒▒▒▒▒▒▒▒ sslmode=require"
Connection URL:
postgres://sequin_user:▒▒▒▒▒▒▒▒▒▒▒▒▒▒▒@▒▒▒▒▒▒▒▒▒▒.compute-1.amazonaws.com:5432/d3e6▒▒▒▒▒▒▒▒▒▒
```
### Heroku Dashboard[](#heroku-dashboard-1 "Direct link to Heroku Dashboard")
**Step 1:** Navigate to the **Resources** tab and select your Heroku Postgres database.
**Step 2:** Select the **Credentials** tab and click the **Create Credential** button.
**Step 3:** Enter `sequin_user` for the **Credential Name** and click **Create**. It may take a couple minutes for Heroku to create the user:
 **Step 4:** Once the `sequin_user` is created, you'll see it appear on the credentials page. Now, grant the `sequin_user` the proper permissions using the Heroku CLI (as described in Step 3 of the Heroku CLI instructions above) or by connecting to the database using another Postgres client (e.g. [Postico](https://eggerapps.at/postico/)) and running the following SQL:
```sql theme={null}
grant connect, create on database YOUR_DB_NAME to sequin_user;
```
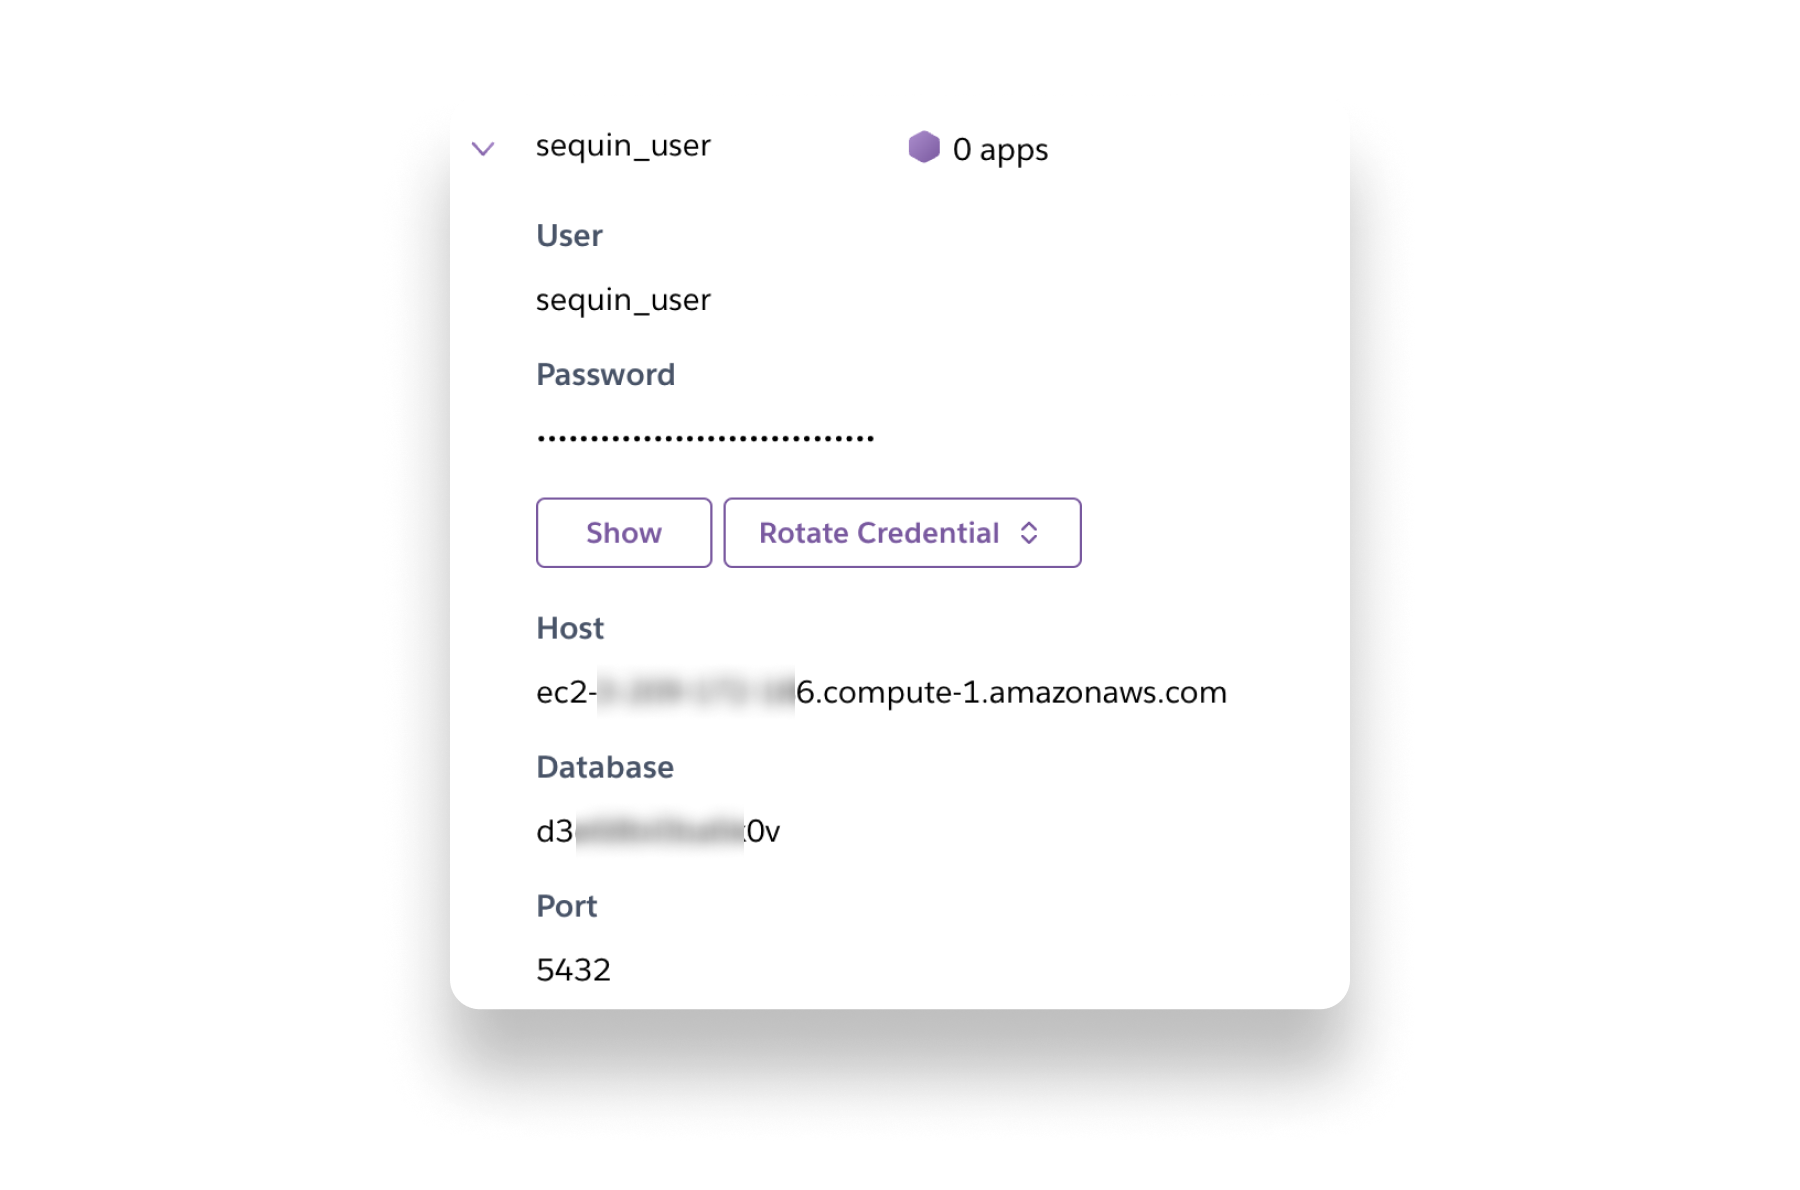
**Step 5:** Finally, note the `user`, `password`, `host`, `database`, and `port` values for the `sequin_user` credential. You'll need these to connect Sequin to your Heroku Postgres database:
**Step 4:** Once the `sequin_user` is created, you'll see it appear on the credentials page. Now, grant the `sequin_user` the proper permissions using the Heroku CLI (as described in Step 3 of the Heroku CLI instructions above) or by connecting to the database using another Postgres client (e.g. [Postico](https://eggerapps.at/postico/)) and running the following SQL:
```sql theme={null}
grant connect, create on database YOUR_DB_NAME to sequin_user;
```
**Step 5:** Finally, note the `user`, `password`, `host`, `database`, and `port` values for the `sequin_user` credential. You'll need these to connect Sequin to your Heroku Postgres database:
 ## Connect Sequin to Heroku Postgres[](#connect-sequin-to-heroku-postgres "Direct link to Connect Sequin to Heroku Postgres")
With your `sequin_user` created, you can now connect Sequin to your Heroku Postgres database.
**Step 1:** Begin to create a new sync in the Sequin console (if you need more instruction, check out one of our step-by-step [guides](/docs/#getting-started)). After connecting your source and selecting the data you want to include in your sync, you'll be prompted to connect your destination. Click **Launch or Connect** and choose **Connect** to start a new connection to your Heroku database.
**Step 2:** On the screen that appears, enter the `host` and `port` that you noted down for your Heroku Postgres database and click the **Continue** button.
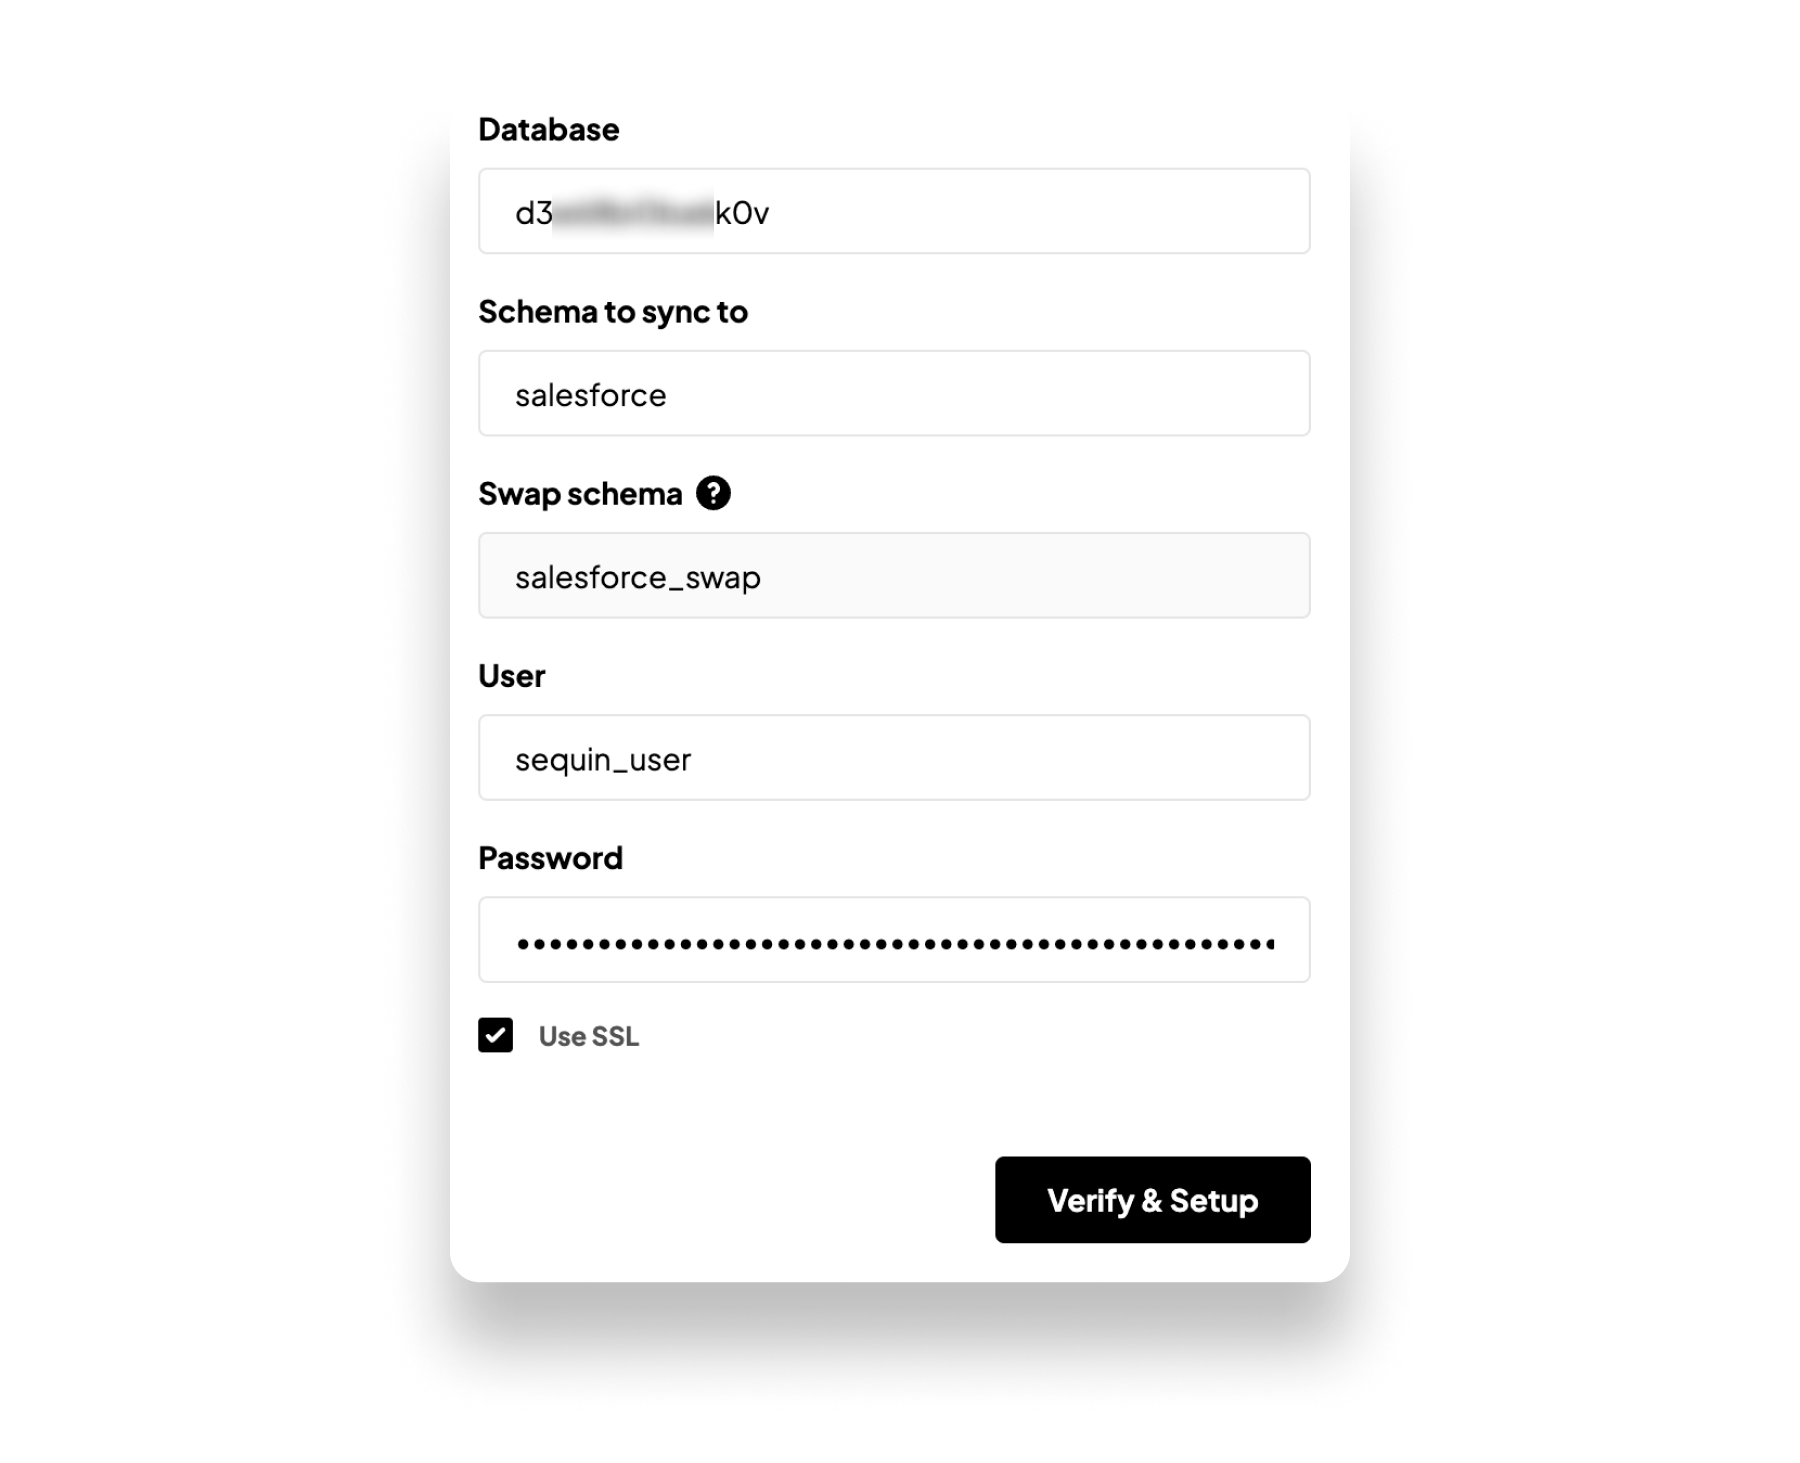
**Step 3:** On the next page, click the **Setup manually instead** option. Since you've already created the Heroku user in the steps above, skip the instructions and scroll down to enter the `database`, `user`, and `password` that you noted for the`sequin_user` credential you created. Make sure you've checked **Use SSL**, then click the **Verify & Setup** button:
## Connect Sequin to Heroku Postgres[](#connect-sequin-to-heroku-postgres "Direct link to Connect Sequin to Heroku Postgres")
With your `sequin_user` created, you can now connect Sequin to your Heroku Postgres database.
**Step 1:** Begin to create a new sync in the Sequin console (if you need more instruction, check out one of our step-by-step [guides](/docs/#getting-started)). After connecting your source and selecting the data you want to include in your sync, you'll be prompted to connect your destination. Click **Launch or Connect** and choose **Connect** to start a new connection to your Heroku database.
**Step 2:** On the screen that appears, enter the `host` and `port` that you noted down for your Heroku Postgres database and click the **Continue** button.
**Step 3:** On the next page, click the **Setup manually instead** option. Since you've already created the Heroku user in the steps above, skip the instructions and scroll down to enter the `database`, `user`, and `password` that you noted for the`sequin_user` credential you created. Make sure you've checked **Use SSL**, then click the **Verify & Setup** button:
 **Step 4:** Sequin will connect to your database and configure your database for your sync. You'll see a success message and the option to give your database a name in Sequin. Click **Continue** to finish setting up your sync.
## Next steps[](#next-steps "Direct link to Next steps")
You are now set up to sync sources like Salesforce, Airtable, and HubSpot to your Heroku Postgres database. From here, you can begin to work with your source data right from your database. Check out one of our tutorials to start building. If you have any questions, please [send us a note.](mailto:support@sequin.io)
**Step 4:** Sequin will connect to your database and configure your database for your sync. You'll see a success message and the option to give your database a name in Sequin. Click **Continue** to finish setting up your sync.
## Next steps[](#next-steps "Direct link to Next steps")
You are now set up to sync sources like Salesforce, Airtable, and HubSpot to your Heroku Postgres database. From here, you can begin to work with your source data right from your database. Check out one of our tutorials to start building. If you have any questions, please [send us a note.](mailto:support@sequin.io)