> ## Documentation Index
> Fetch the complete documentation index at: https://sequin.io/docs/llms.txt
> Use this file to discover all available pages before exploring further.
# Hasura
> [Hasura](https://hasura.com/) is an open-source engine that auto-generates a GraphQL backend on top of a Postgres database. Paired with Sequin, you can easily query across all your data in one place.
With Hasura and Sequin, you can read data from and write data to Salesforce, HubSpot, and Airtable using GraphQL.
This guide will walk you through setting up Sequin, connecting Hasura Cloud, configuring your schema, and querying your data.
 ## Setup Sequin[](#setup-sequin "Direct link to Setup Sequin")
To use Hasura with Sequin, you need to sync to a [self-hosted database](/docs/sync-process/self-hosted). A Sequin-hosted demo database isn't configured with the permissions required to connect to Hasura.
**Step 1:** Login to Sequin and select the source you want to sync. If you need more details, follow the [step-by-step setup guide](/docs/#getting-started) for your source.
**Step 2:** Once you've connected your source, [select which objects and properties](/docs/data-mapping) you would like to sync to your database. You can always change this later.
**Step 3:** Connect your database to Sequin. Click the **Connect** button in the destination section of the Sequin dashboard. Then, enter your database connection details and set the name of the schema you want to sync your data to. If you need more detail, read our guide on [connecting a database](/docs/sync-process/self-hosted).
**Step 5:** Click **Create** to start your sync.
Sequin will now create a new schema in your database and start syncing your data to it. You can monitor the progress of your sync in the Sequin dashboard. Within a minute or two, you'll see your tables and data appear in your database. You can now setup Hasura.
## Setup Hasura[](#setup-hasura "Direct link to Setup Hasura")
**Step 1:** Create a new Hasura Cloud project. If you don't have one already, you can [sign up for a free account](https://cloud.hasura.io/signup).
**Step 2:** Connect your database to Hasura. You can do this by selecting **Postgres** and then clicking the **Connect Existing Database** button in the Hasura dashboard. Enter your database connection details and click **Connect Database**. If you need more details, read the [Hasura docs](https://hasura.io/docs/latest/graphql/cloud/projects/create.html#connect-database).
**Step 3:** Once Hasura connects to your database, it will appear in the Data Manager. Next, you can configure Hasura to track the tables in your database. Select your database and the schema containing the tables you want to track. Then, click the **Track** button next to each table you want to query via Hasura. Do this for both your `public` schema and your Sequin schema.
## Setup Sequin[](#setup-sequin "Direct link to Setup Sequin")
To use Hasura with Sequin, you need to sync to a [self-hosted database](/docs/sync-process/self-hosted). A Sequin-hosted demo database isn't configured with the permissions required to connect to Hasura.
**Step 1:** Login to Sequin and select the source you want to sync. If you need more details, follow the [step-by-step setup guide](/docs/#getting-started) for your source.
**Step 2:** Once you've connected your source, [select which objects and properties](/docs/data-mapping) you would like to sync to your database. You can always change this later.
**Step 3:** Connect your database to Sequin. Click the **Connect** button in the destination section of the Sequin dashboard. Then, enter your database connection details and set the name of the schema you want to sync your data to. If you need more detail, read our guide on [connecting a database](/docs/sync-process/self-hosted).
**Step 5:** Click **Create** to start your sync.
Sequin will now create a new schema in your database and start syncing your data to it. You can monitor the progress of your sync in the Sequin dashboard. Within a minute or two, you'll see your tables and data appear in your database. You can now setup Hasura.
## Setup Hasura[](#setup-hasura "Direct link to Setup Hasura")
**Step 1:** Create a new Hasura Cloud project. If you don't have one already, you can [sign up for a free account](https://cloud.hasura.io/signup).
**Step 2:** Connect your database to Hasura. You can do this by selecting **Postgres** and then clicking the **Connect Existing Database** button in the Hasura dashboard. Enter your database connection details and click **Connect Database**. If you need more details, read the [Hasura docs](https://hasura.io/docs/latest/graphql/cloud/projects/create.html#connect-database).
**Step 3:** Once Hasura connects to your database, it will appear in the Data Manager. Next, you can configure Hasura to track the tables in your database. Select your database and the schema containing the tables you want to track. Then, click the **Track** button next to each table you want to query via Hasura. Do this for both your `public` schema and your Sequin schema.
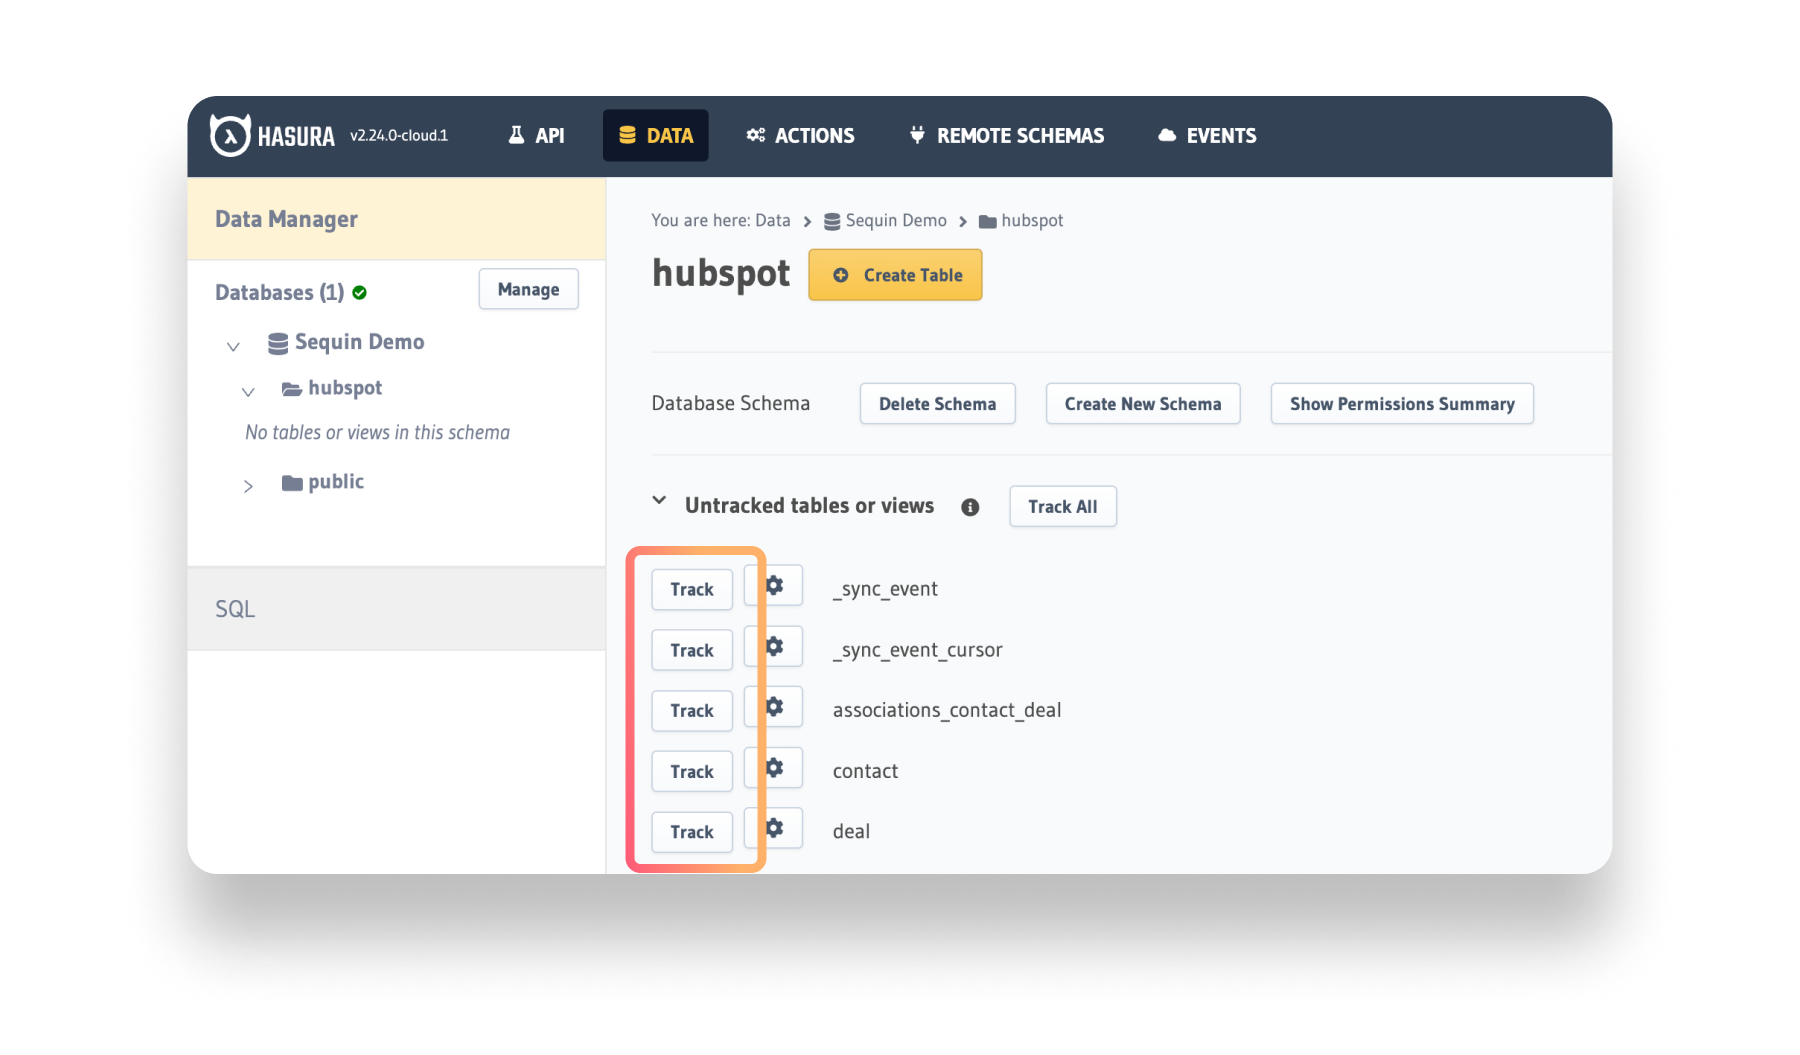 You don't need to track Sequin system tables that start with `_sync`.
## Configure relationships[](#configure-relationships "Direct link to Configure relationships")
Hasura uses relationships to join tables together when executing GraphQL queries. Because your Sequin schema doesn't contain foreign keys, you'll manually configure relationships in the Hasura dashboard or using the Hasura CLI.
**Step 1:** To configure relationships in the Hasura dashboard, select the table you want to define a relationship for in the Data Manager, click the **Relationships** tab, and then click the **Add Relationship** button.
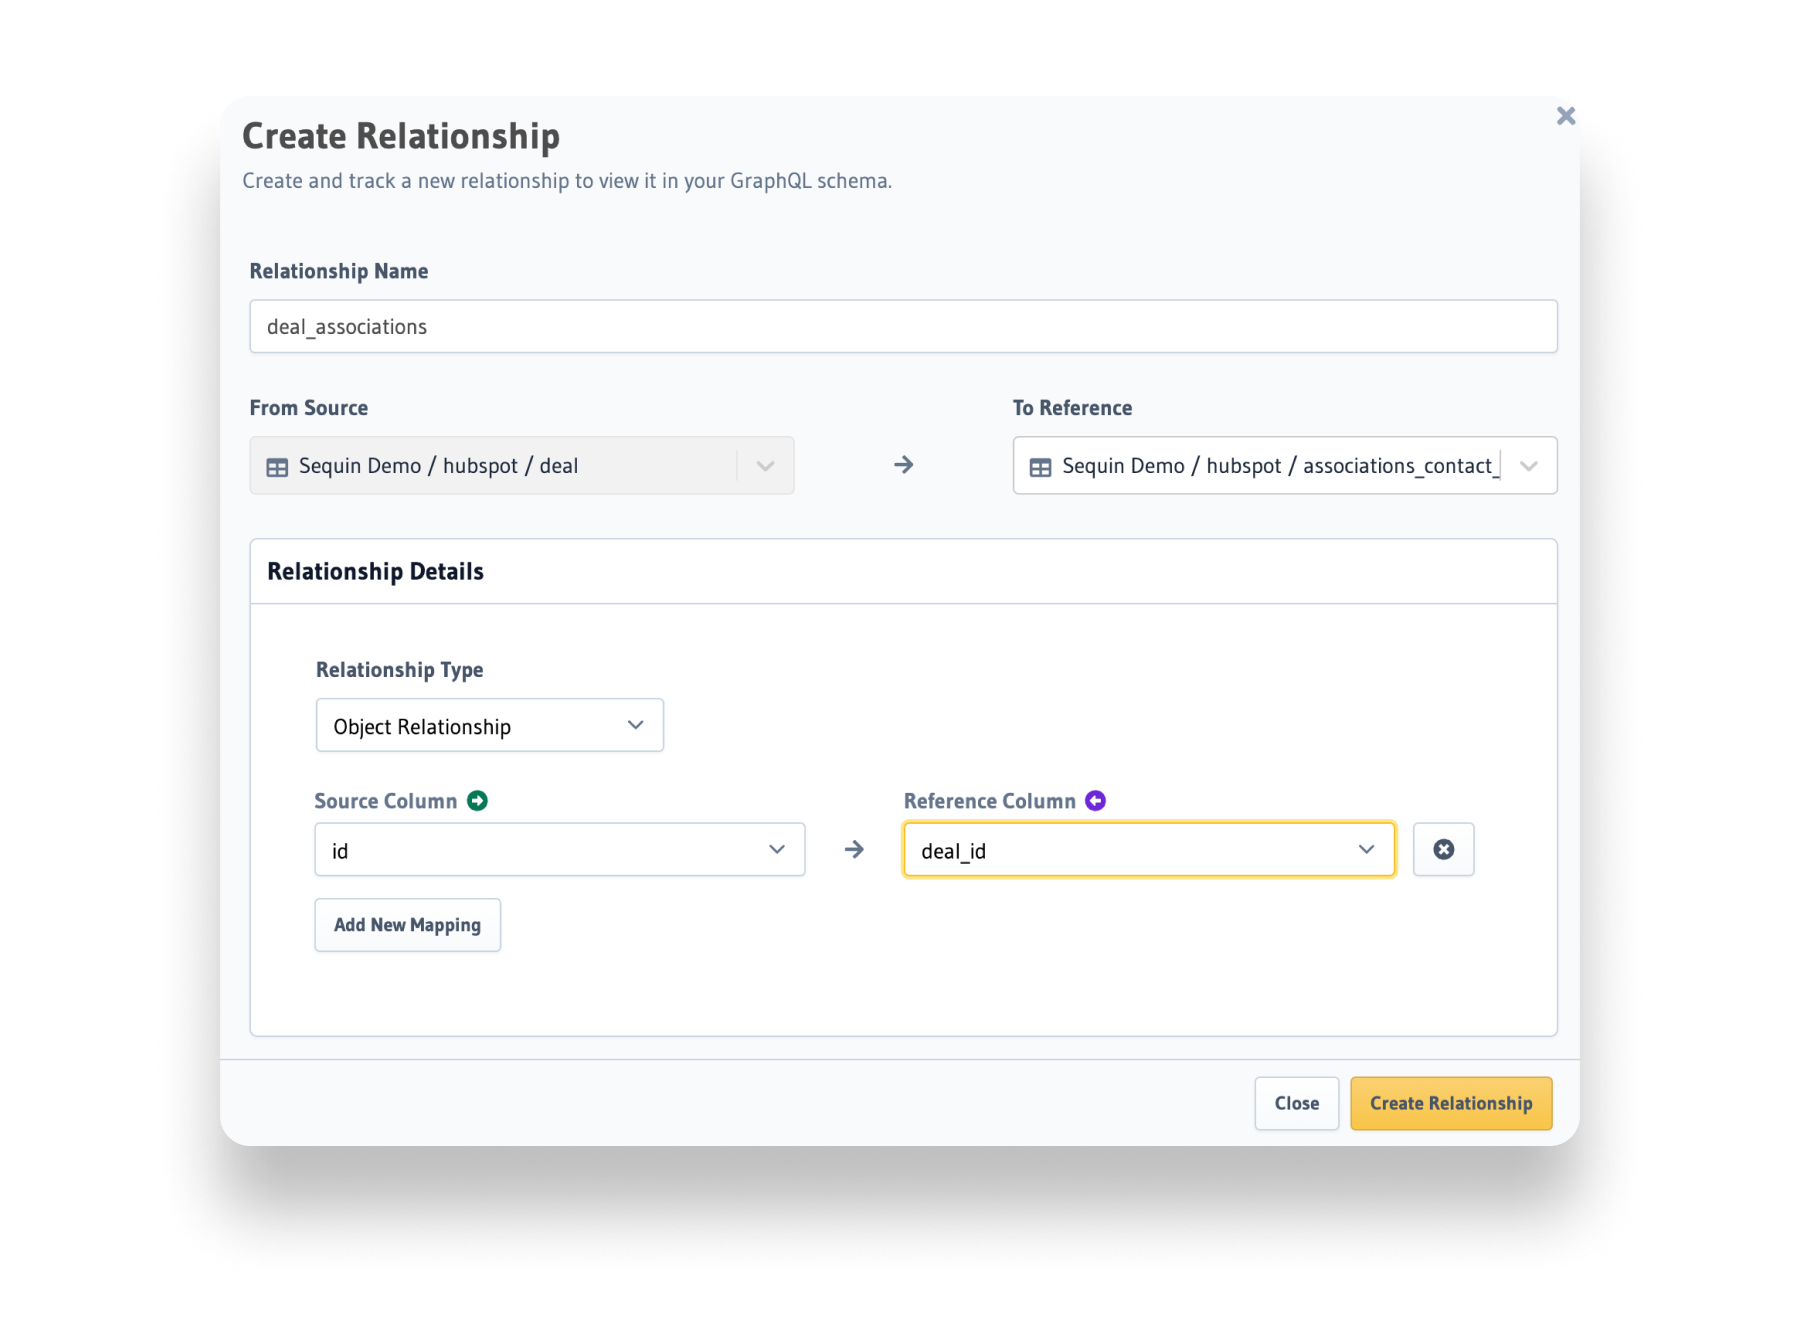
**Step 2:** Give the relationship a name (e.g., `deal_associations`), select the table you want to join to, and then select the columns you want to join on. Then click the **Create Relationship** button:
You don't need to track Sequin system tables that start with `_sync`.
## Configure relationships[](#configure-relationships "Direct link to Configure relationships")
Hasura uses relationships to join tables together when executing GraphQL queries. Because your Sequin schema doesn't contain foreign keys, you'll manually configure relationships in the Hasura dashboard or using the Hasura CLI.
**Step 1:** To configure relationships in the Hasura dashboard, select the table you want to define a relationship for in the Data Manager, click the **Relationships** tab, and then click the **Add Relationship** button.
**Step 2:** Give the relationship a name (e.g., `deal_associations`), select the table you want to join to, and then select the columns you want to join on. Then click the **Create Relationship** button:
 Depending on which source you are syncing, you'll need to define relationships differently. Below are the primary relationship types you'll need to define:
### Direct relationships[](#direct-relationships "Direct link to Direct relationships")
For sources like Salesforce and Stripe, you'll often create a relationship between two tables by simply mapping the primary key of one table to the foreign key of the other table. For example, if you want to join the `account` table to the `opportunity` table, you would map the `account_id` column in the `opportunity` table to the `id` column in the `account` table.
Depending on which source you are syncing, you'll need to define relationships differently. Below are the primary relationship types you'll need to define:
### Direct relationships[](#direct-relationships "Direct link to Direct relationships")
For sources like Salesforce and Stripe, you'll often create a relationship between two tables by simply mapping the primary key of one table to the foreign key of the other table. For example, if you want to join the `account` table to the `opportunity` table, you would map the `account_id` column in the `opportunity` table to the `id` column in the `account` table.
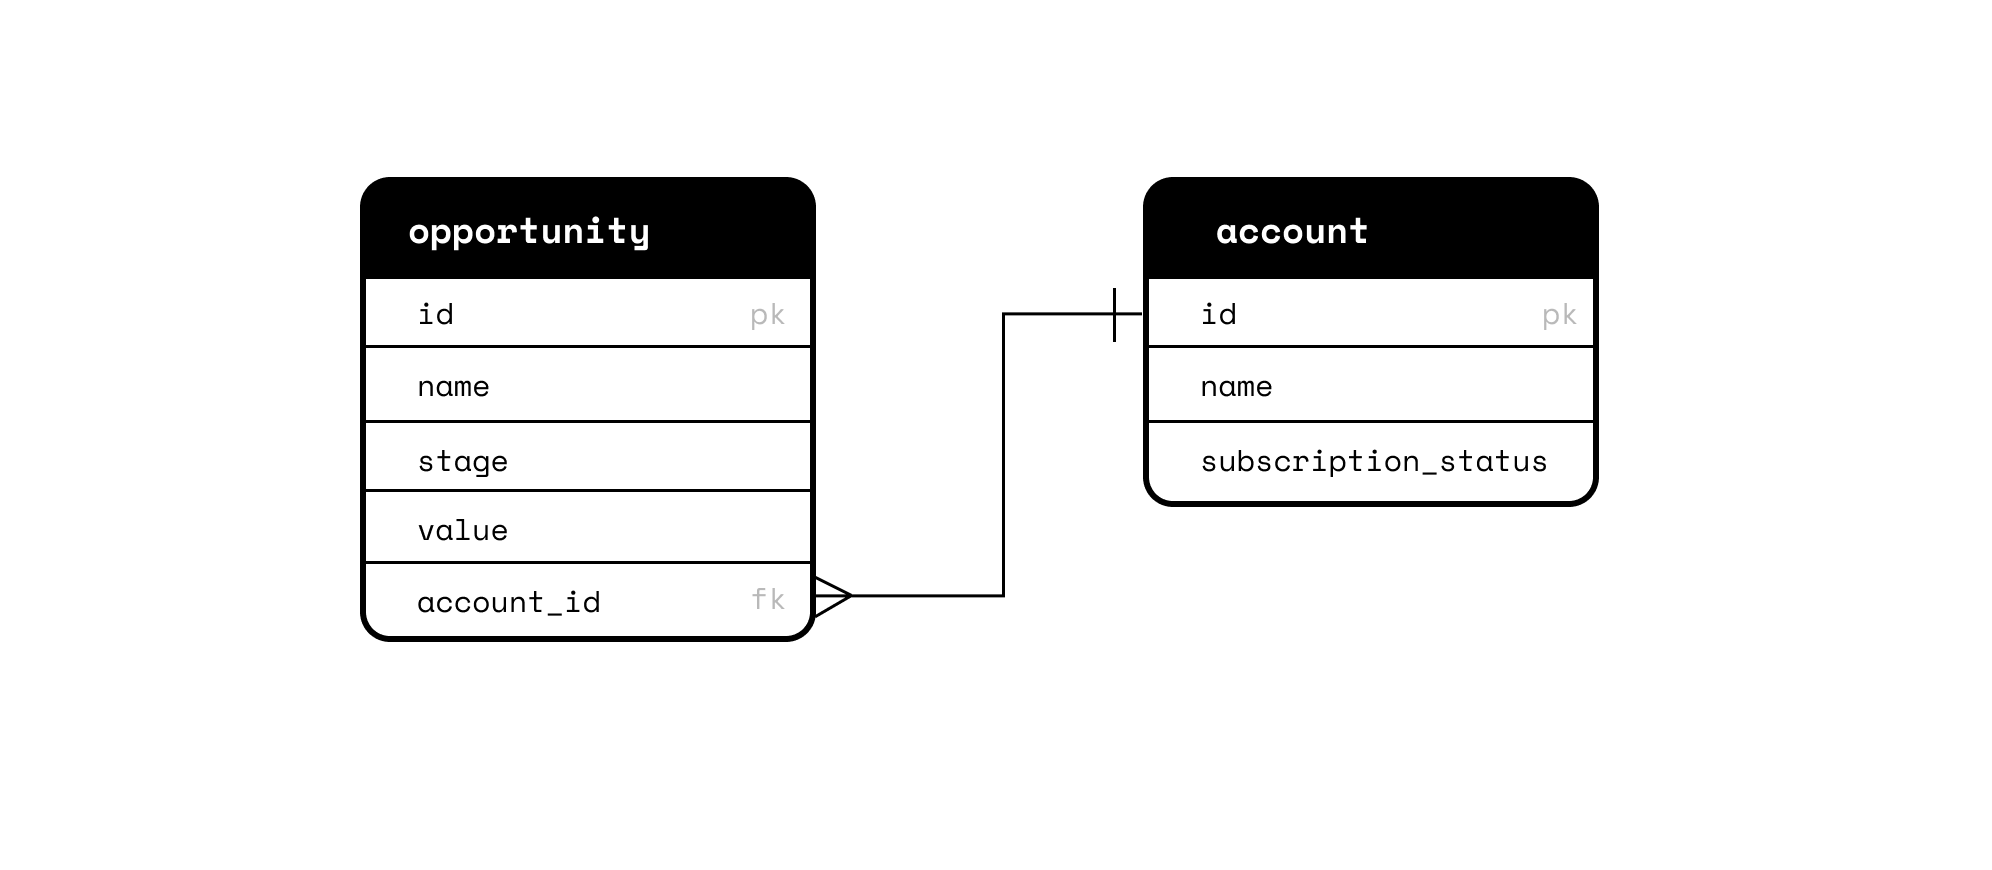 To give you ultimate querying options in GraphQL, you'll create a relationship on each side of this join:
1. On the `account` table you'll create an *object* relationship between `account.id` and `opportunity.account_id`.
2. On the `opportunity` table you'll create an *array* relationship between opportunity `opportunity.account_id` and `account.id`.
### Join table relationships[](#join-table-relationships "Direct link to Join table relationships")
For sources like HubSpot, you'll often need to create a relationship between two tables using an `associations` join table. For example, if you want to join the `deal` table to the `contact` table, you'll sync a join table called `associations_contact_deal` that contains the relationship between `deal_id` and `contact_id`. Then, you would map the `deal_id` column in the `associations_contact_deal` join table to the `id` column in the `deal` table and the `contact_id` column in the `associations_contact_deal` table to the `id` column in the `contact` table.
To give you ultimate querying options in GraphQL, you'll create a relationship on each side of this join:
1. On the `account` table you'll create an *object* relationship between `account.id` and `opportunity.account_id`.
2. On the `opportunity` table you'll create an *array* relationship between opportunity `opportunity.account_id` and `account.id`.
### Join table relationships[](#join-table-relationships "Direct link to Join table relationships")
For sources like HubSpot, you'll often need to create a relationship between two tables using an `associations` join table. For example, if you want to join the `deal` table to the `contact` table, you'll sync a join table called `associations_contact_deal` that contains the relationship between `deal_id` and `contact_id`. Then, you would map the `deal_id` column in the `associations_contact_deal` join table to the `id` column in the `deal` table and the `contact_id` column in the `associations_contact_deal` table to the `id` column in the `contact` table.
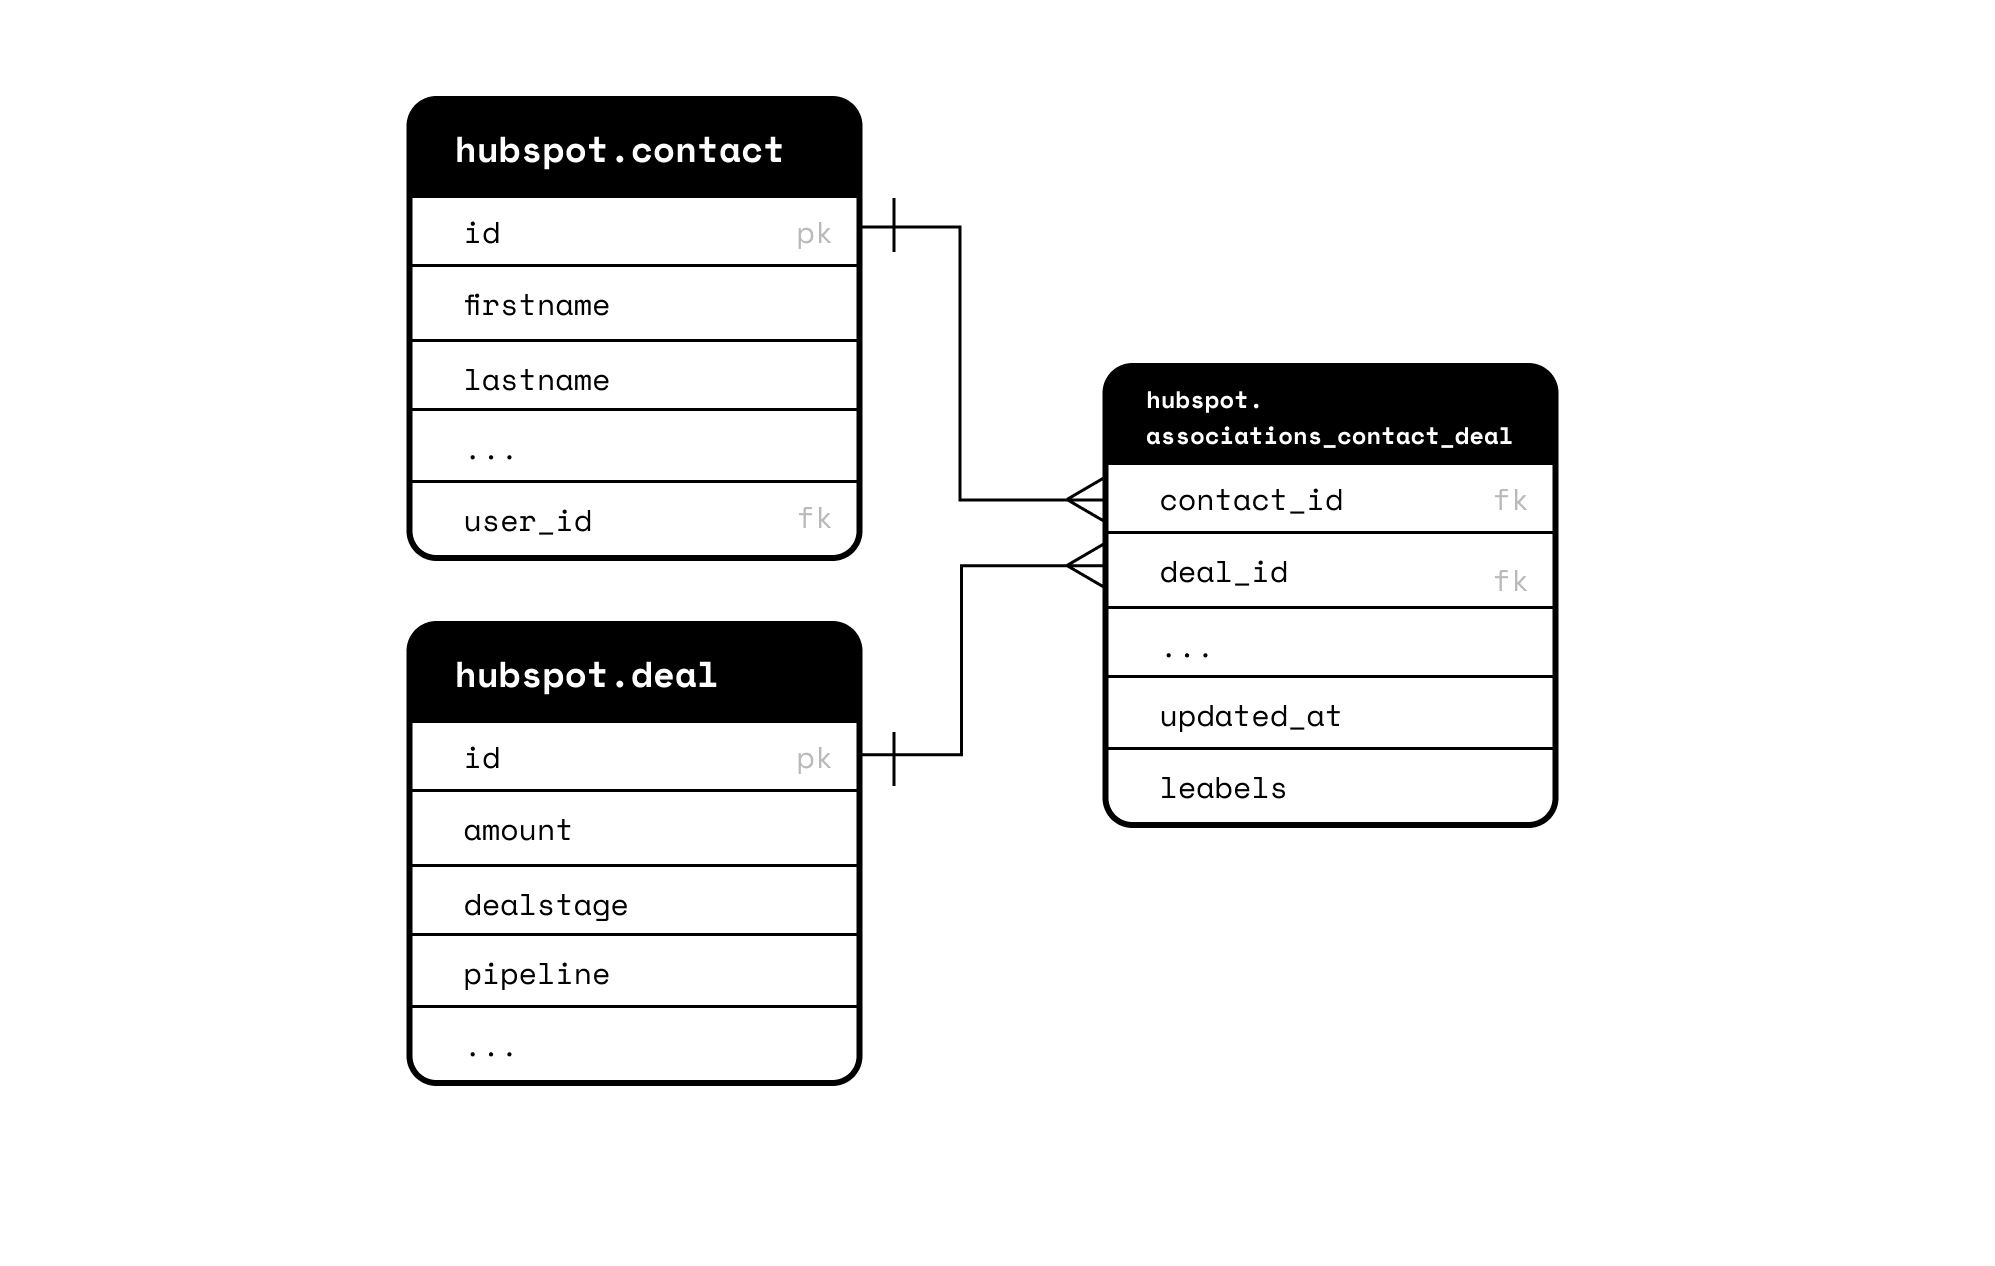 In this scenario, you'll create a total of four relationships:
1. On the `associations_contact_deal` table you'll create an object relationship between `associations_contact_deal.contact_id` and `contact.id`. You can call this `associations_contact`.
2. You'll then create the other end of the first relationship. On the `contact` table you'll create an object relationship between `associations_contact_deal.contact_id` and `contact.id`. You can call this `contact_associations`.
You'll then repeat this process for the `deal` table:
1. On the `associations_contact_deal` table you'll create a object relationship between `associations_contact_deal.deal_id` and `deal.id`. You can call this `associations_deal`.
2. You'll then create the other end of the relationship. On the `deal` table you'll create an object relationship between `associations_contact_deal.deal_id` and `deal.id`. You can call this `deal_associations`.
## Views and generated columns[](#views-and-generated-columns "Direct link to Views and generated columns")
Hasura and Sequin support [Postgres views](https://www.postgresql.org/docs/current/sql-createview.html) and [generated columns](https://www.postgresql.org/docs/current/ddl-generated-columns.html). You can use these features to create custom views and columns in your database to simplify querying patterns in GraphQL.
For instance, you can create a view called `deals_and_contacts` that joins your HubSpot `deal` table to your `contact` table via the `associations_contact_deal` join table. The view can contain just the columns you need:
```sql theme={null}
create view deals_and_contacts as
select
contact.id as "contact_id",
contact.firstname,
contact.lastname,
deal.id as "deal_id",
deal.dealname,
deal.stage
from hubspot.contact
join hubspot.associations_contact_deal on contact.id = associations_contact_deal.contact_id
join hubspot.deal on associations_contact_deal.deal_id = deal.id;
```
In Hasura, you can then track this view to include it in your GraphQL schema - simplifying the query pattern.
Alternatively, you may need to use a generated column to ensure joins in Hasura function correctly. For example, let's say you want to join your `public.users` table with your `salesforce.contact` table on the `users.id` and `contact.user_id` columns. However, the `users.id` column is type `int4` and the `contact.user_id` column is type `varchar`. You can create a generated column on the `contact` table that casts the `user_id` column to `int4` in a new column called `_user_id`:
```sql theme={null}
ALTER TABLE salesforce.contact
ADD COLUMN _user_id int4
GENERATED ALWAYS AS (CAST(user_id AS int4)) STORED;
```
In Hasura, you'll then define a relationship between the `users` table and the `contact` table using the `_user_id` column.
## Build[](#build "Direct link to Build")
Sequin and Hasura are now configured to work together. You can now use all the power of Hasura to query your database using GraphQL. A query to return the the state of a deal for one of your users might look like this:
```sql theme={null}
query MyQuery {
users(where: { id: { _eq: 1 } }) {
first_name
last_name
email
user_to_contact {
contact_to_association {
association_to_deal {
id
dealname
stage
}
}
}
}
}
```
From here, you can use Hasura's event triggers, actions, and authentication to rapidly build your application.
In this scenario, you'll create a total of four relationships:
1. On the `associations_contact_deal` table you'll create an object relationship between `associations_contact_deal.contact_id` and `contact.id`. You can call this `associations_contact`.
2. You'll then create the other end of the first relationship. On the `contact` table you'll create an object relationship between `associations_contact_deal.contact_id` and `contact.id`. You can call this `contact_associations`.
You'll then repeat this process for the `deal` table:
1. On the `associations_contact_deal` table you'll create a object relationship between `associations_contact_deal.deal_id` and `deal.id`. You can call this `associations_deal`.
2. You'll then create the other end of the relationship. On the `deal` table you'll create an object relationship between `associations_contact_deal.deal_id` and `deal.id`. You can call this `deal_associations`.
## Views and generated columns[](#views-and-generated-columns "Direct link to Views and generated columns")
Hasura and Sequin support [Postgres views](https://www.postgresql.org/docs/current/sql-createview.html) and [generated columns](https://www.postgresql.org/docs/current/ddl-generated-columns.html). You can use these features to create custom views and columns in your database to simplify querying patterns in GraphQL.
For instance, you can create a view called `deals_and_contacts` that joins your HubSpot `deal` table to your `contact` table via the `associations_contact_deal` join table. The view can contain just the columns you need:
```sql theme={null}
create view deals_and_contacts as
select
contact.id as "contact_id",
contact.firstname,
contact.lastname,
deal.id as "deal_id",
deal.dealname,
deal.stage
from hubspot.contact
join hubspot.associations_contact_deal on contact.id = associations_contact_deal.contact_id
join hubspot.deal on associations_contact_deal.deal_id = deal.id;
```
In Hasura, you can then track this view to include it in your GraphQL schema - simplifying the query pattern.
Alternatively, you may need to use a generated column to ensure joins in Hasura function correctly. For example, let's say you want to join your `public.users` table with your `salesforce.contact` table on the `users.id` and `contact.user_id` columns. However, the `users.id` column is type `int4` and the `contact.user_id` column is type `varchar`. You can create a generated column on the `contact` table that casts the `user_id` column to `int4` in a new column called `_user_id`:
```sql theme={null}
ALTER TABLE salesforce.contact
ADD COLUMN _user_id int4
GENERATED ALWAYS AS (CAST(user_id AS int4)) STORED;
```
In Hasura, you'll then define a relationship between the `users` table and the `contact` table using the `_user_id` column.
## Build[](#build "Direct link to Build")
Sequin and Hasura are now configured to work together. You can now use all the power of Hasura to query your database using GraphQL. A query to return the the state of a deal for one of your users might look like this:
```sql theme={null}
query MyQuery {
users(where: { id: { _eq: 1 } }) {
first_name
last_name
email
user_to_contact {
contact_to_association {
association_to_deal {
id
dealname
stage
}
}
}
}
}
```
From here, you can use Hasura's event triggers, actions, and authentication to rapidly build your application.